How to create a lease opportunity online How to create a lease opportunity online

How to create a lease opportunity online

How to Create a Solar Lease Opportunity — Skylight Installer Guide
Portal Guide

How to Create a Solar Lease Opportunity

The end-to-end process for creating and submitting a new solar lease opportunity in the Skylight Lending platform — from address entry through quote configuration and sending the agreement.
4
Sections
65
Steps
~20
Minutes
1
Submission
What you'll need before you start
Homeowner's full name
Exactly as it appears on the property title
Date of Birth
Required for pre-qualification
Full Social Security Number
Required for the credit pre-qualification
Email & phone number
For agreement delivery and contact
Total annual income
Minimum $50,000 to qualify
Electrical meter number
Found on the physical meter or the electric bill
System design details
Panel model, inverter, racking, system size (kW), and estimated first-year production
Project address
The installation address — must match the homeowner's utility bill exactly
How this process works
Select product Enter address Add homeowner Pre-qualification Configure quote Send agreement
Steps 1–5
1
Navigate to the Skylight Portal and log in
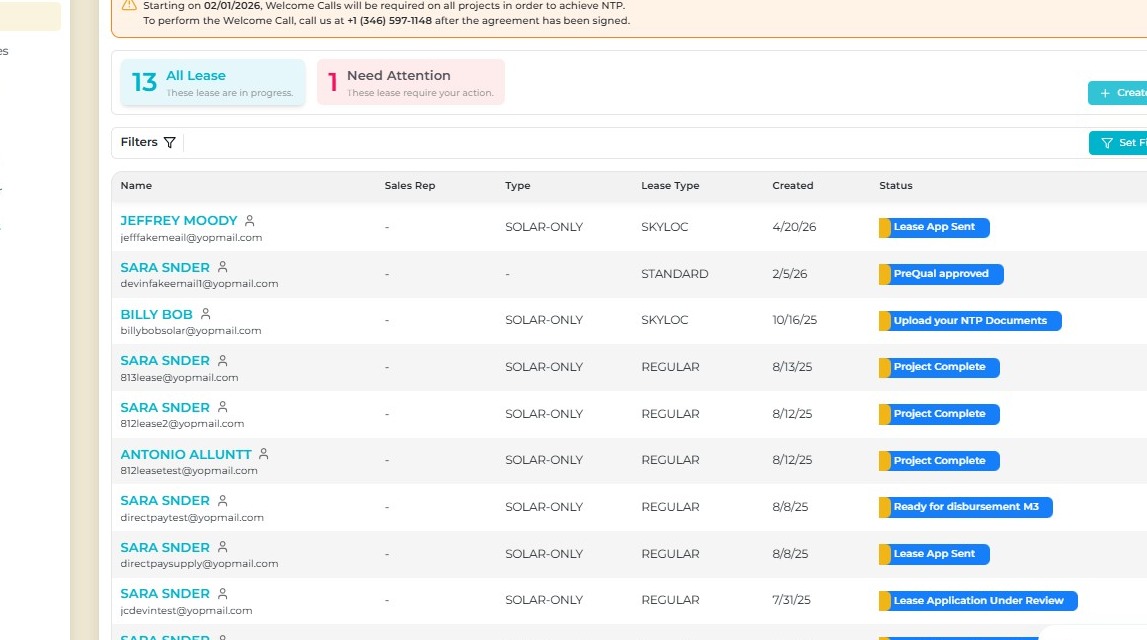
Go to the Skylight Lending Installer Portal and sign in with your credentials. Make sure you're on the correct account before creating a new opportunity.
Skylight Portal login
2
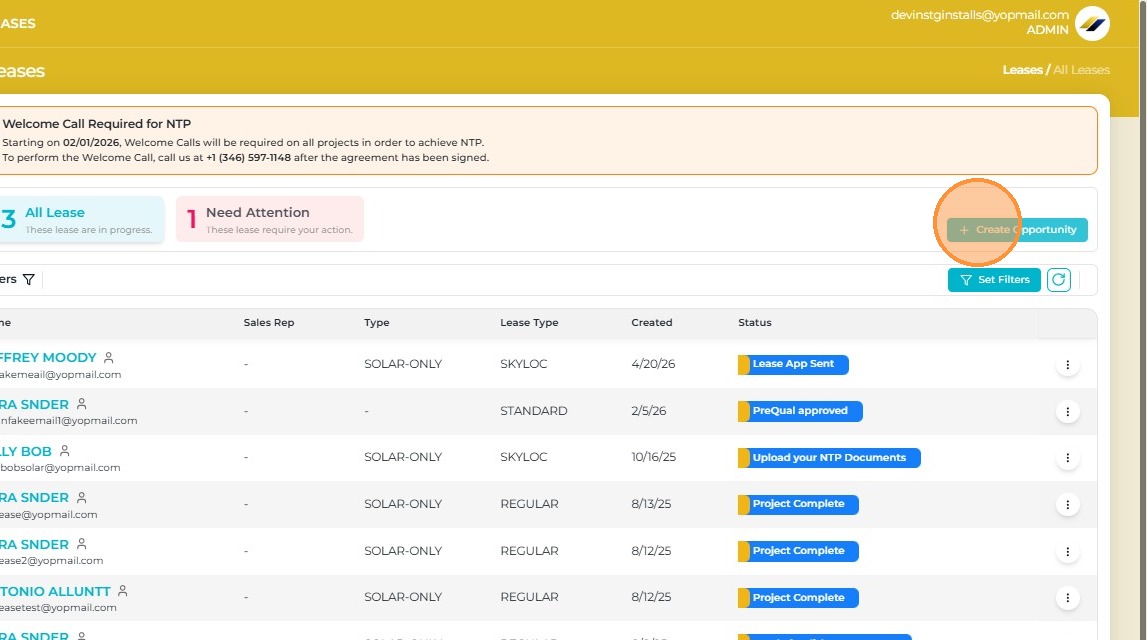
Click "Create Opportunity"
From the portal dashboard, click the Create Opportunity button to start a new lease application. This is where every new deal begins.
Create Opportunity
3
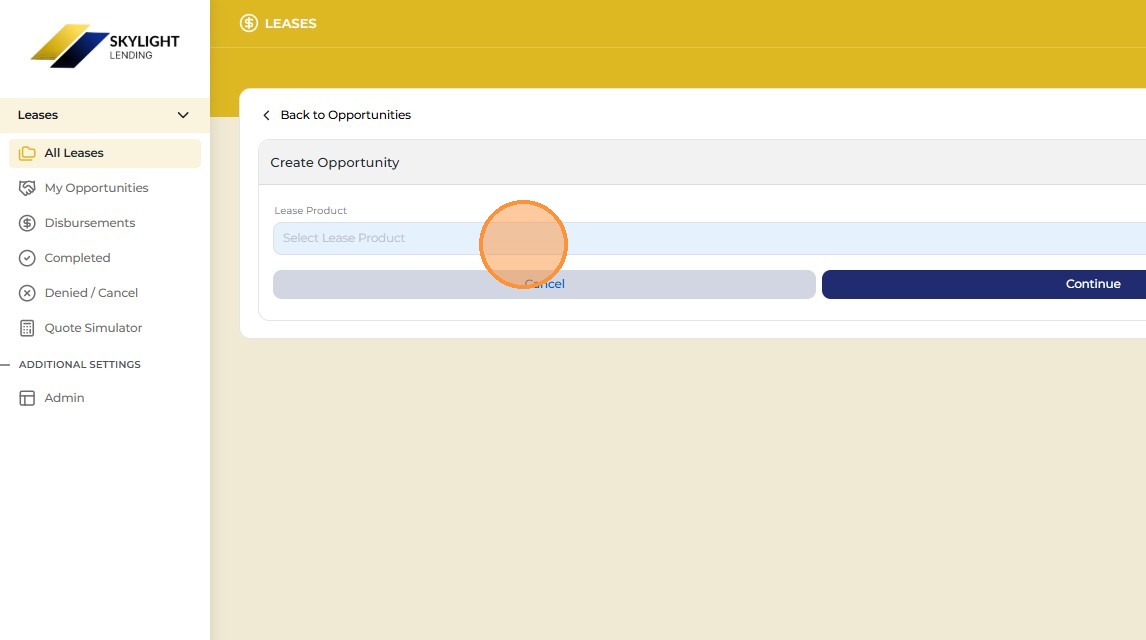
Click "Select Lease Product"
Choose the product type for this opportunity. Click Select Lease Product to see the available lease options.
Select Lease Product
4
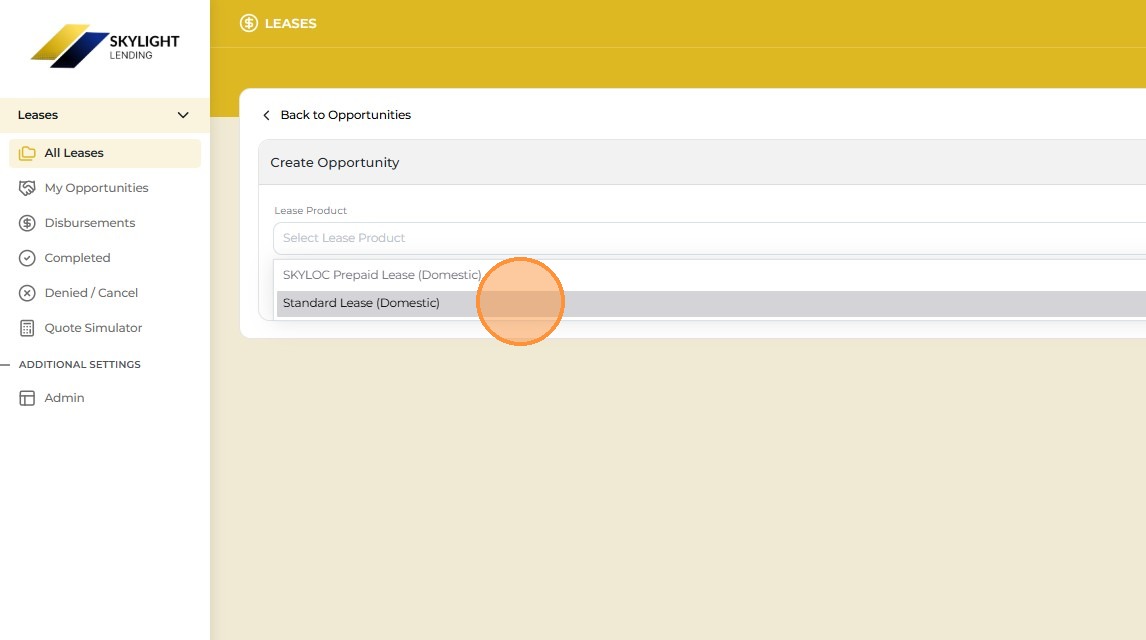
Click "Standard Lease (Domestic)"
Select Standard Lease (Domestic) for all standard residential solar lease projects. This is the most common product type for Skylight Lending deals and covers both solar-only and solar + battery configurations.
Standard Lease Domestic
5
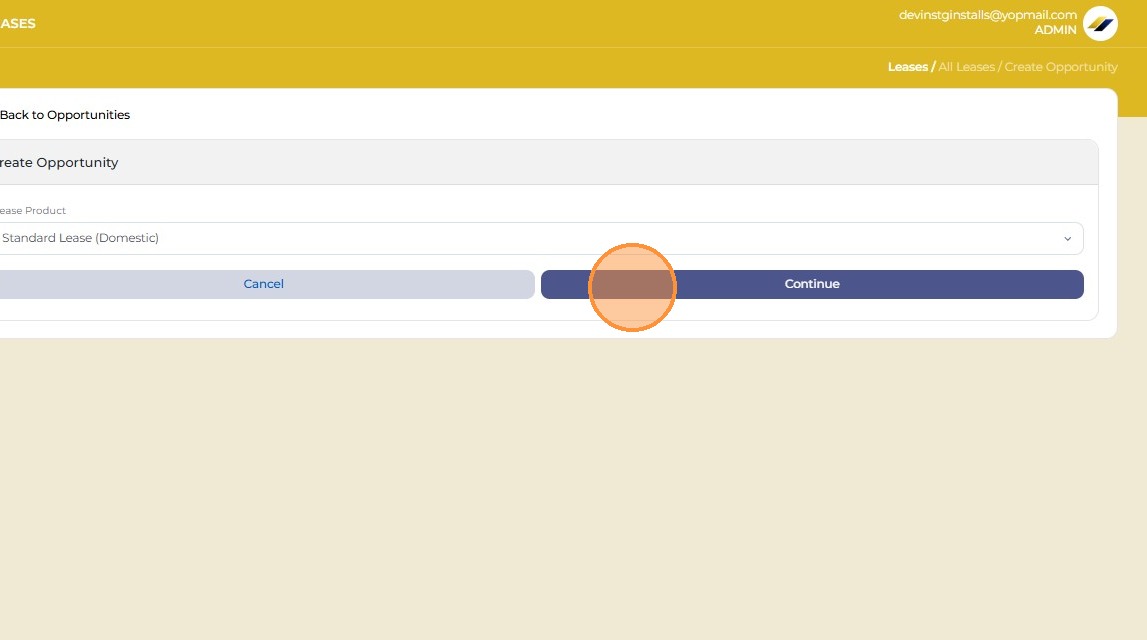
Click "Continue"
Confirm your product selection and move to the next step where you'll enter the project address.
Continue
Steps 6–17
6
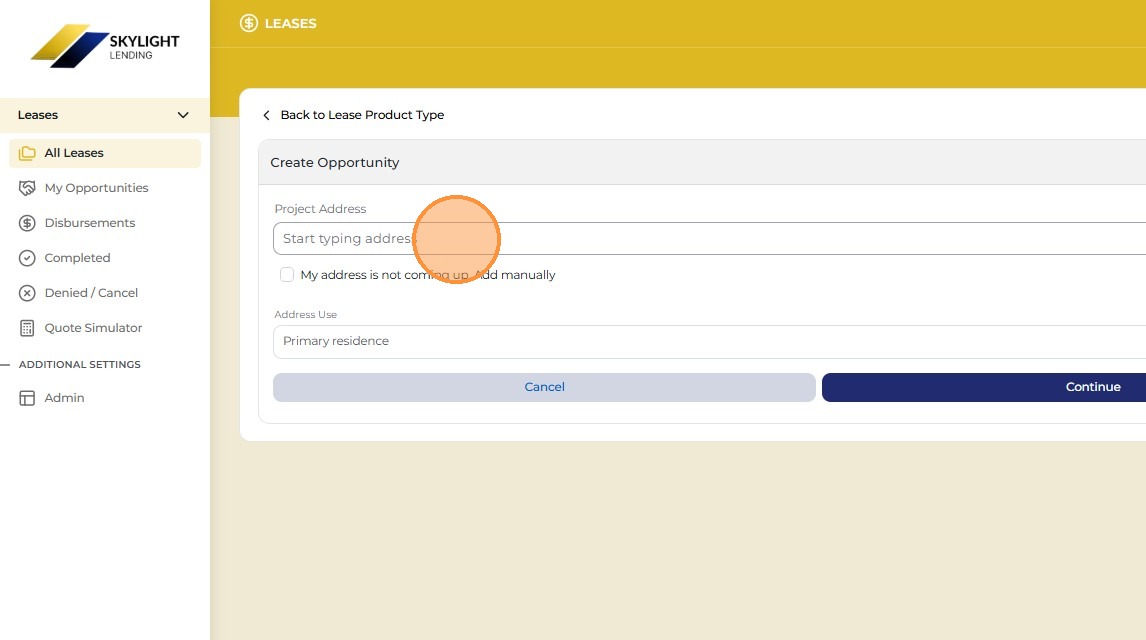
Click the "Project Address" field
Click into the Project Address field to begin entering the installation address. This must be the address where the solar system will be physically installed — not a mailing address.
Project Address field
7
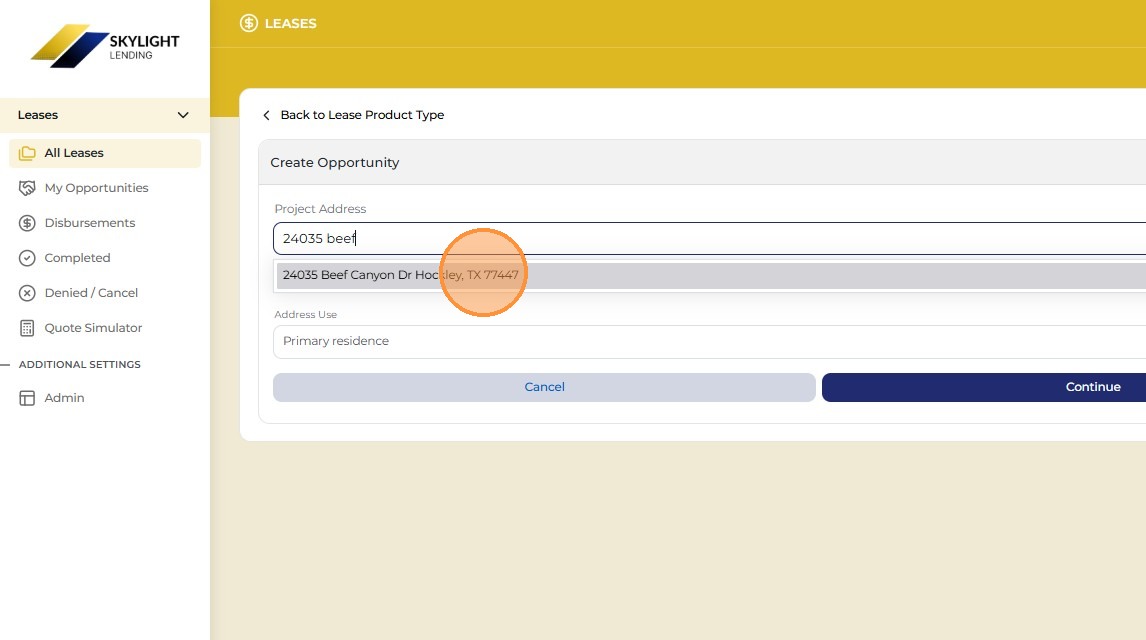
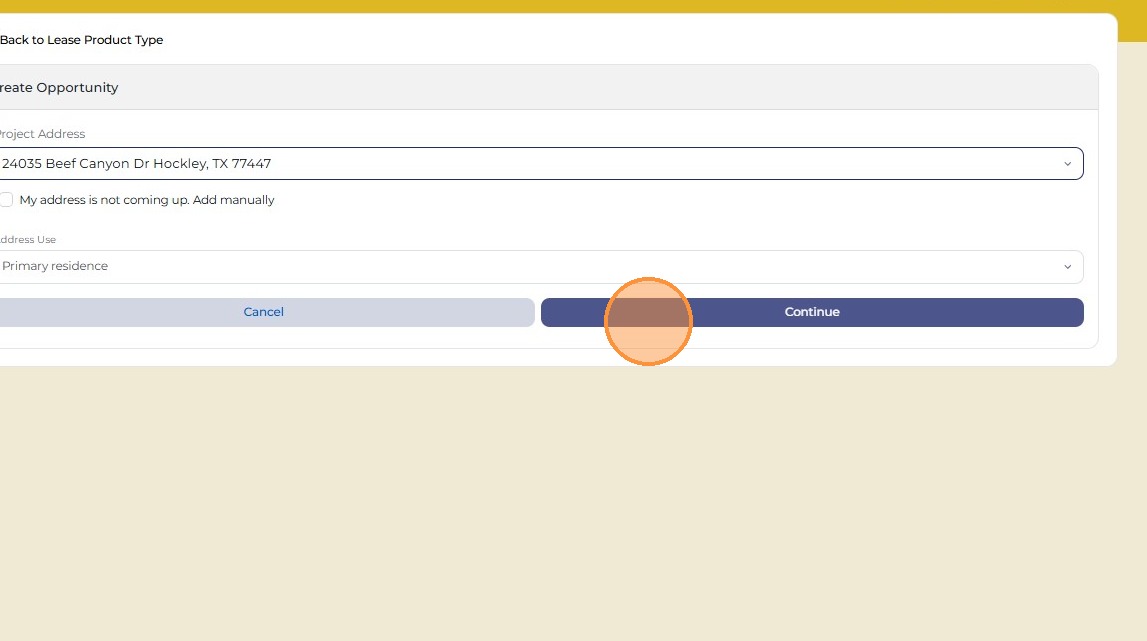
Type the address and select it from the dropdown
Start typing the address — the system will pull up matching results as you type. Wait for the correct address to appear in the dropdown, then click it. Always select from the dropdown rather than typing the full address manually — this ensures it's formatted correctly and matches the system record.
Address dropdown
Pro Tip

Always click the address from the dropdown — never just type it and move on. Selecting from the dropdown ensures the address is validated and geocoded correctly for the map confirmation in the next step.
8
Click "Continue"
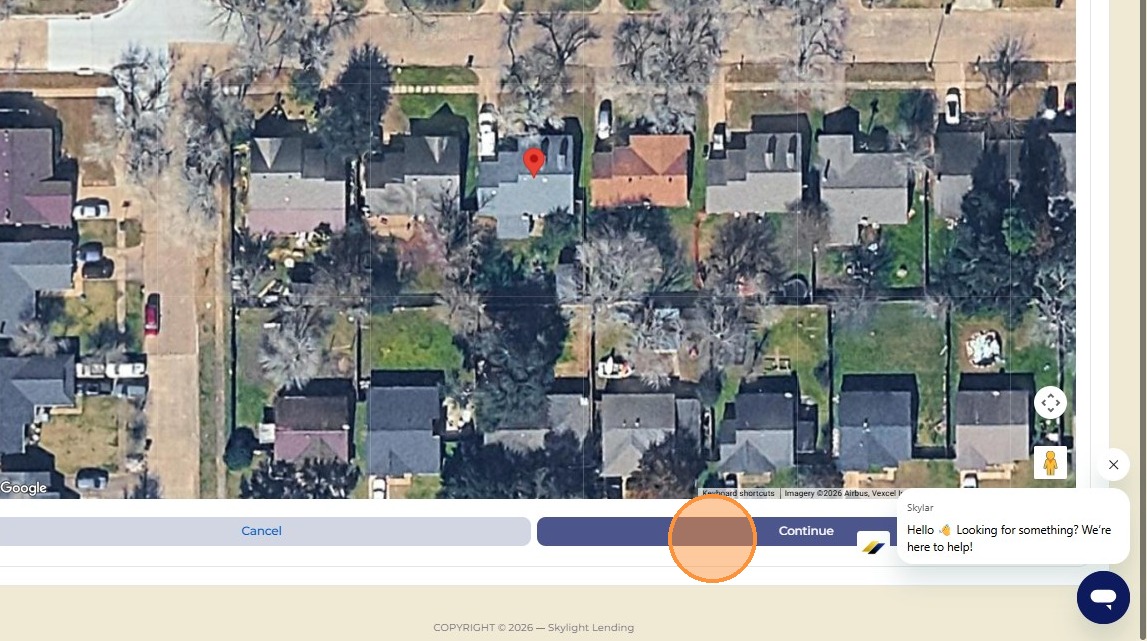
Once the address is selected, click Continue. The system will pull up a satellite map to let you visually confirm the property location.
Continue
9
Confirm the correct house on the map, then click Continue
A satellite map will display with a red pin on the address you entered. Visually confirm the pin is sitting on the correct property. If the pin landed on the wrong home — for example, a neighbor's house — drag it to the correct location before continuing.
Map confirmation
10
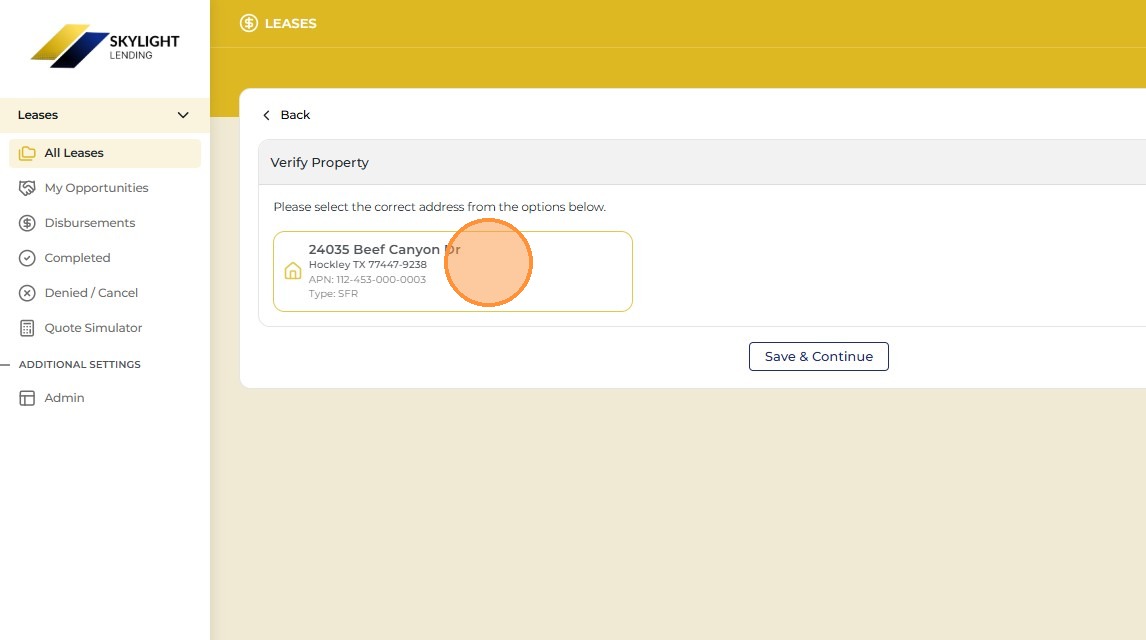
Select the tile that shows TYPE as SFR (Single Family Residence)
The system will display property data tiles pulled from public records. Select the tile where the TYPE field shows SFR (Single Family Residence). This confirms the property type meets Skylight's eligibility requirements. If you don't see an SFR tile, the property may not be eligible.
SFR tile
11
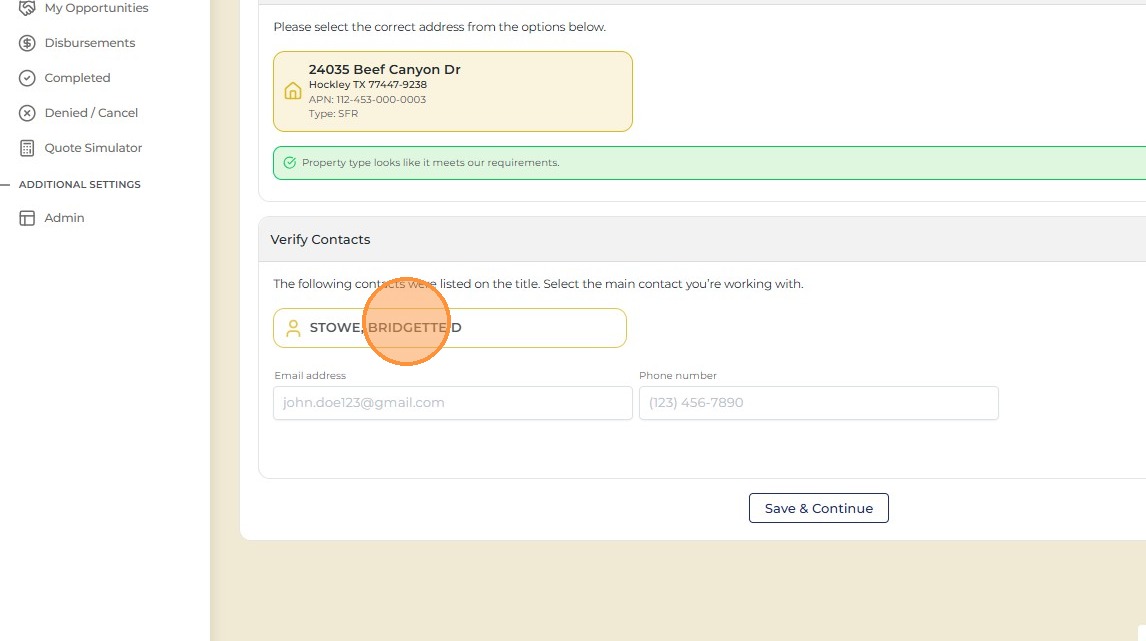
Select the homeowner from the list
The system automatically pulls the owner of record for the property from public data. You'll see one or more names listed — select the individual you are working with. If the home was recently purchased and the new owner doesn't appear yet, use the "Add a Contact" option in the next step.
Homeowner selection
12
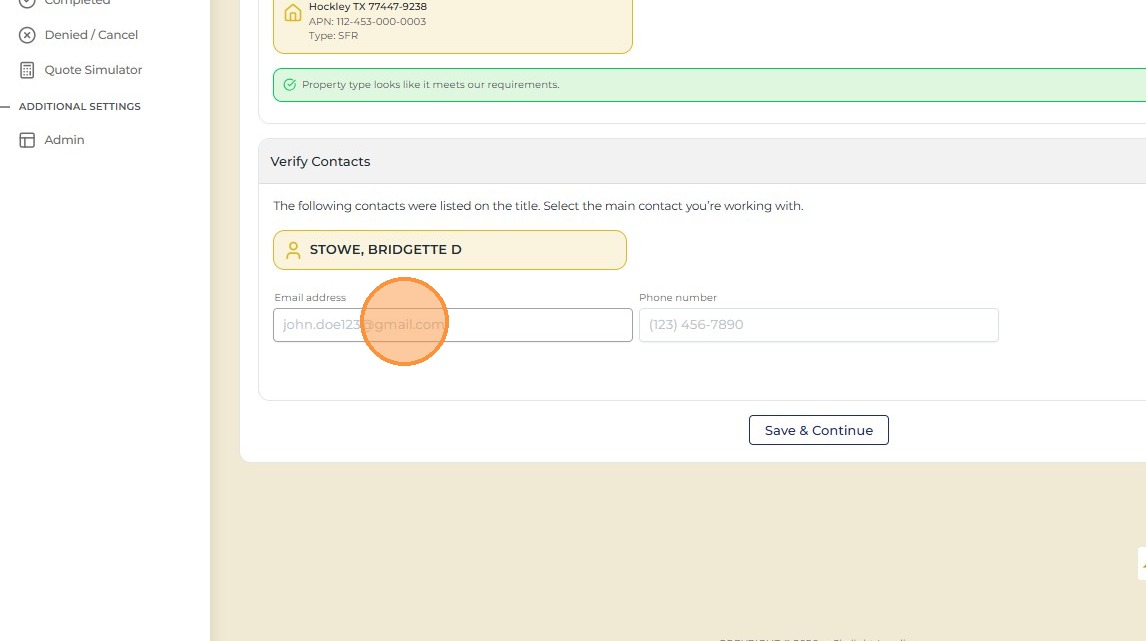
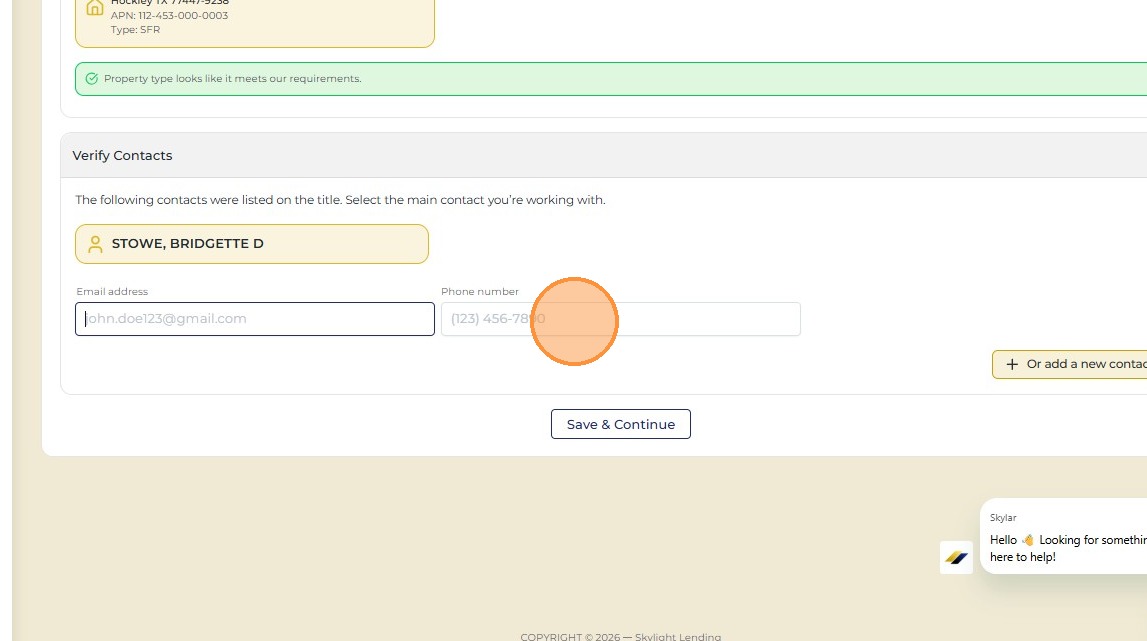
Enter the homeowner's email address
Enter the homeowner's email address carefully — this is where the lease agreement and all portal communications will be sent. Double-check the spelling before moving on. A typo here means the customer won't receive their agreement.
Email field
13
Enter the homeowner's phone number
Enter the homeowner's best contact number. This is used for Skylight Lending communications and for the welcome call process after signing.
Phone number
14
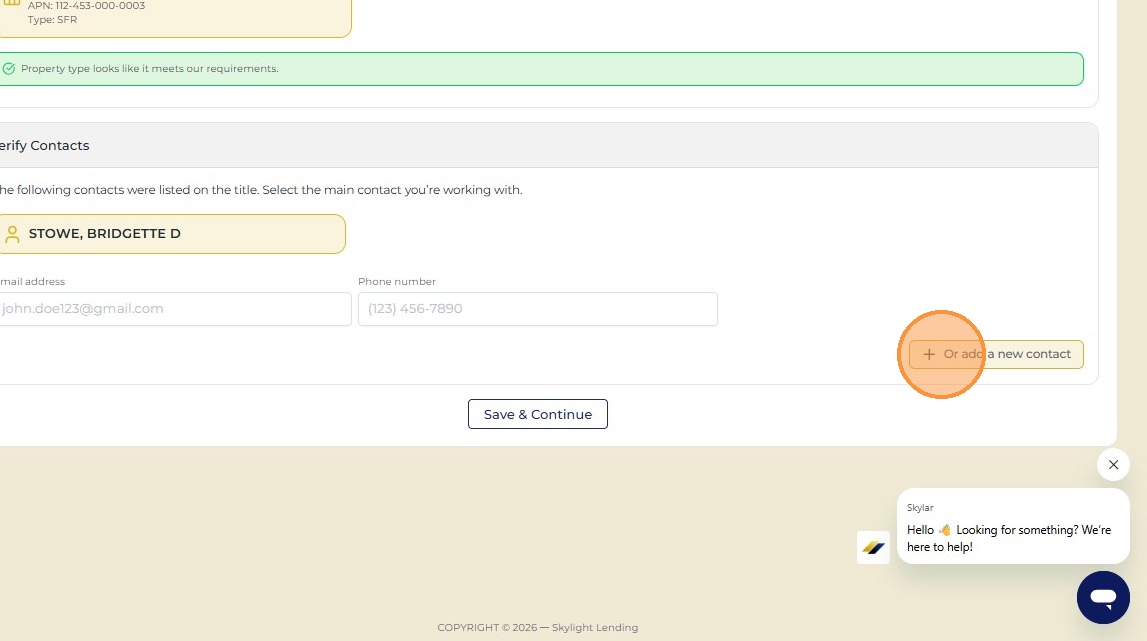
If the home was recently purchased, click "Add a Contact" to add the new owner
If the person you're working with recently bought the home and doesn't appear in the system's owner list yet, use Add a Contact to manually enter their details. This is common when public records haven't caught up to a recent sale.
Add a contact
15
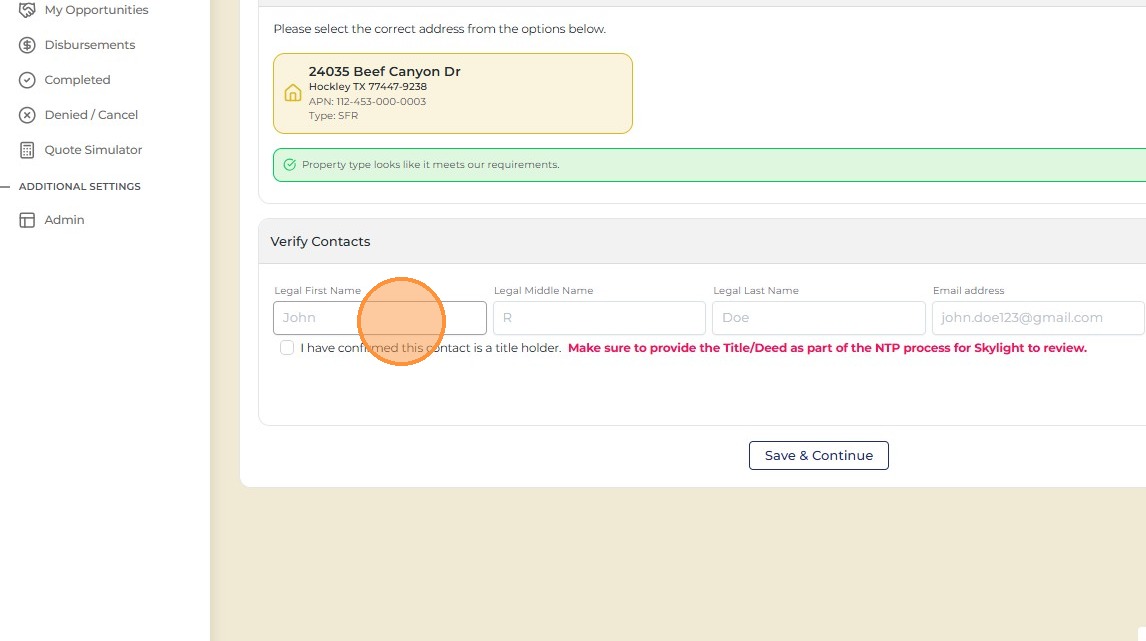
Input the new homeowner's details
Enter the new homeowner's full legal name, email, and phone number. Make sure the name matches exactly what appears on the property deed — this is critical for the title holder confirmation in the next step.
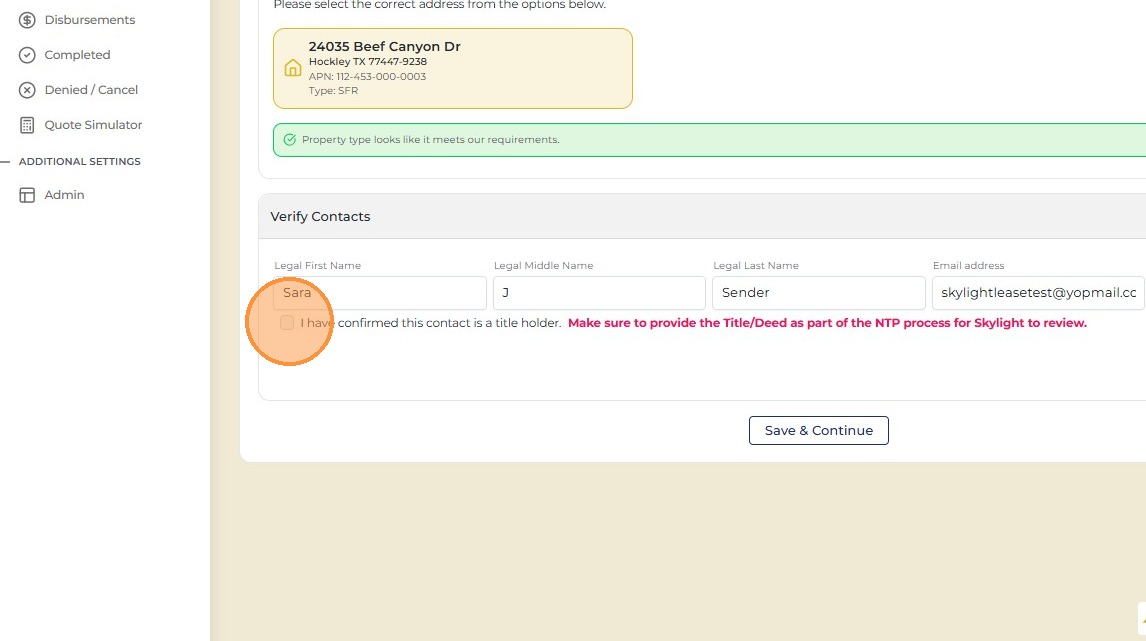
New homeowner details
16
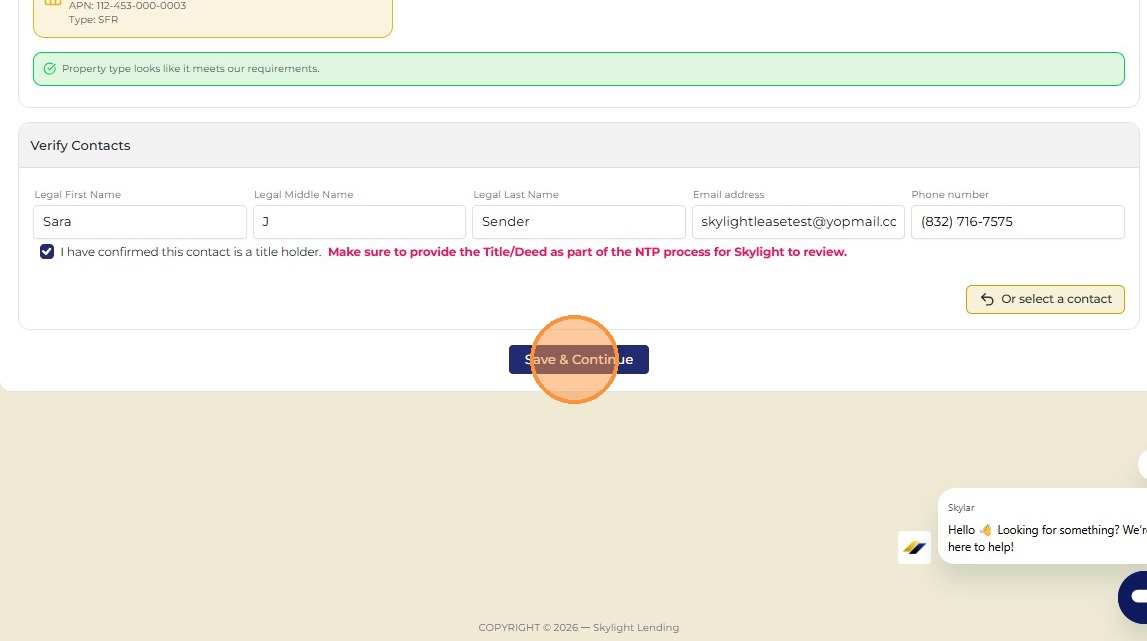
Check the box confirming this contact is a title holder
By checking this box you are confirming that the selected contact is listed on the property title or deed. At least one applicant must be a title holder to proceed. You will need to provide the Title/Deed as part of the NTP document submission for Skylight to review.
Title holder confirmation
Title holder required

At least one applicant must be confirmed as a title holder. If the person you're working with is not on the deed, you'll need to add the person who is — or obtain proof of ownership before proceeding.
17
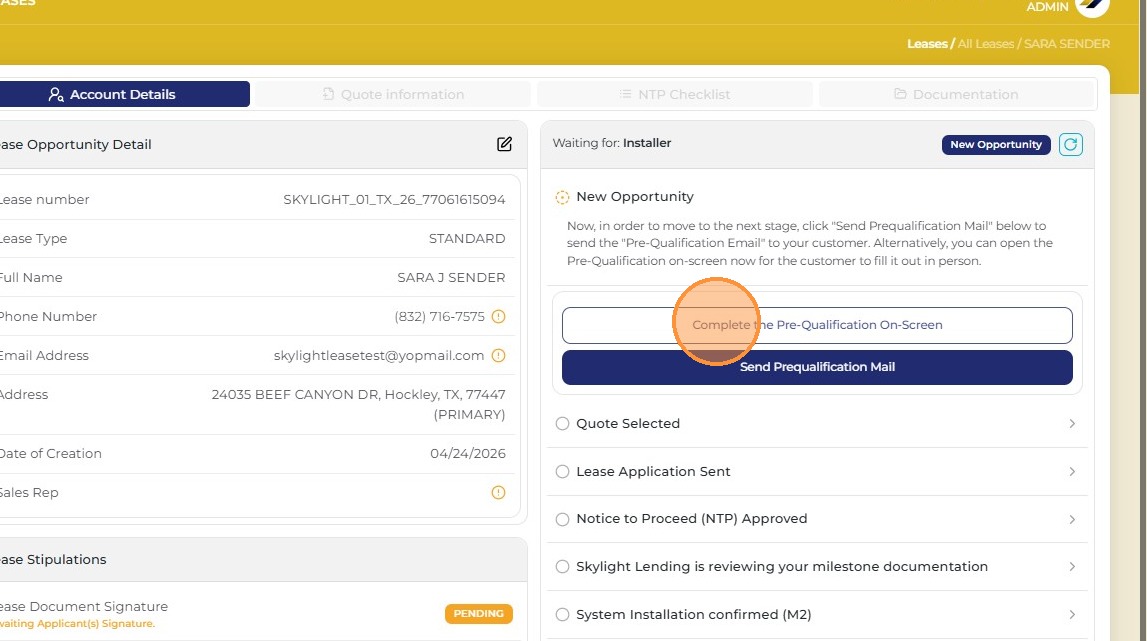
Click "Save & Continue"
Save your contact information and move on to the pre-qualification step. The system will retain everything you've entered so far.
Save and Continue
Steps 18–28
18
Choose how to complete the pre-qualification
You have two options: complete the pre-qualification on-screen with the customer right now, or email it to them to complete on their own. If you are in-home or on a screenshare, click "Complete the Pre-Qualification On-Screen" to go through it together. If you are not with the customer, send it via email so they can complete it privately — this is the preferred method when the customer is not present, as it keeps their sensitive information secure.
Pre-qual method
19
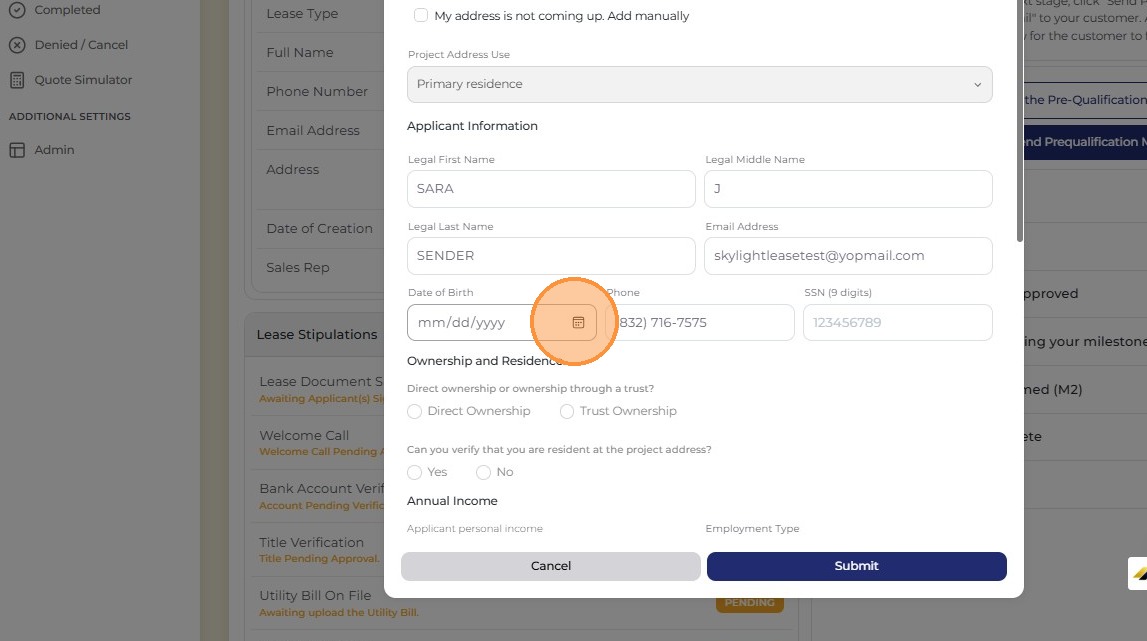
Enter the homeowner's Date of Birth and full Social Security Number
These two fields are required to run the credit check. The SSN must be the full 9-digit number — partial entries will not process. If completing on-screen, step away or turn the screen toward the customer so they can enter this information privately.
DOB and SSN
20
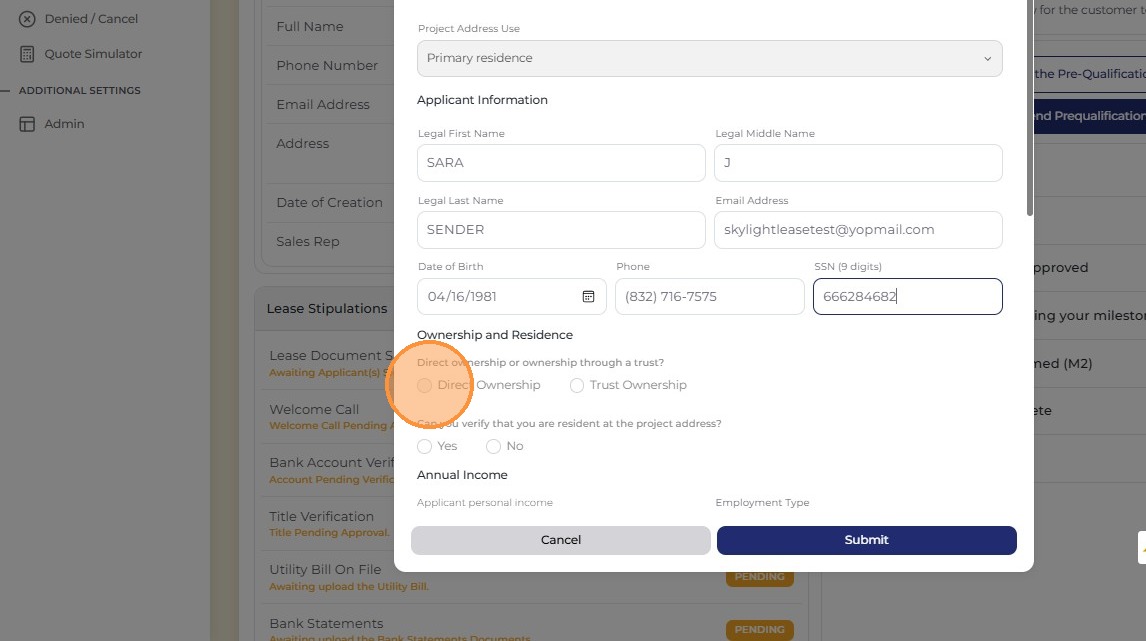
Confirm whether ownership is direct or through a trust
Select whether the homeowner holds the property directly in their name or through a trust. If the property is in a trust, additional trust documentation will be required as part of the NTP package.
Ownership type
21
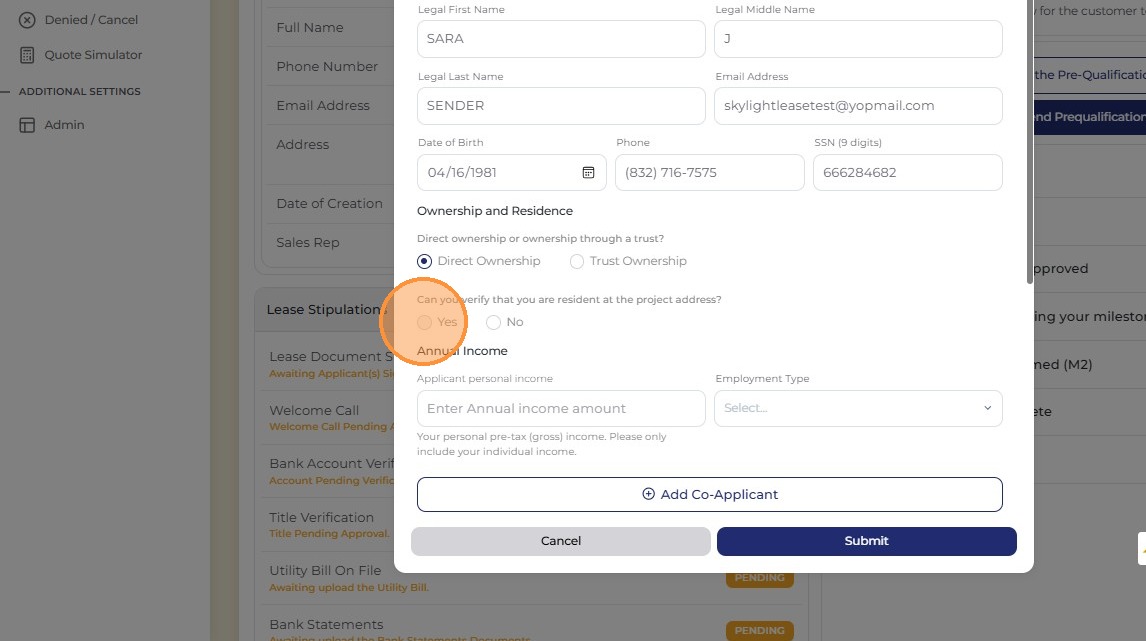
Confirm the homeowner is a resident of the address
Confirm that the applicant actually lives at the installation address. Skylight Lending requires the applicant to be a resident — investment properties or homes where the applicant does not live are not eligible.
Residency confirmation
22
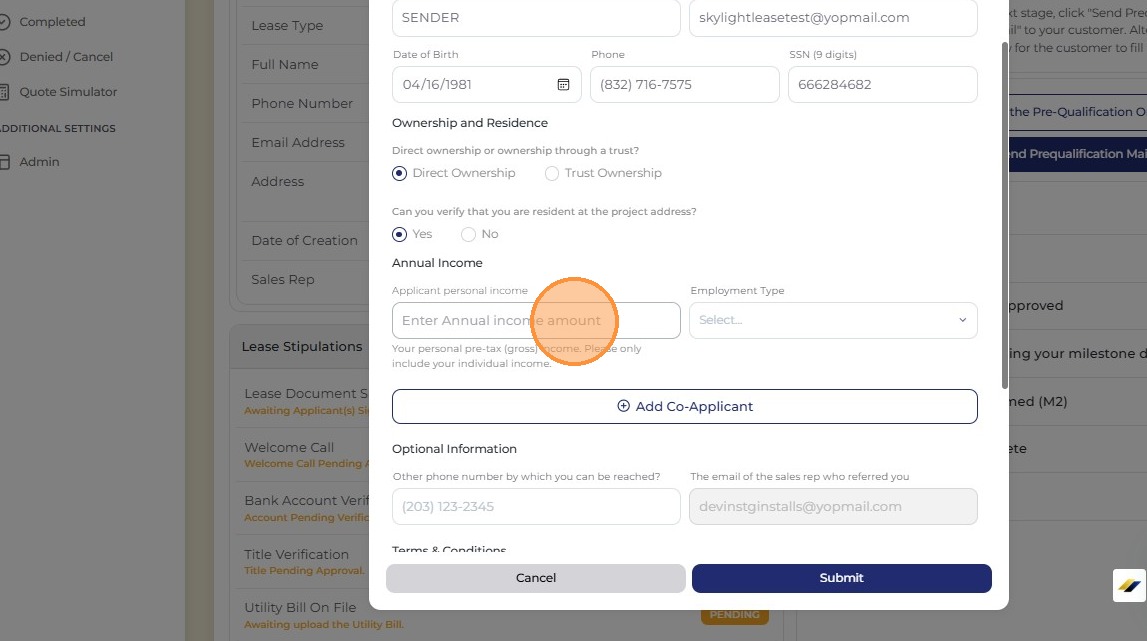
Enter the total annual income amount
Enter the homeowner's total gross annual income. The minimum qualifying income is $50,000 per year. Income is verified through third-party sources, so make sure the amount entered is accurate — overstating income can result in rejection or compliance issues.
Annual income
23
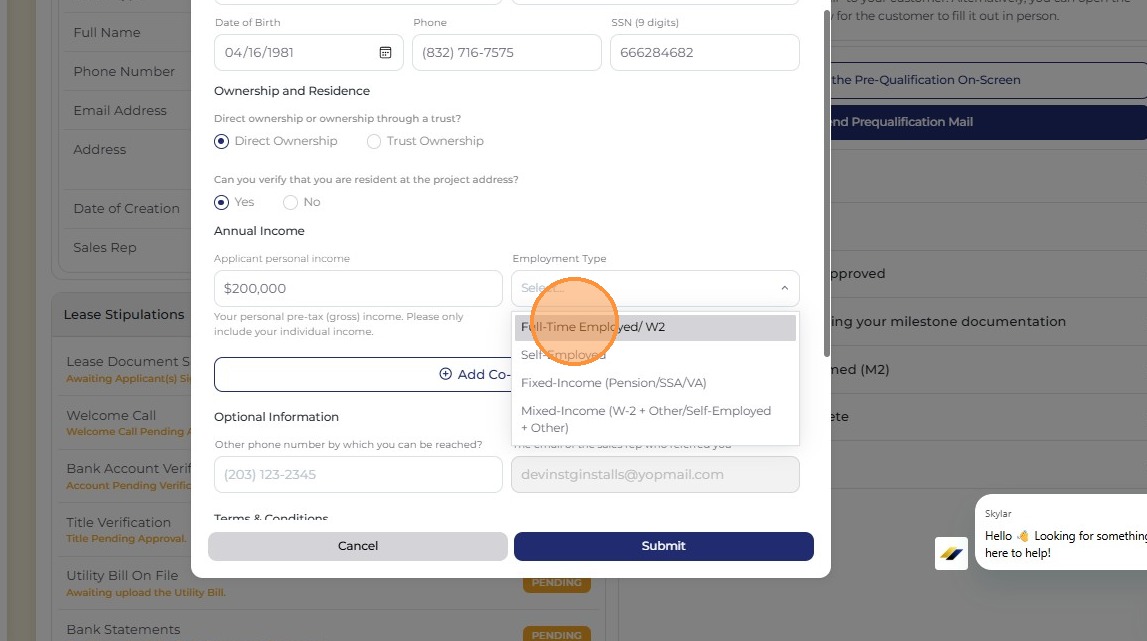
Select the employment type
Choose the option that best describes the homeowner's employment situation — for example, employed, self-employed, retired, or other. This helps the system assess income stability as part of the qualification process.
Employment type
24
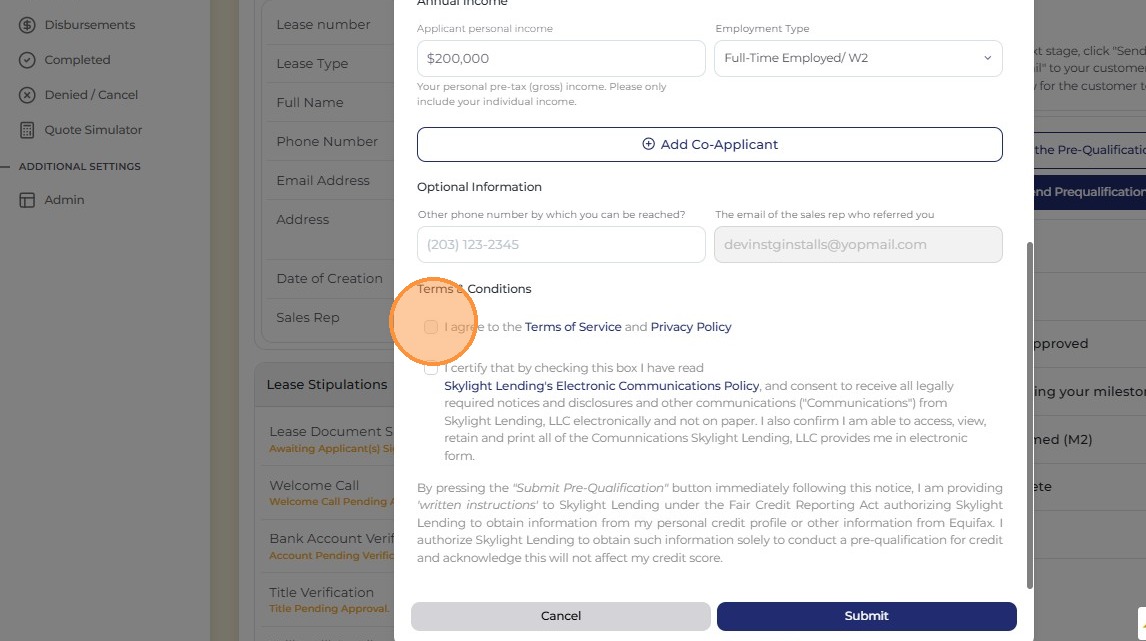
Click to agree to the Terms of Service
The homeowner must agree to Skylight Lending's Terms of Service before the pre-qualification can be submitted. Read through and check the box to confirm acceptance.
Terms of Service
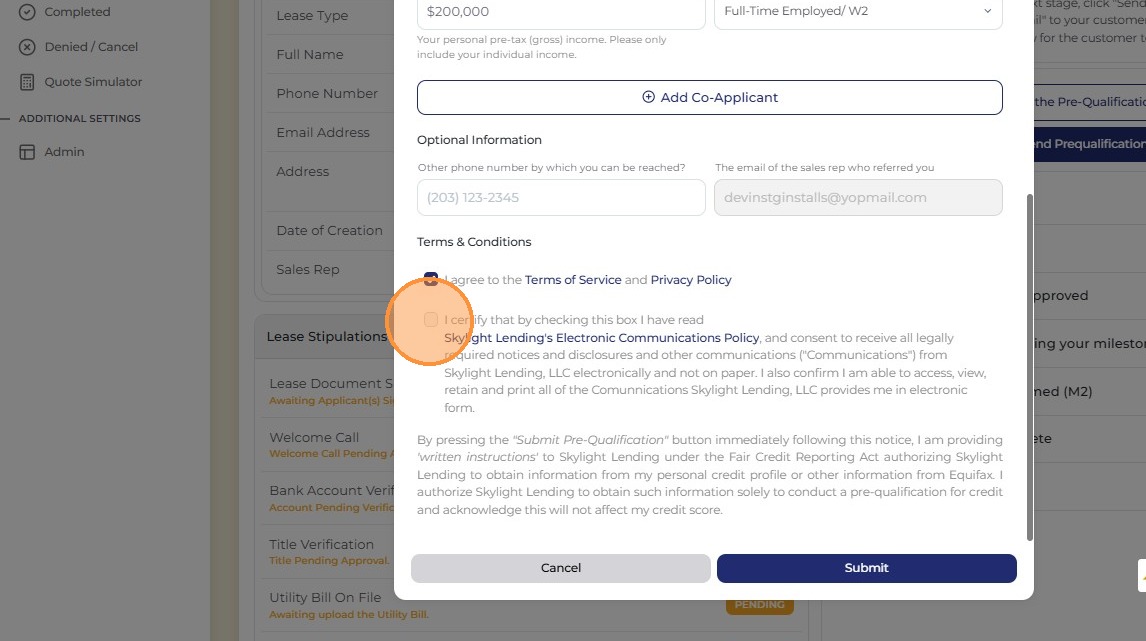
25
Confirm you have read Skylight Lending's Electronic Communication Policy
Check the box to confirm the homeowner has acknowledged Skylight Lending's Electronic Communication Policy. This authorizes the company to send agreements, notices, and billing documents electronically.
Electronic Communication Policy
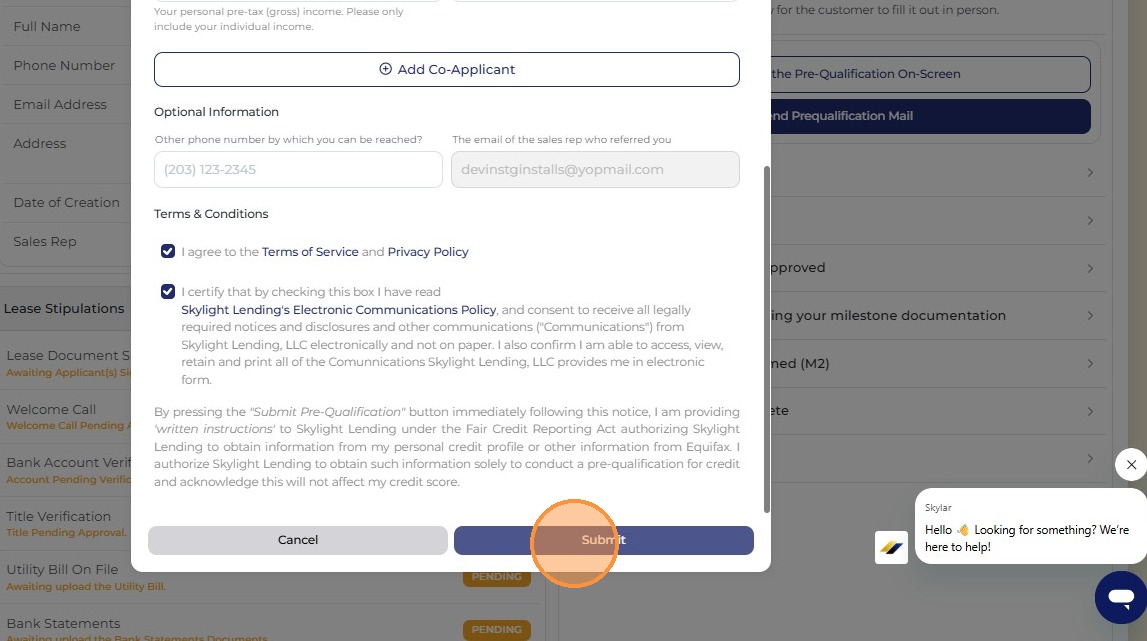
26
Click "Submit"
Submit the pre-qualification form. The system will now run a soft credit check using the information provided. This does not impact the homeowner's credit score.
Submit
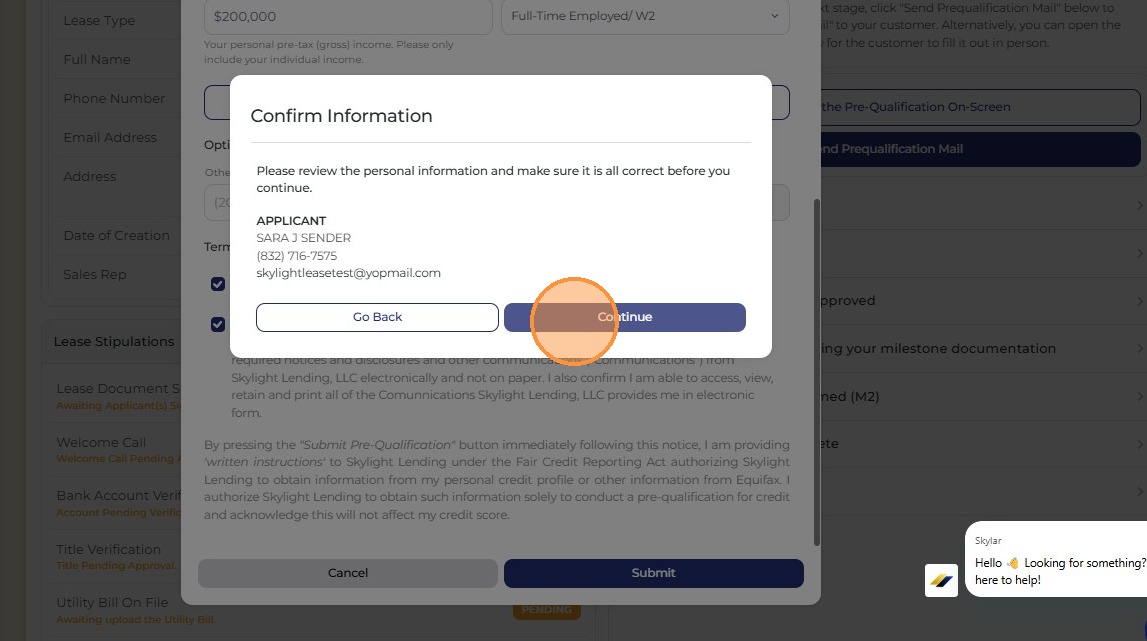
27
Verify the information is correct, then click Continue
A summary screen will display the information you entered. Review it carefully — if anything looks wrong, go back and correct it before continuing. Once you proceed, the pre-qualification will be processed.
Verify information
28
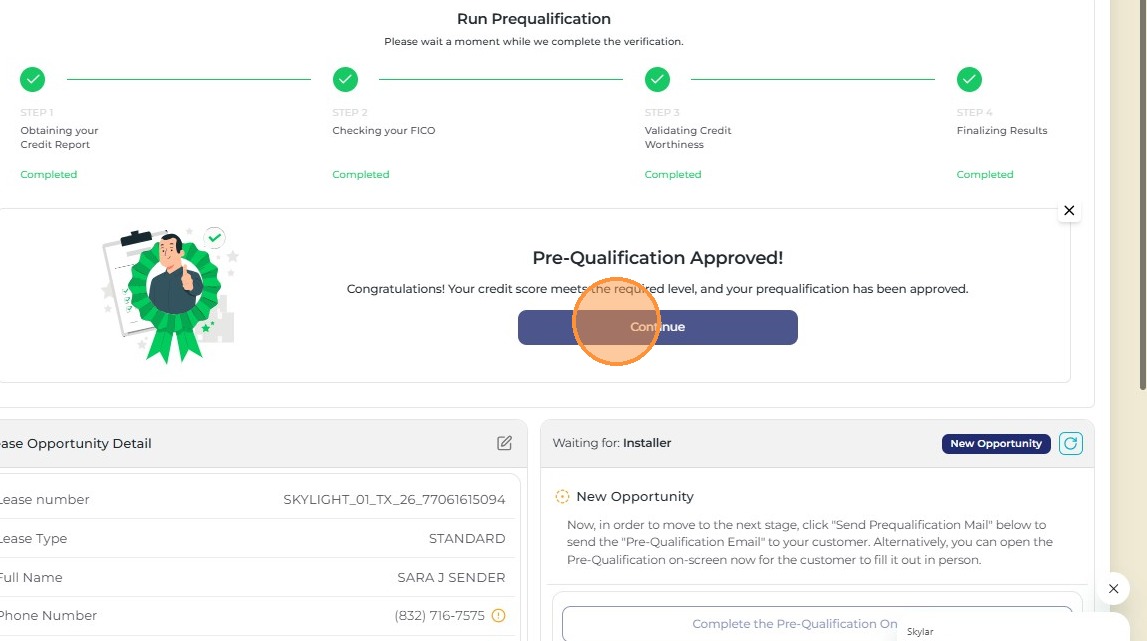
Review the pre-qualification results
The results screen will show whether the customer passed or failed. If they passed — great, move on to the quote. If they didn't qualify, the screen will indicate the stage at which it failed, which gives you a clue about the reason — whether it was credit score, income, or another factor. Use this to guide your next conversation with the customer.
Pre-qual results
Pro Tip — If the customer doesn't qualify

The stage the pre-qualification fails at tells you a lot. An early failure often signals a credit issue. A later-stage failure may relate to income or other factors. Use this as a starting point for a candid conversation with your customer about next steps.
Steps 29–65
29
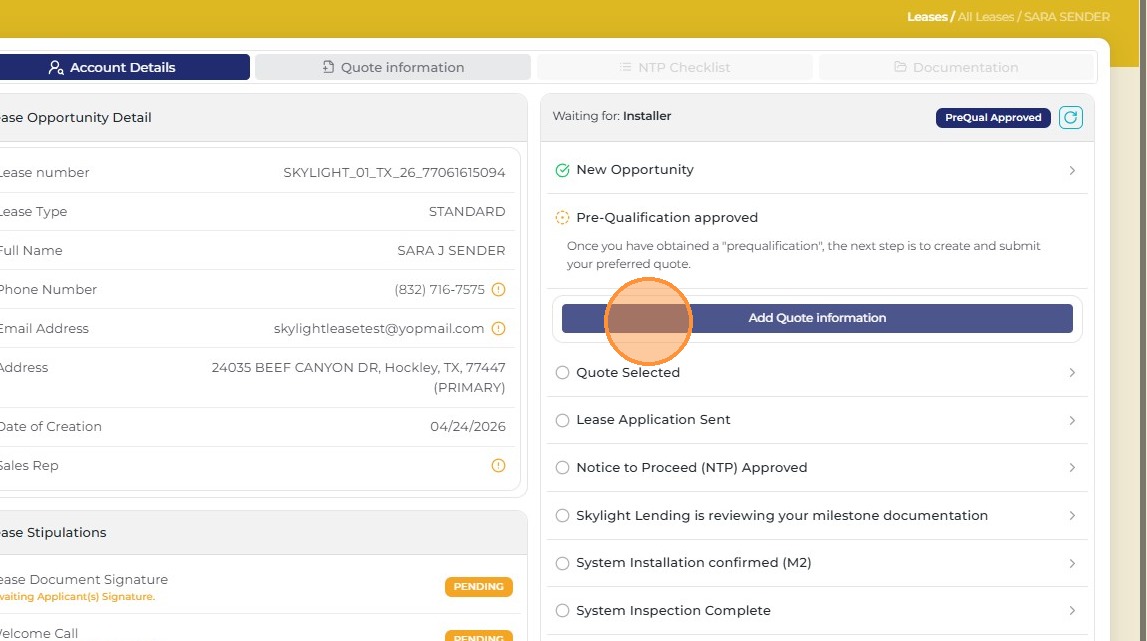
Click "Add Quote Information"
Now that the customer has pre-qualified, it's time to build the quote. Click Add Quote Information to open the quote configuration screen where you'll enter all the system and pricing details.
Add Quote Information
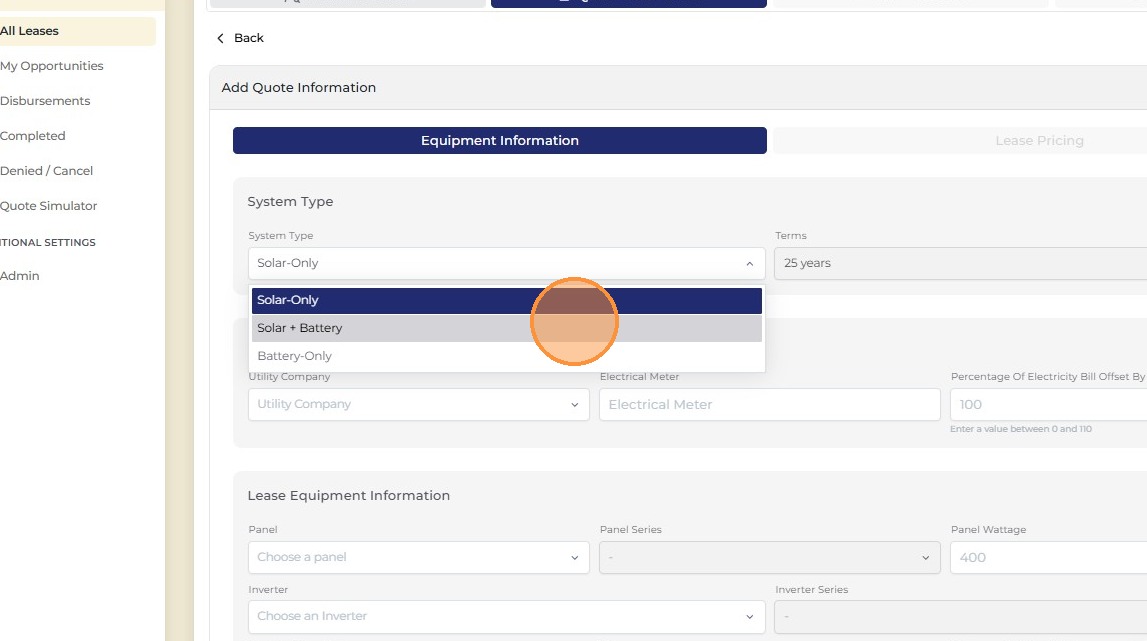
30
Choose the system type
Select whether this is a Solar Only or Solar + Battery project. This determines which equipment fields appear and how the pricing is calculated. Make sure this matches what you've designed for the customer.
System type
31
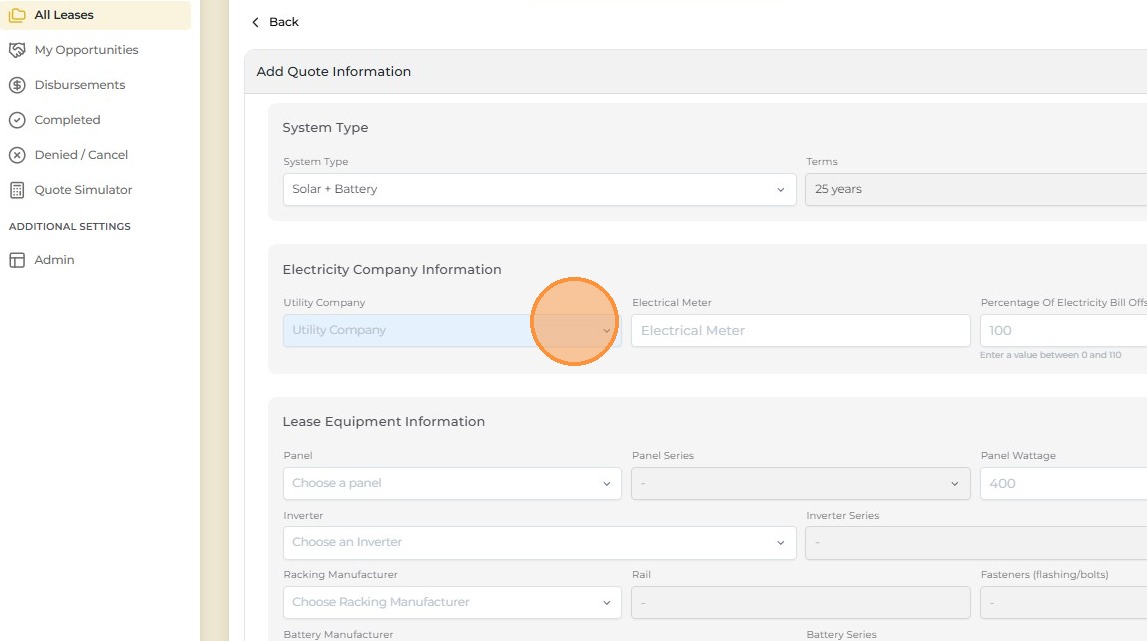
Select the utility provider
Select the customer's electric utility provider from the dropdown. This must match the utility that serves the installation address. If you're unsure, check the customer's electric bill — the utility name is always listed at the top.
Utility selection
32
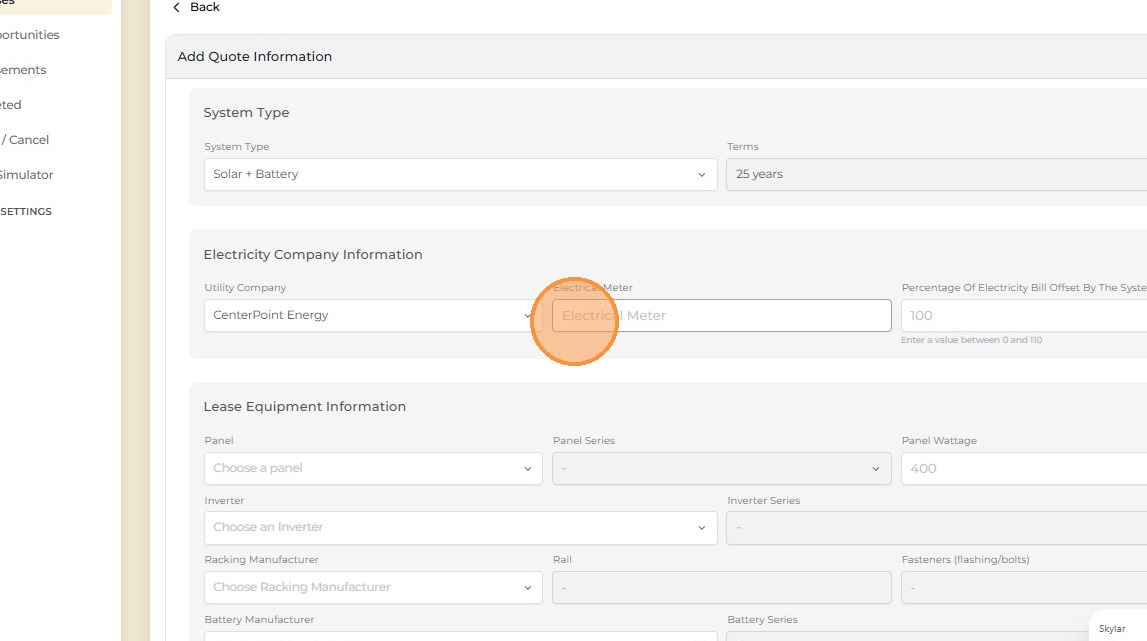
Enter the electrical meter number
Enter the meter number exactly as it appears on the physical meter or the customer's electric bill. This number ties the solar system to the correct utility account and is required for interconnection. The meter number is typically 8–12 digits long and labeled "Meter Number" or "Meter #" on the bill.
Meter number
33
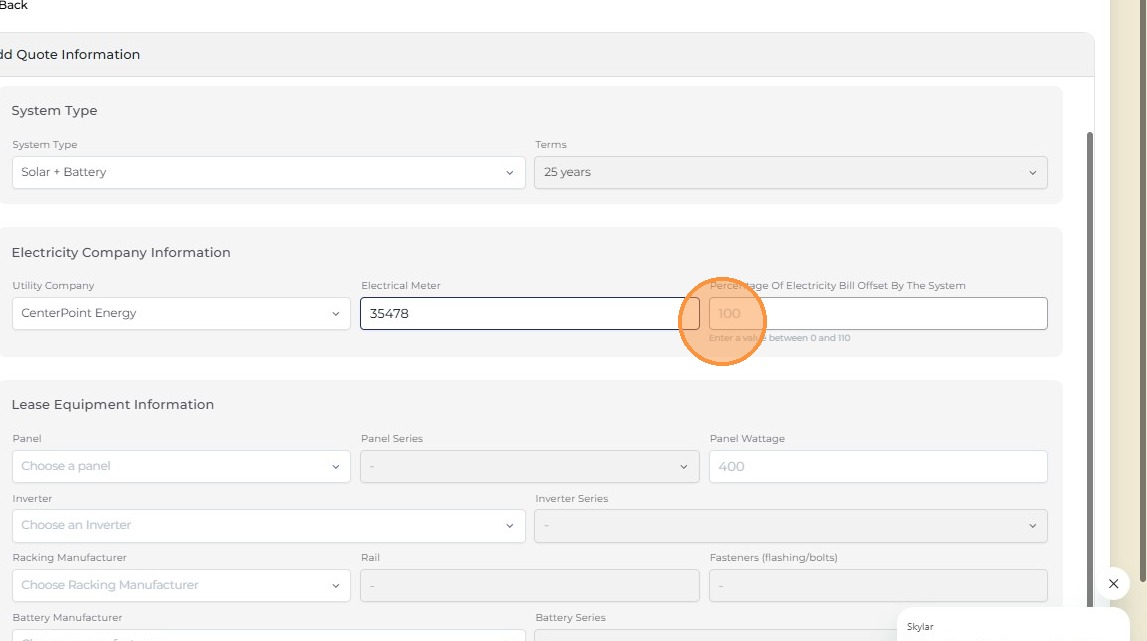
Enter the system offset
Enter the percentage of the customer's electricity usage that the solar system is designed to offset. For example, a 90% offset means the system is designed to generate roughly 90% of what the customer uses annually. This comes from your system design tool.
System offset
34
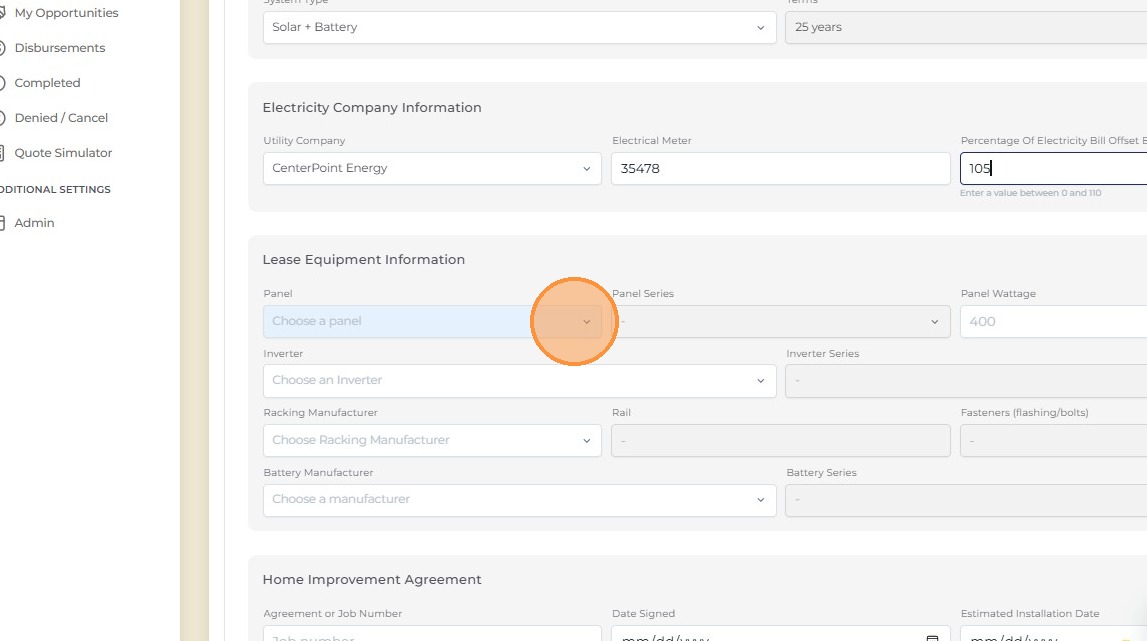
Select a panel manufacturer from the dropdown
Choose the manufacturer of the solar panels you're installing. Only manufacturers on Skylight's Approved Vendor List (AVL) will appear in the dropdown. If your panel brand doesn't appear, it may not be approved — check the AVL before proceeding.
Panel manufacturer
35
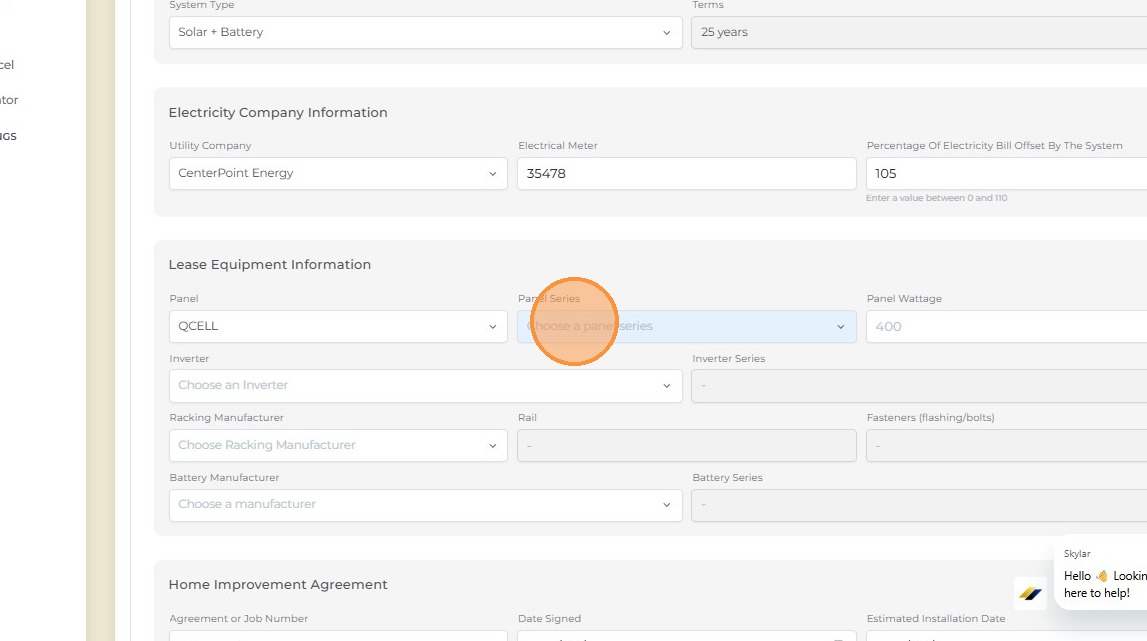
Select the panel series
After selecting the manufacturer, choose the specific panel product series being installed. Make sure this matches the exact product on your purchase order or design.
Panel series
36
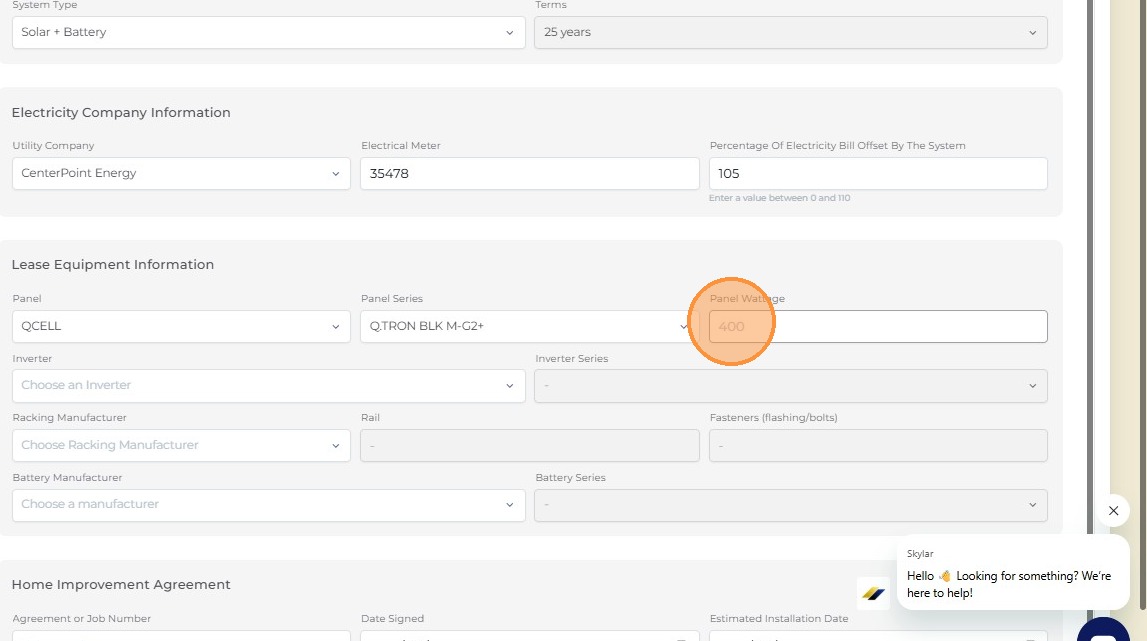
Enter the panel wattage
Enter the wattage rating for each individual panel — for example, 400W. This is found on the panel spec sheet or the manufacturer's product page. The system uses this to calculate the total system size.
Panel wattage
37
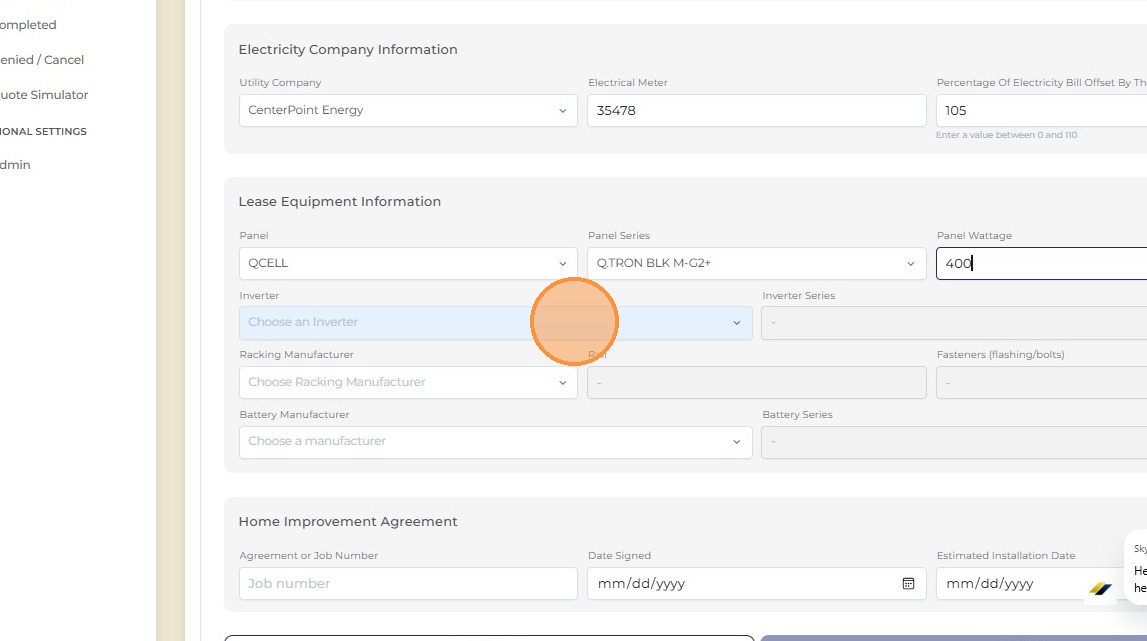
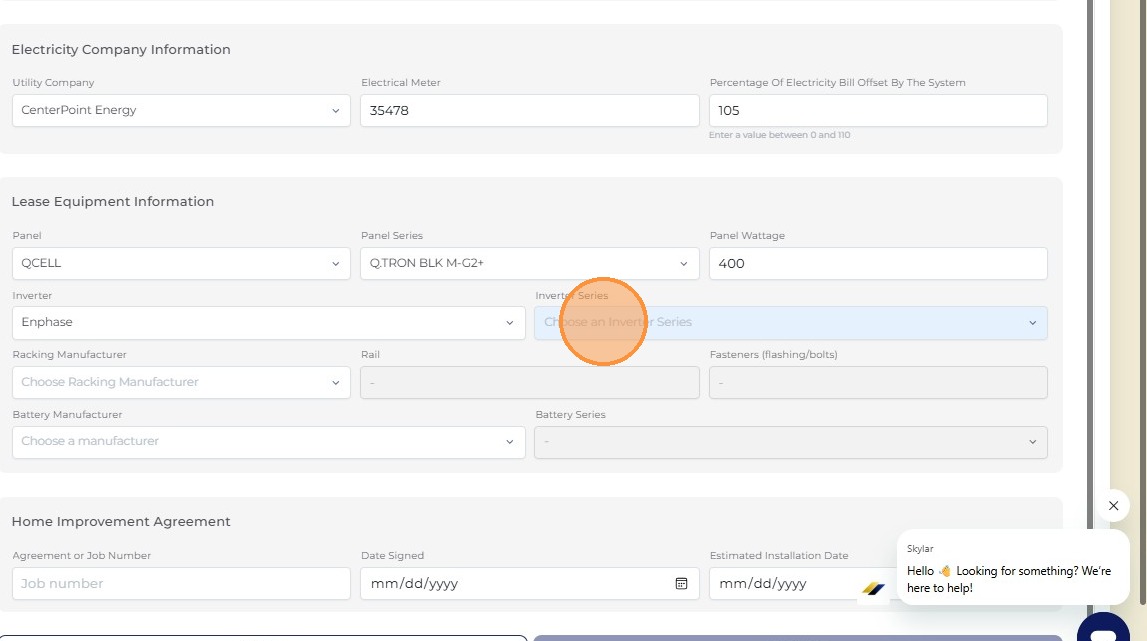
Select an inverter manufacturer
Choose the manufacturer of the inverter being installed. As with panels, only AVL-approved inverter brands will appear. Skylight currently approves Enphase and SolarEdge for inverters.
Inverter manufacturer
38
Click "Choose an Inverter Series"
After selecting the manufacturer, click to open the inverter series dropdown.
Inverter series dropdown
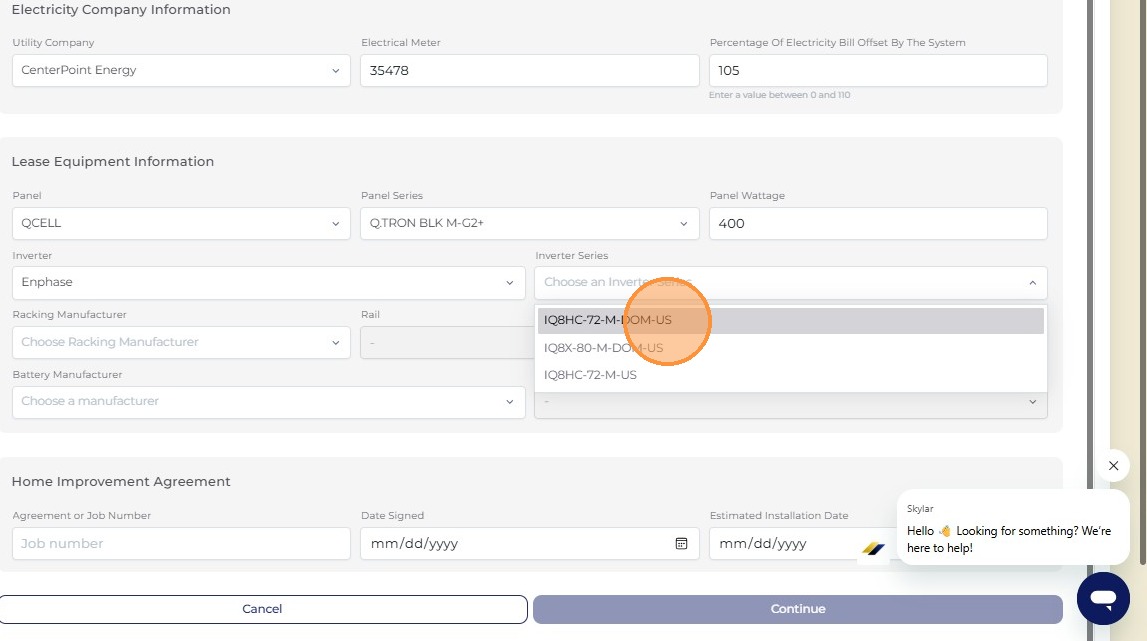
39
Select the inverter series
Choose the specific inverter product line. For example, if using Enphase, select the appropriate IQ series. Make sure this matches what's on your design.
Inverter series
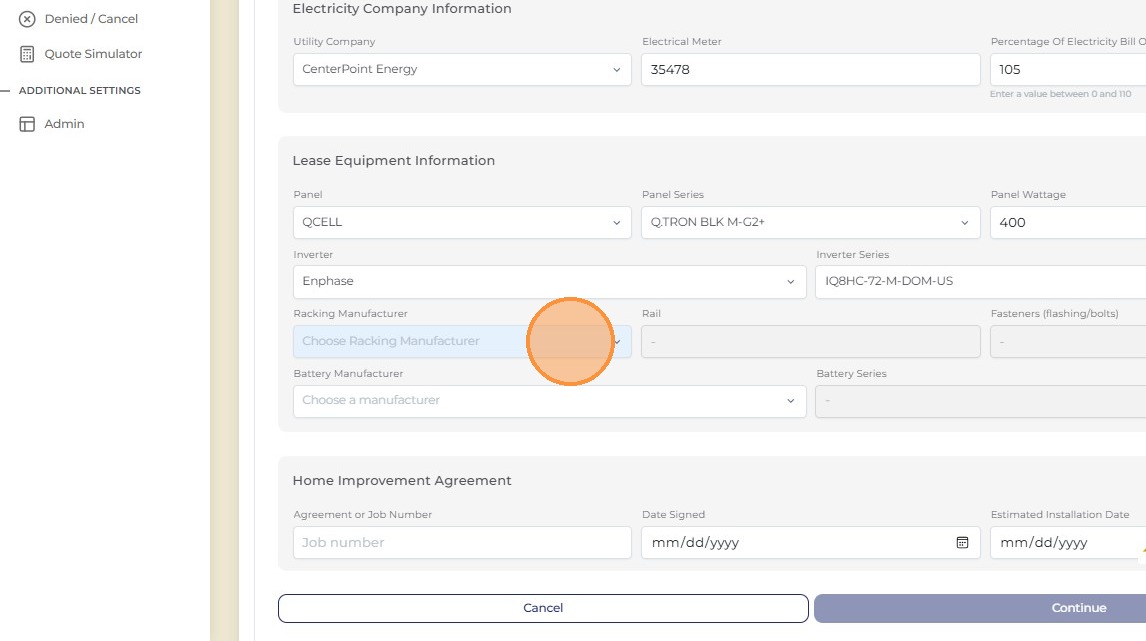
40
Select a racking manufacturer
Choose the racking manufacturer from the dropdown. Only AVL-approved racking brands will appear. All racking components — including rail, clamps, splice, and MLPE mounts — must be Domestic Content certified.
Racking manufacturer
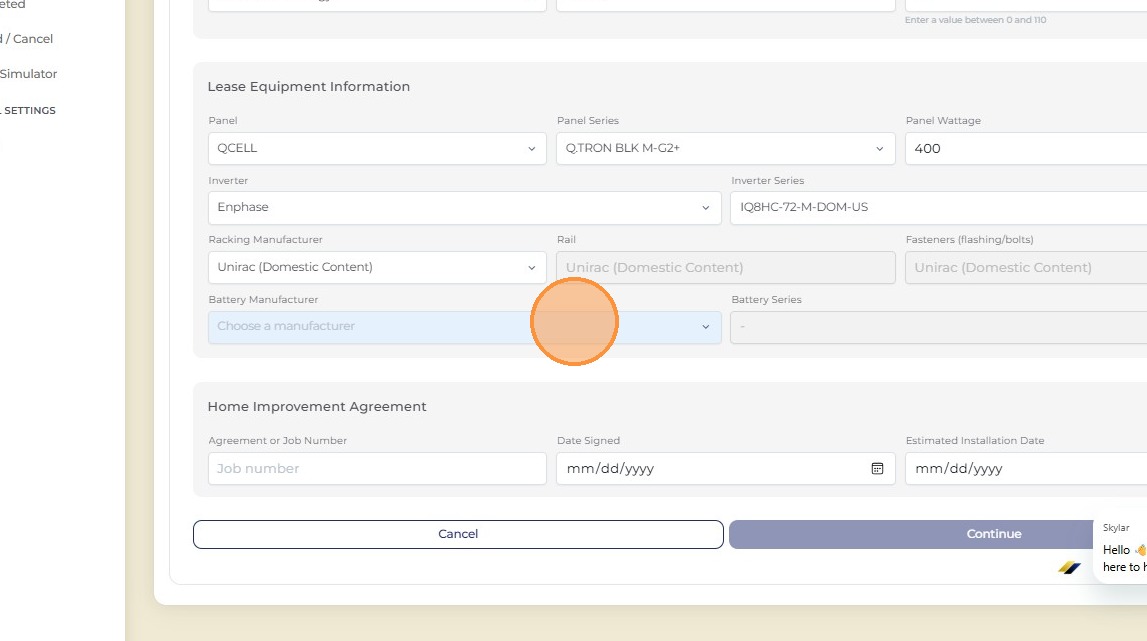
41
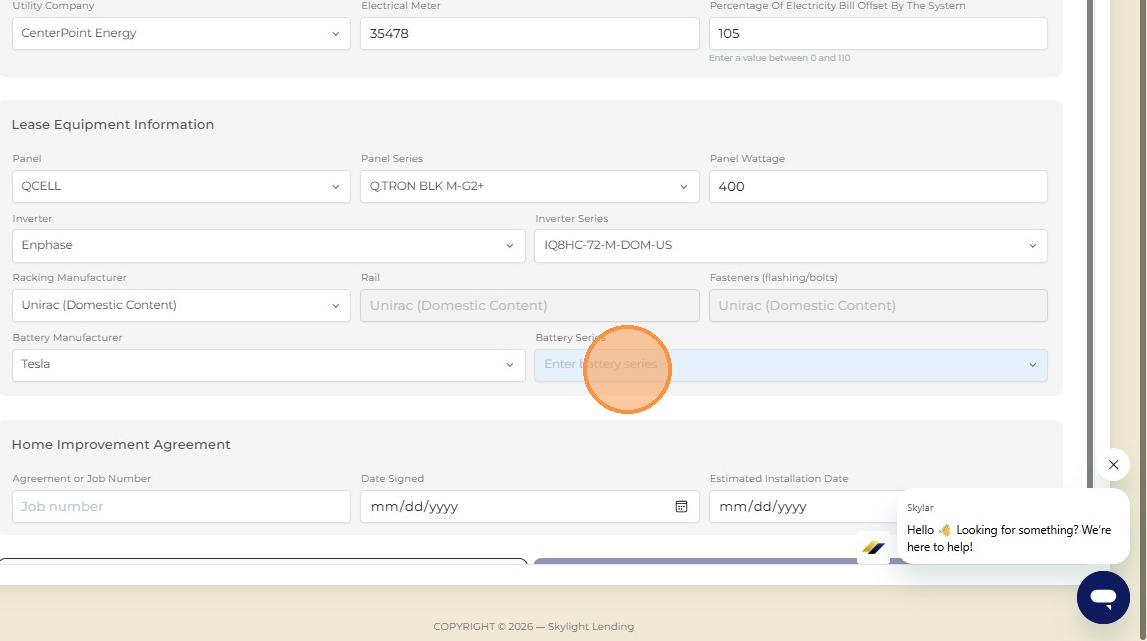
Solar + Battery only: select a battery manufacturer
This section only appears for Solar + Battery projects. Select the battery manufacturer from the dropdown. If this is a Solar Only project, this section will not be displayed — skip ahead to step 43.
Battery manufacturer
42
If applicable: select the battery series
After selecting the battery manufacturer, choose the specific battery product series being installed. Make sure this matches the exact product on your design and purchase order.
Battery series
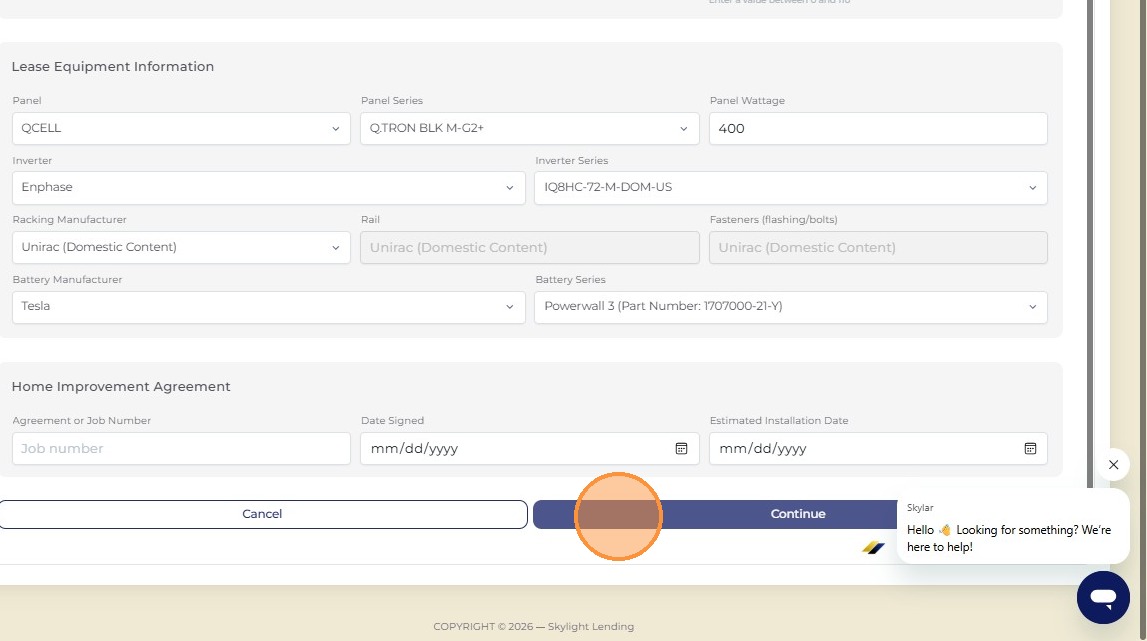
43
Click Continue past the Home Improvement Agreement section
The Home Improvement Agreement section is an optional installer tracking tool — it is not required by Skylight Lending. You can fill it out if your company uses it internally, but you can also simply click Continue to skip it without affecting your submission.
Home Improvement Agreement
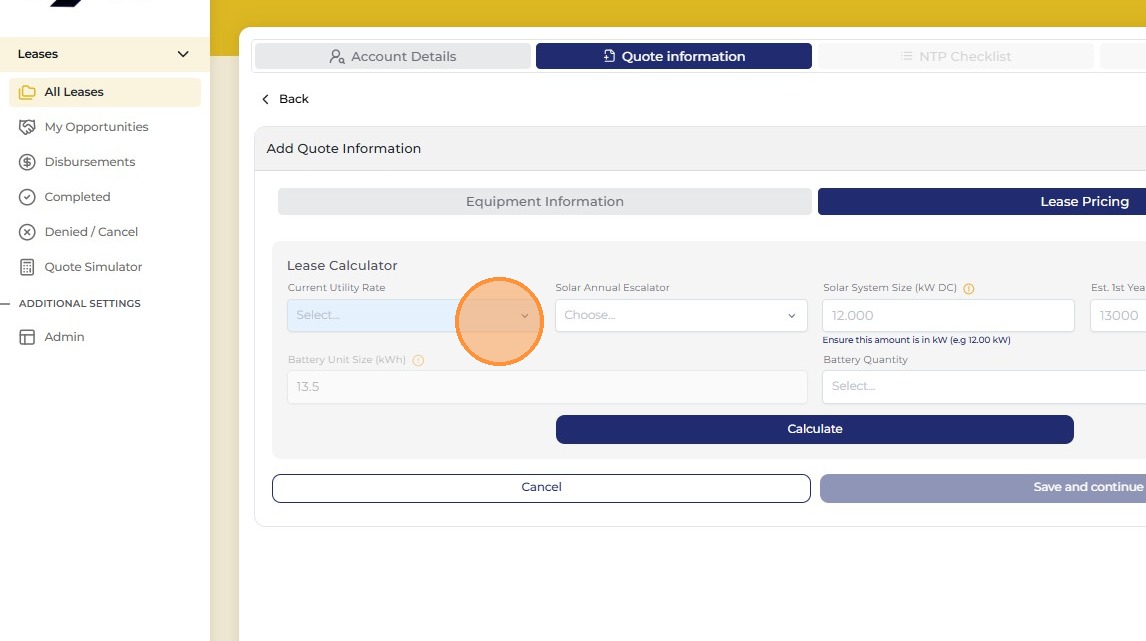
44
Select the client's current utility rate
Select the utility rate that best matches what the customer is currently paying per kWh. This is used to calculate projected savings for the customer. If you're unsure which rate tier applies, check the customer's utility bill or contact your account manager — they can walk you through the rate structure for your specific market.
Utility rate
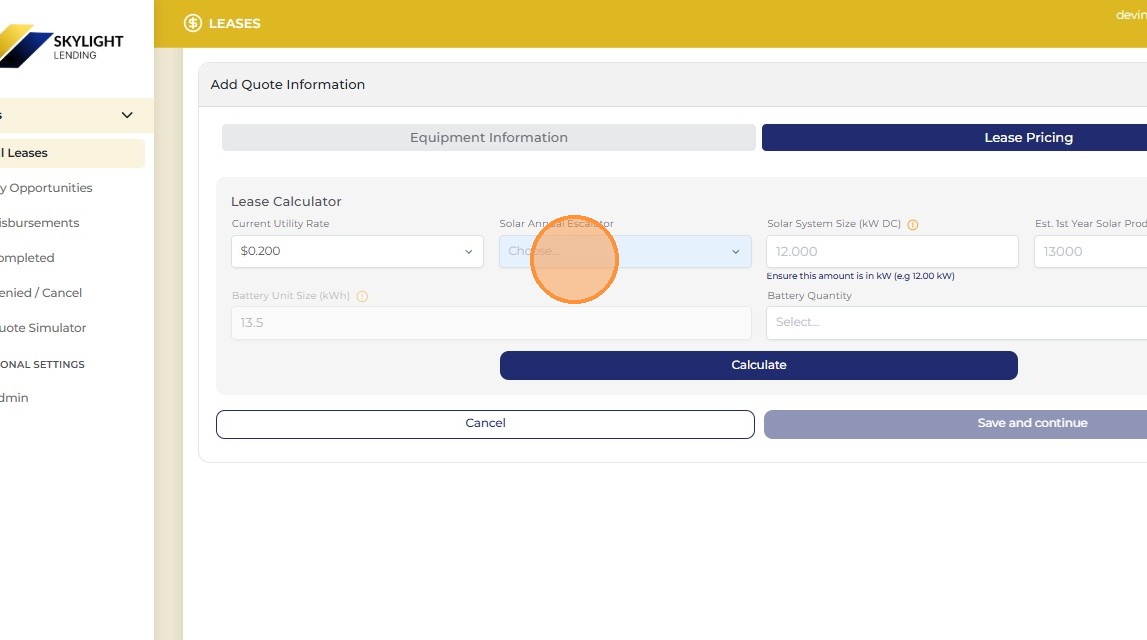
45
Select an escalator
Choose the annual escalator rate for the lease. The escalator determines how much the monthly payment increases each year. The maximum is 3.99% in most states — but if the customer is in Massachusetts, the maximum is 2.99%. Choose based on what works best for the customer's budget and your sales approach.
Escalator
46
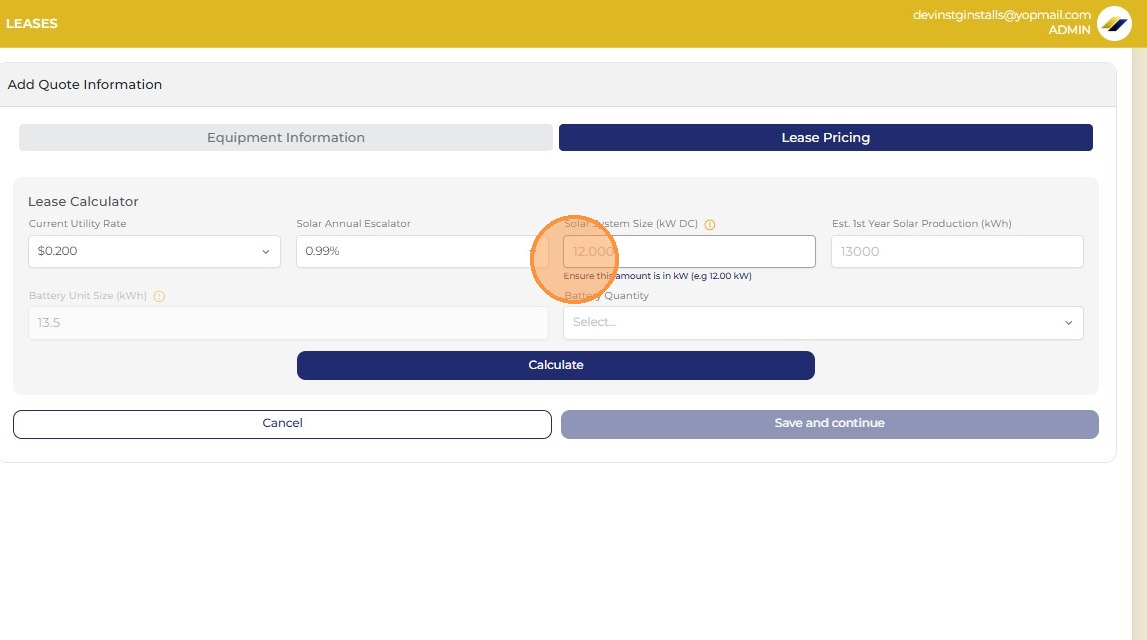
Enter the system size in kW
Enter the total DC system size in kilowatts. For example, a 20-panel system at 400W per panel would be 8.0 kW. This comes directly from your design tool. Remember: Solar Only minimum is 6 kW; Solar + Battery minimum solar size is 3 kW.
System size kW
47
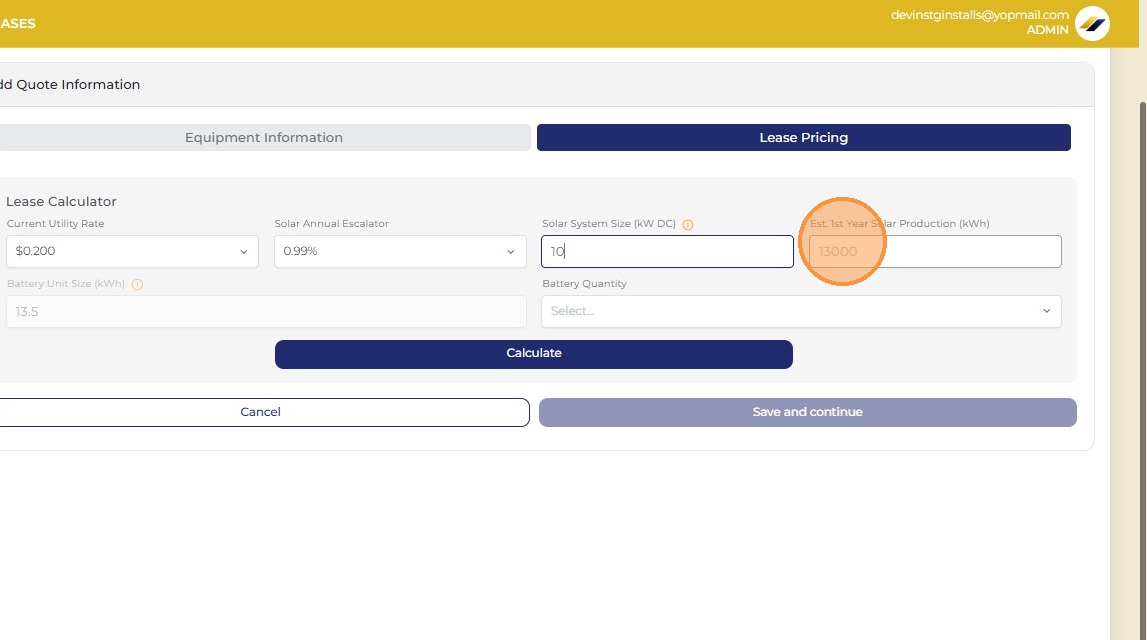
Enter the system's estimated first-year production
Enter the estimated annual production in kWh for year one. This figure comes from your solar design software (Aurora, OpenSolar, etc.) and is used to calculate the customer's projected offset and savings. Make sure it matches your design — this number will appear in the lease agreement.
First-year production
48
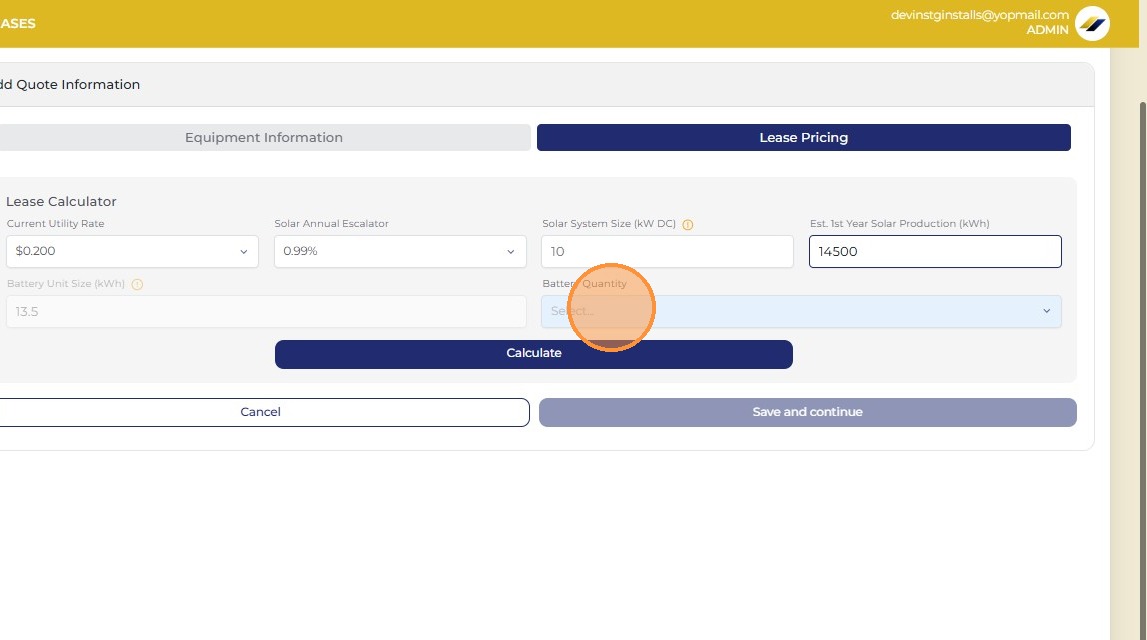
Select the number of batteries (if applicable)
If this is a Solar + Battery project, select how many battery units are being installed. Each unit will be priced separately in the pricing section. If Solar Only, this field will not appear.
Number of batteries
49
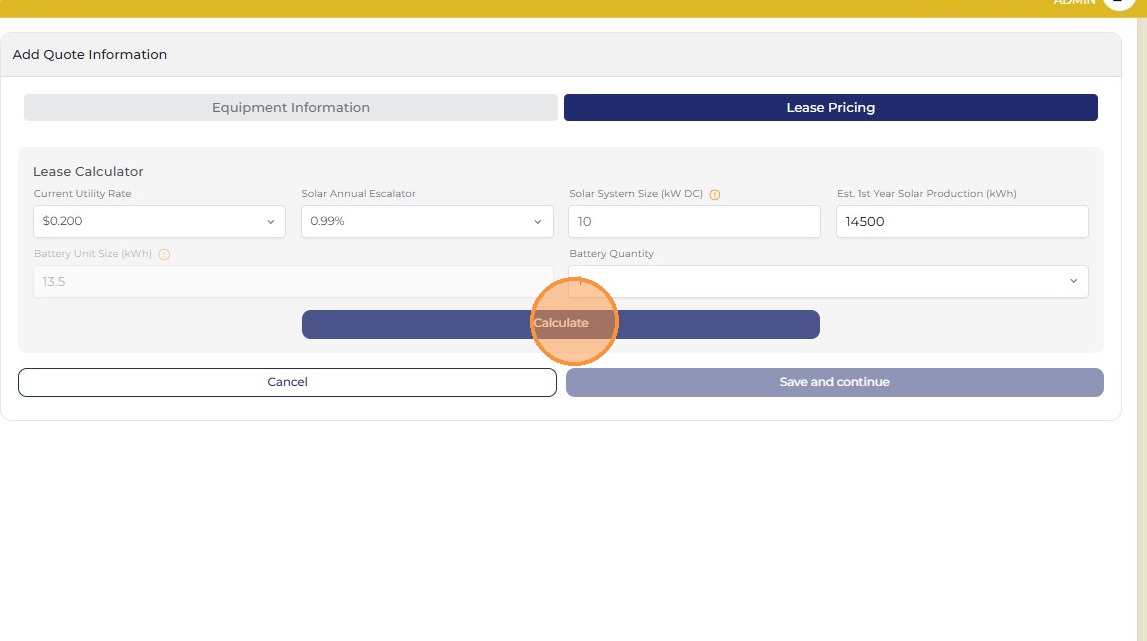
Click "Calculate"
Once all system details are entered, click Calculate. The system will process your inputs and generate the maximum allowed pricing based on your configuration. This is your pricing ceiling — you can always price lower, but never above this number.
Calculate
50
Review the "Max Allowed" pricing
The Max Allowed field shows the highest price you can submit for this system configuration. It's automatically calculated based on system size, production, and state. If this number meets your target, you can proceed with max pricing. If you want to price differently, move to the next step.
Max Allowed pricing
51
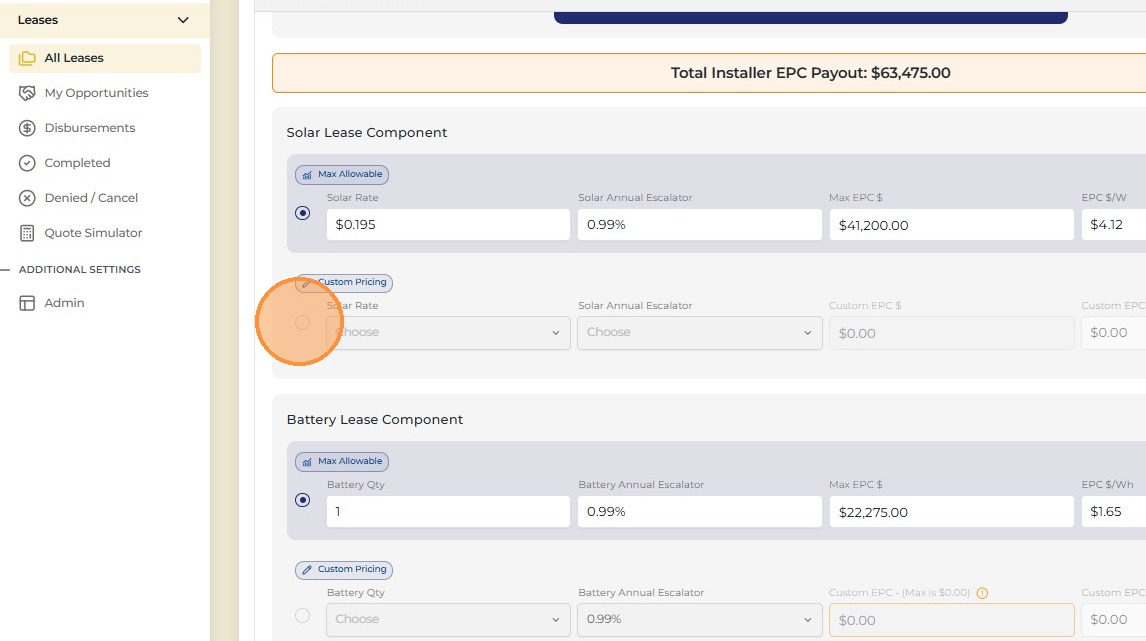
Select "Custom Pricing" if you want to price below the max
If you want to offer the customer a lower price than the maximum — for example, to be more competitive or match a specific budget — select the Custom Pricing option. This will allow you to manually enter a solar rate in the next step.
Custom pricing
52
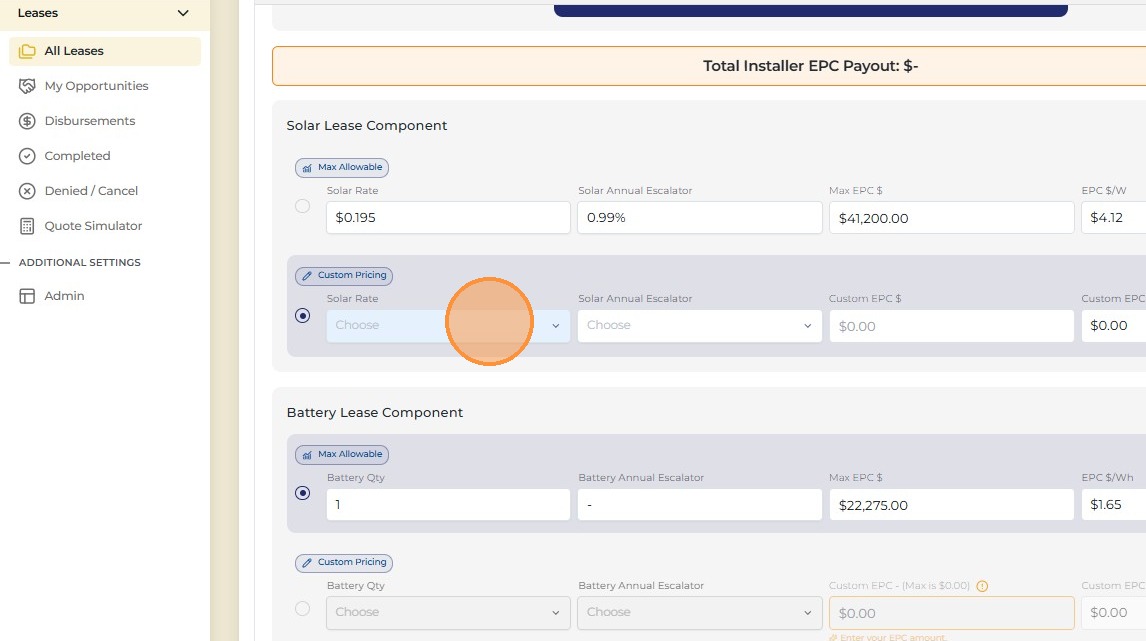
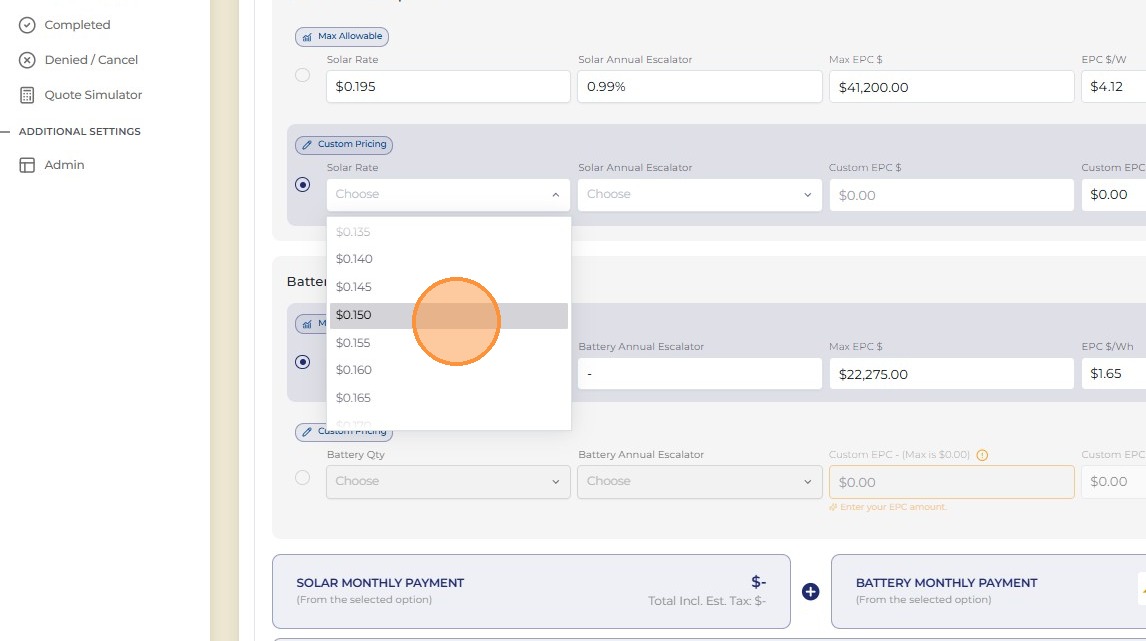
Select the solar rate
Choose or enter the solar rate — the per-kWh price the customer will pay for their solar energy. This is the core pricing input for the lease. The rate you set here directly determines both the customer's monthly payment and your EPC payout.
Solar rate
53
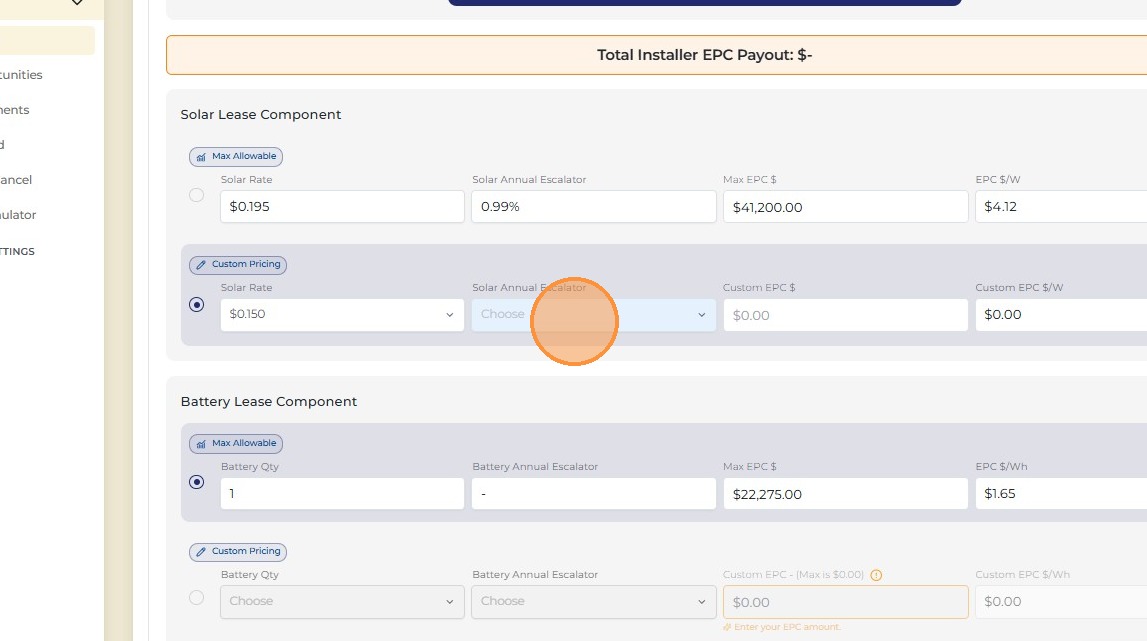
Select the escalator for the solar pricing
Confirm the escalator rate for the solar portion of the lease. This should match the escalator you selected in step 45.
Solar escalator
54
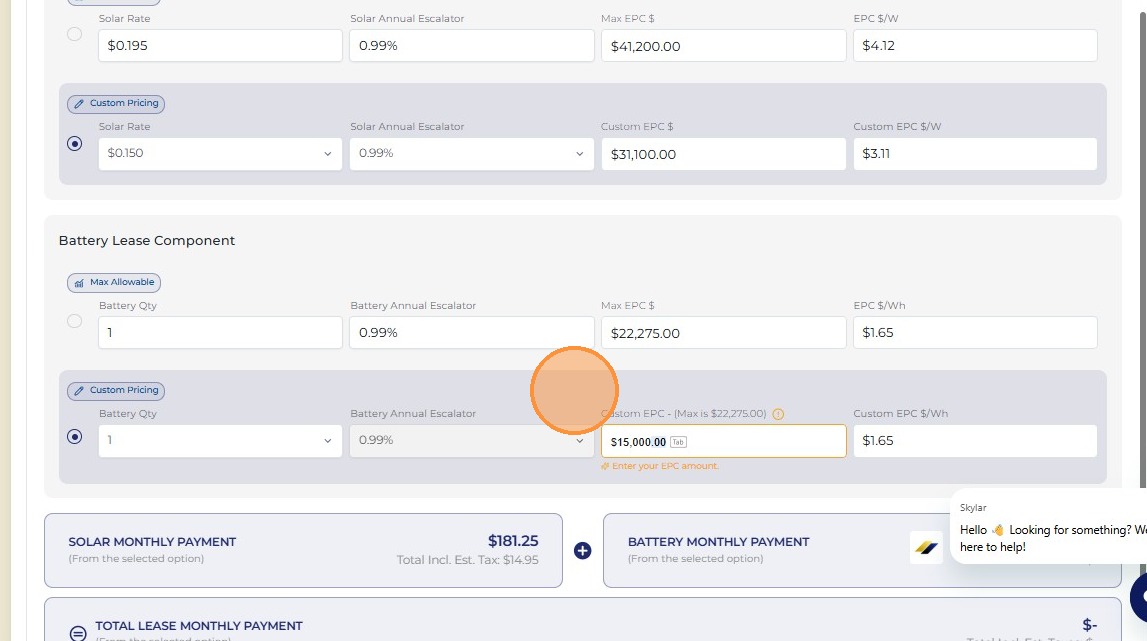
Configure battery pricing — same logic as solar (if applicable)
The battery pricing section works exactly the same way as solar. You'll see a Max Allowed value for the battery. You can accept that or choose custom pricing to enter a different amount. Battery pricing is per kWh of storage capacity.
Battery pricing
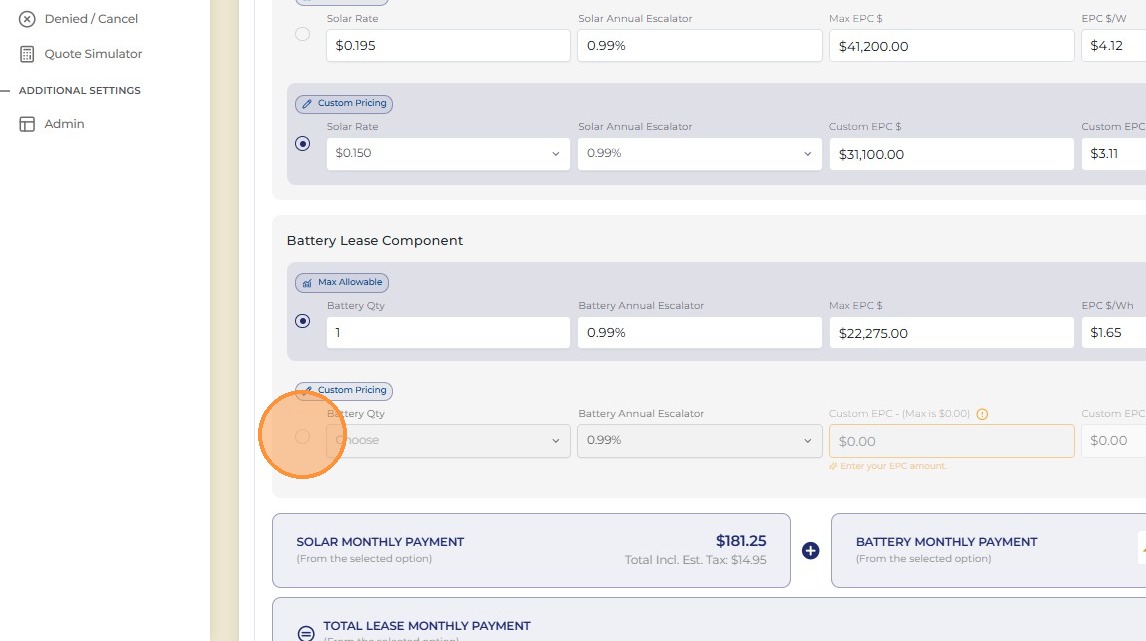
55
Select "Custom" to price the battery below max (if applicable)
Custom battery pricing
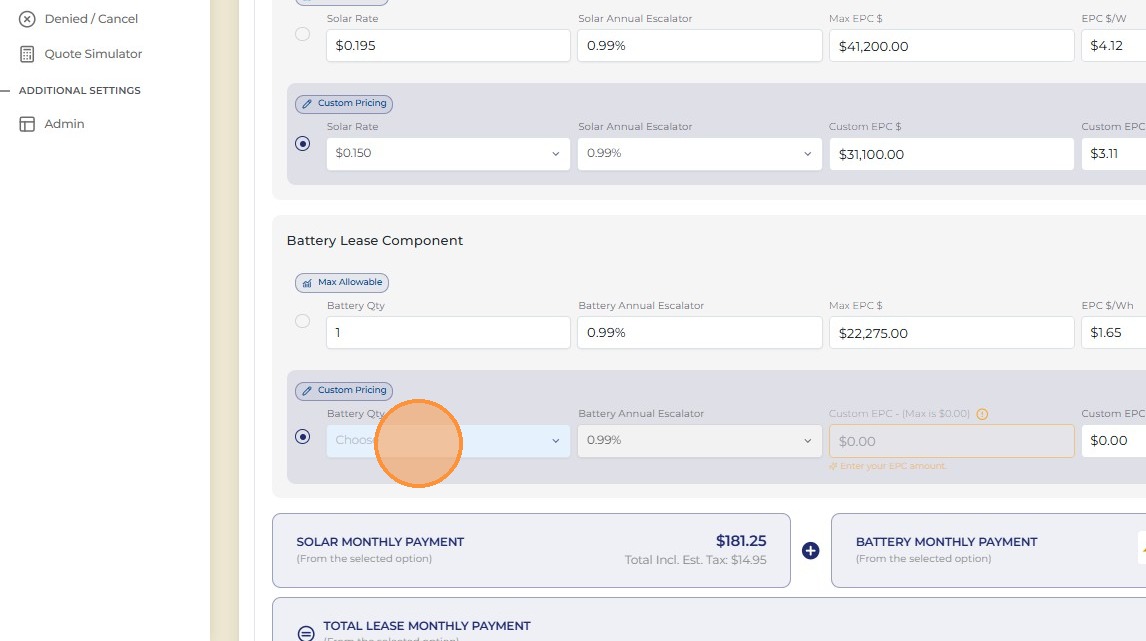
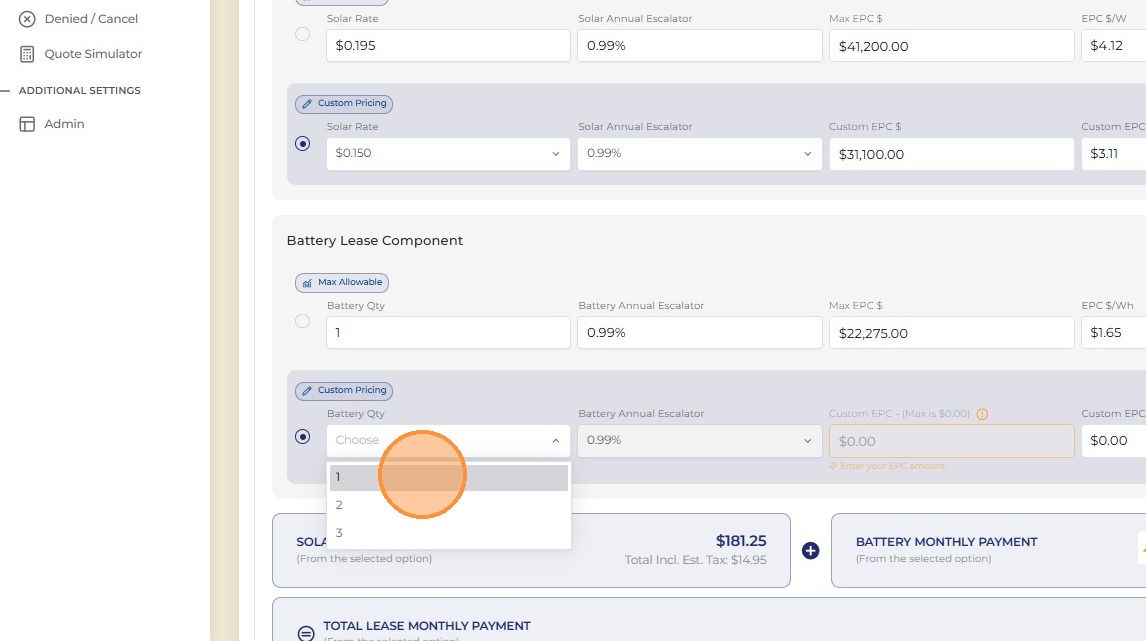
56
Confirm the number of batteries
Verify that the battery count shown matches what you entered earlier. If it's incorrect, go back and update it before continuing.
Confirm battery count
57
Review the EPC field — this is your installer payout for the job
The EPC (Engineering, Procurement, and Construction) field shows the total dollar amount Skylight Lending will pay you for this installation, based on the pricing you've configured. Review this before finalizing — it reflects your gross payout before any company splits or deductions.
EPC field
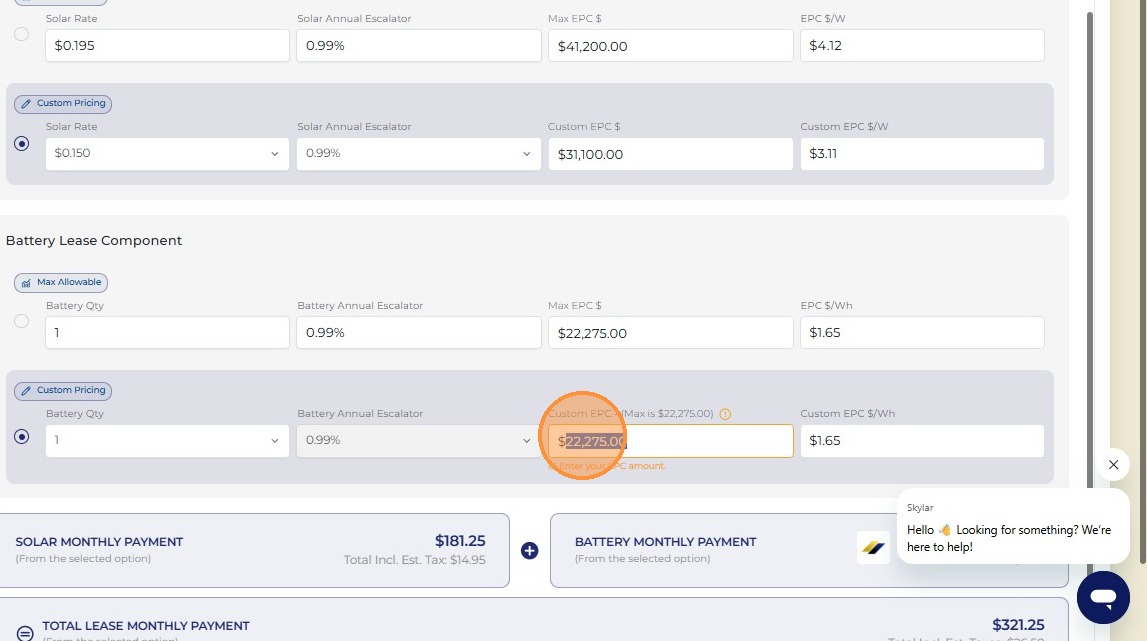
58
Enter your custom battery price (if using custom pricing)
If you selected custom pricing for the battery, enter your desired price here. Make sure it doesn't exceed the Max Allowed value shown — the system will flag anything over the limit.
Custom battery price
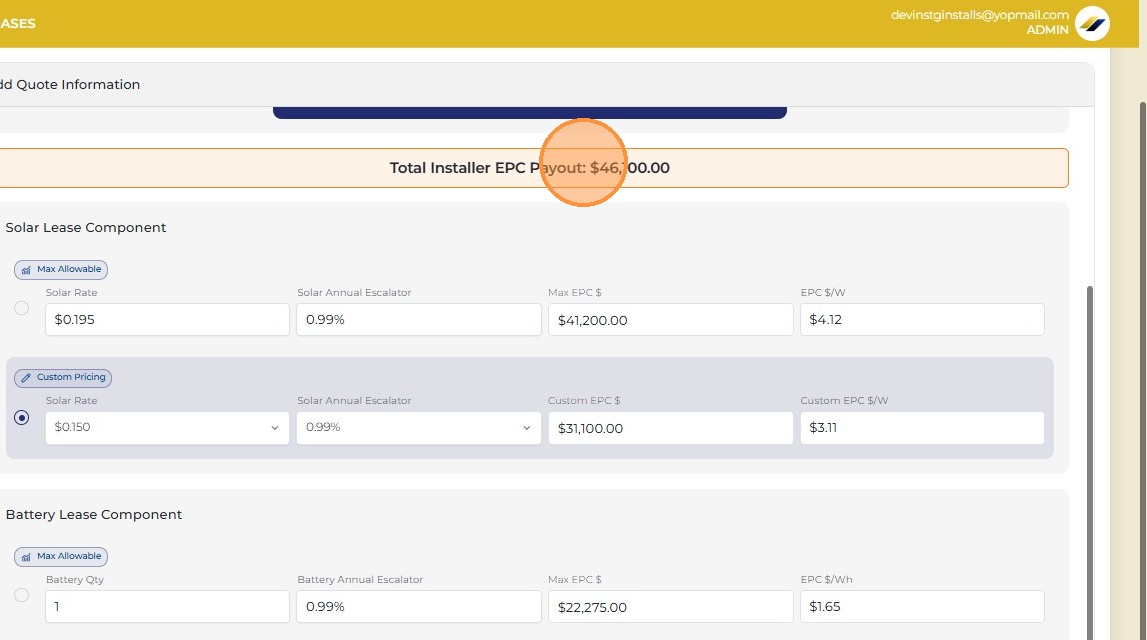
59
Check the top banner — it shows your Total Installer EPC Payout
The banner at the top of the pricing screen shows the combined total EPC payout — solar plus battery combined. This is the number you'll be paid at the M1 milestone after NTP is issued.
Total EPC payout
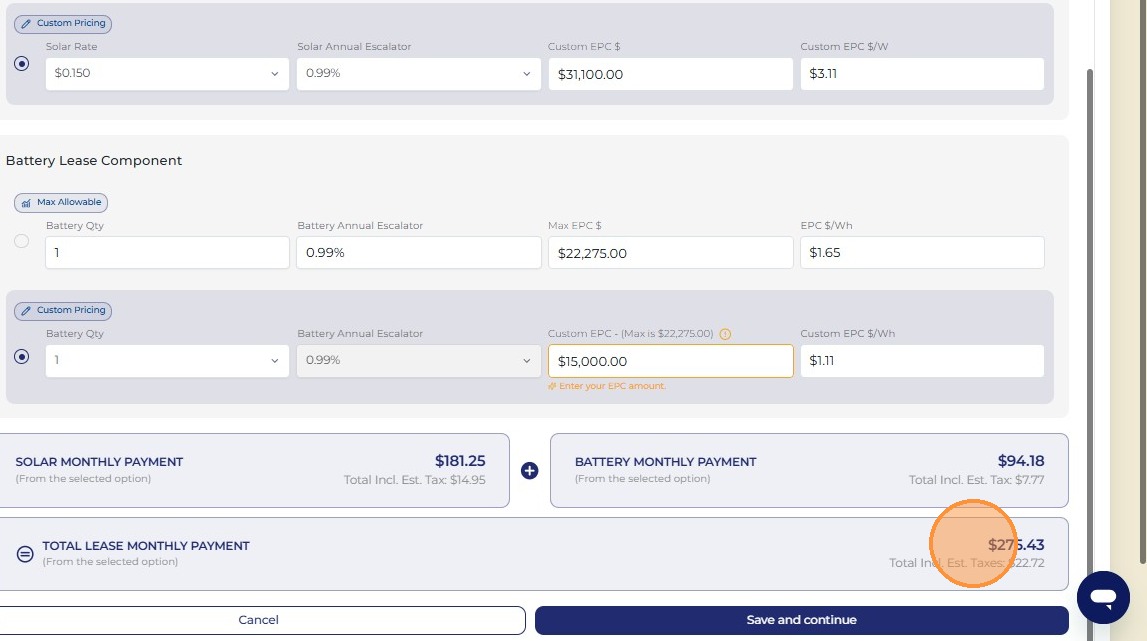
60
Check the lower right — it shows the client's total monthly bill
The lower right corner of the pricing screen displays the customer's projected total monthly lease payment. Review this before finalizing — this is the number the customer will see on their agreement and pay each month. Make sure it aligns with what you've discussed with them.
Client monthly bill
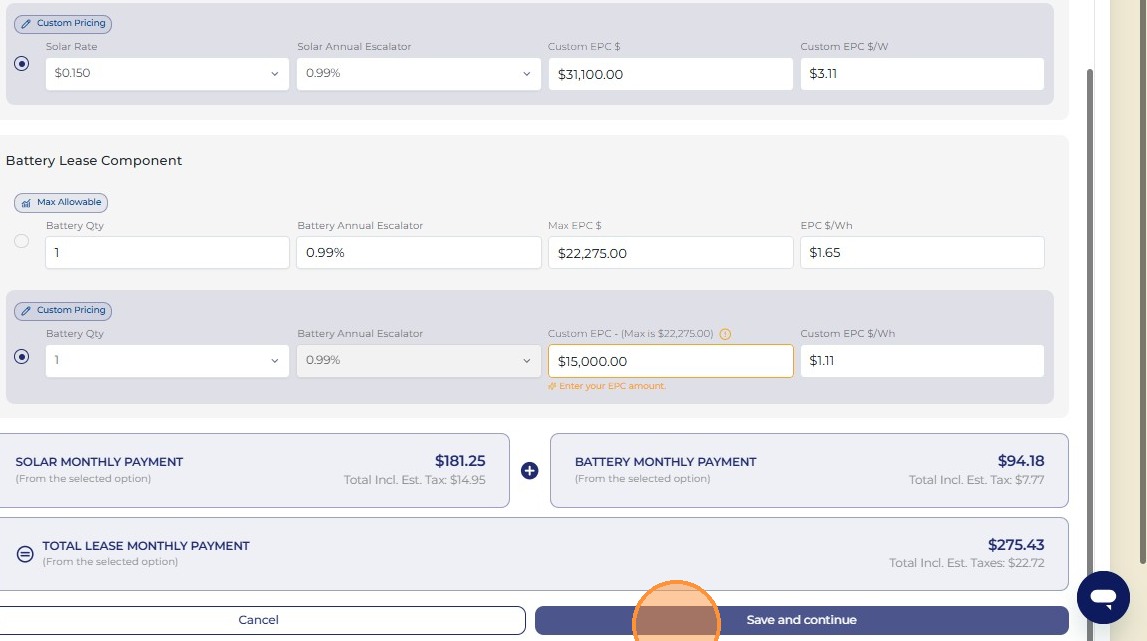
61
Click "Save and Continue"
Once you're satisfied with the pricing, click Save and Continue to lock in the quote and move to the final review screen.
Save and Continue
62
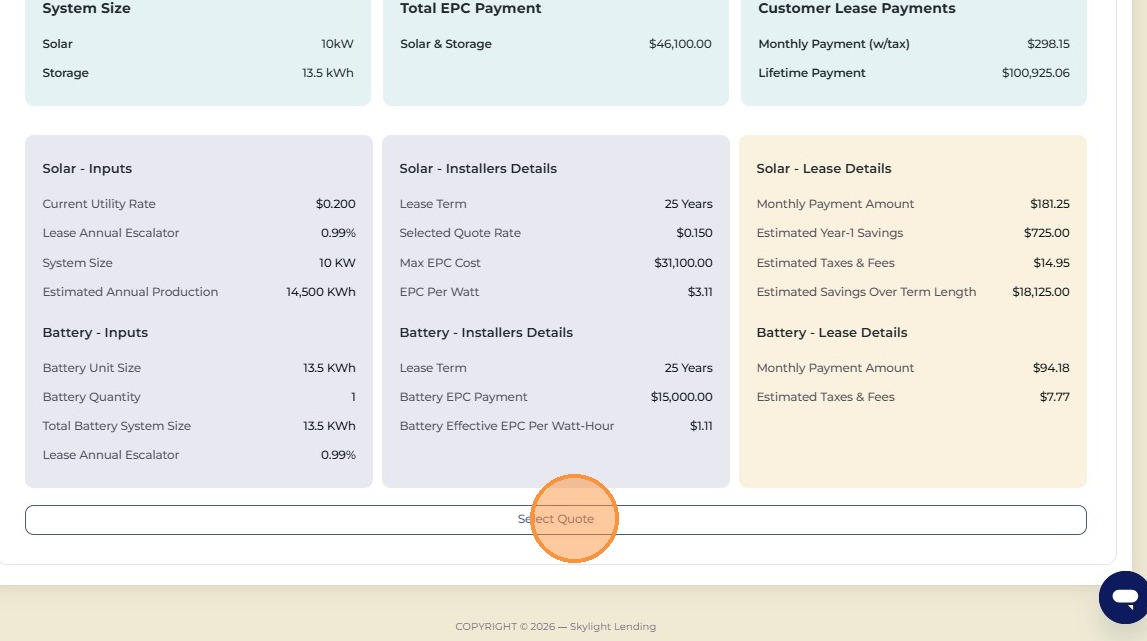
Review the full quote details, then click "Quote" to move forward
A full summary of the quote will display — equipment, system size, pricing, escalator, and projected monthly payment. Review everything carefully. If anything looks off, go back and correct it before clicking Quote. Once you click Quote, the lease agreement will be generated based on these exact details.
Full quote review
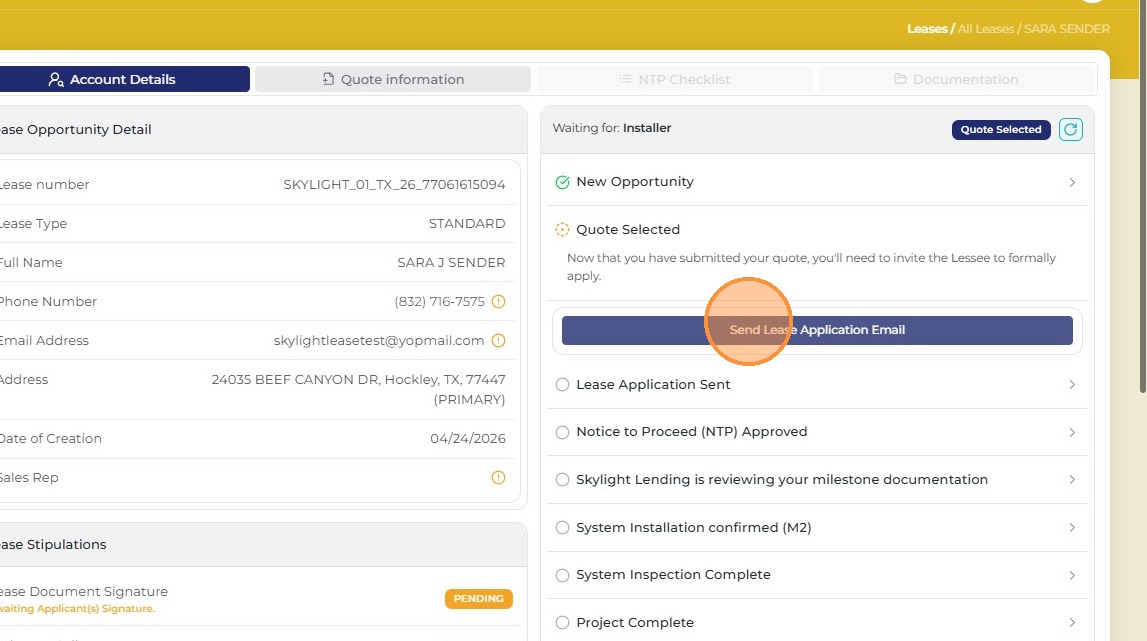
63
Click the button to send the lease agreement to your client for signature
The lease agreement has been generated. Click the send button to deliver it to the customer's email address for their e-signature. The customer will receive a link to review and sign the full lease agreement through the Skylight portal.
Send agreement
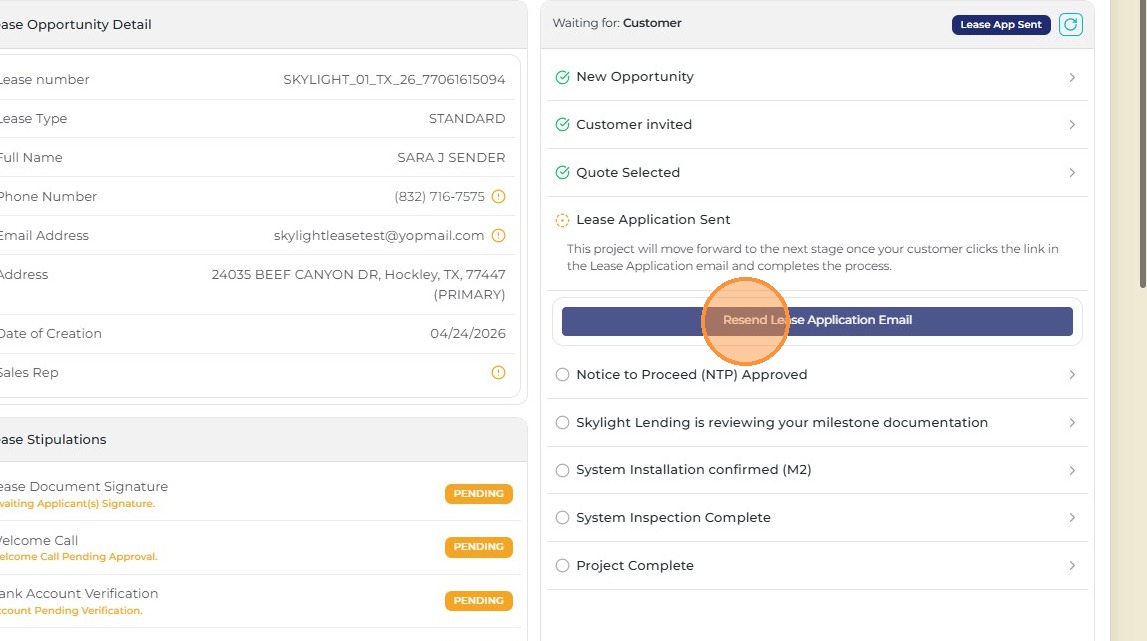
64
If the client can't find the agreement, resend it
If the customer says they didn't receive the agreement, ask them to check their spam or junk folder first. If it's still not there, click the resend option to send it again. You can resend as many times as needed.
Resend agreement
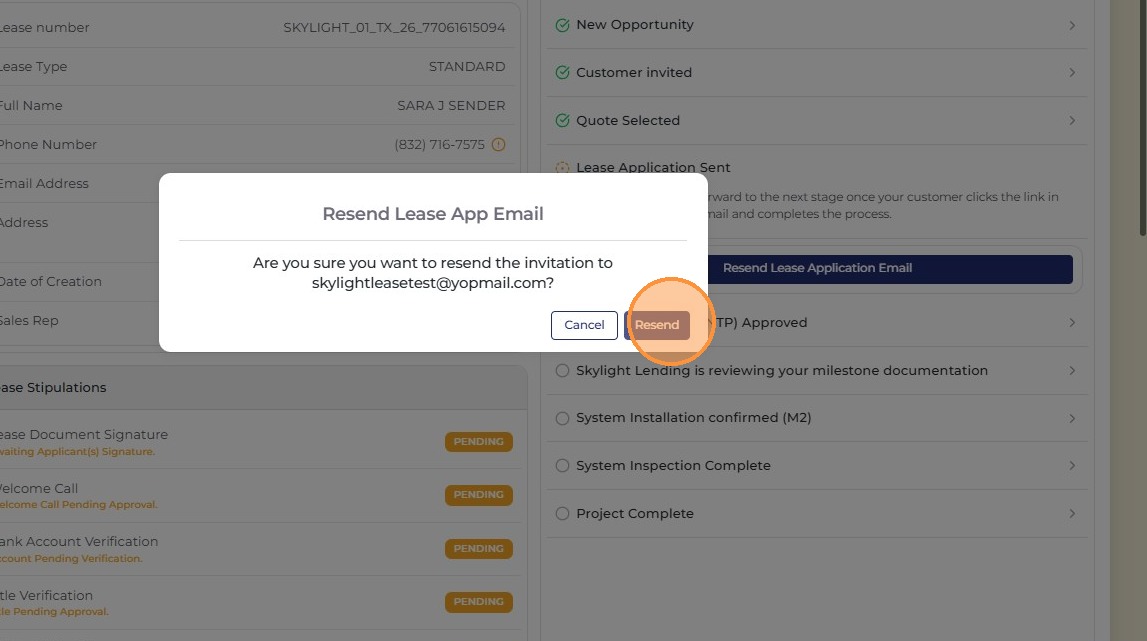
65
Confirm the resend
Click confirm to send the agreement again. The customer will receive a new email with a fresh link to sign. The previous link will be deactivated.
Confirm resend
Opportunity created and agreement sent!
Your solar lease opportunity is live in the Skylight Lending portal and the agreement has been sent to your customer for signature. Once they sign, the next step is completing the NTP requirements — upload all required documents and click Notify Lender only after everything is in.