Complete NTP Checklist — Skylight Installer Guide
Step-by-step guide

Complete NTP Checklist
to receive NTP

Follow this checklist to upload all required documents to your lease opportunity and get your Notice to Proceed (NTP) approved by Skylight Lending.

5
Sections
27
Steps
~15
Minutes
Solar + Battery Lease — Battery Certification Required
If this is a Solar + Battery lease, Skylight Lending must have your battery certifications on file before NTP can be issued. If your battery certifications have not already been submitted, please email them to Installer Support so our records can be updated: InstallerSupport@skylightlending.com. Failure to submit these certifications will delay your NTP approval.
Documents required for NTP — upload all of these
Utility billBank statement / voided checkBank account verificationOwnership / title deedGovernment ID (front & back)
Always click "Notify Lender" after every upload
This is the most critical step in the entire process. After uploading each document, you MUST click "Notify Lender" — otherwise Skylight Underwriting will not know the document is there and it will not be reviewed. No notification = no review = delayed NTP.

Underwriting processing time is typically 24 to 48 hours. As long as you click "Notify Lender" after each upload, the Skylight underwriting team will get to your documents as quickly as possible.
NTP document checklist — complete all 6 before submitting
1
Utility bill — up to 60 days old, 30-day service period shown
2
Bank statement or voided check
3
Bank account verification
4
Title or deed — only if owner differs from applicant
5
Government-issued ID — front and back
6
Property/Structural Integrity Photos — required for every opportunity
2 steps
1
Navigate to the lease opportunity in the Skylight portal
Log into the Skylight Lending installer portal and open the specific lease opportunity for your customer. This is where you'll find the NTP document checklist.
Lease opportunity
2
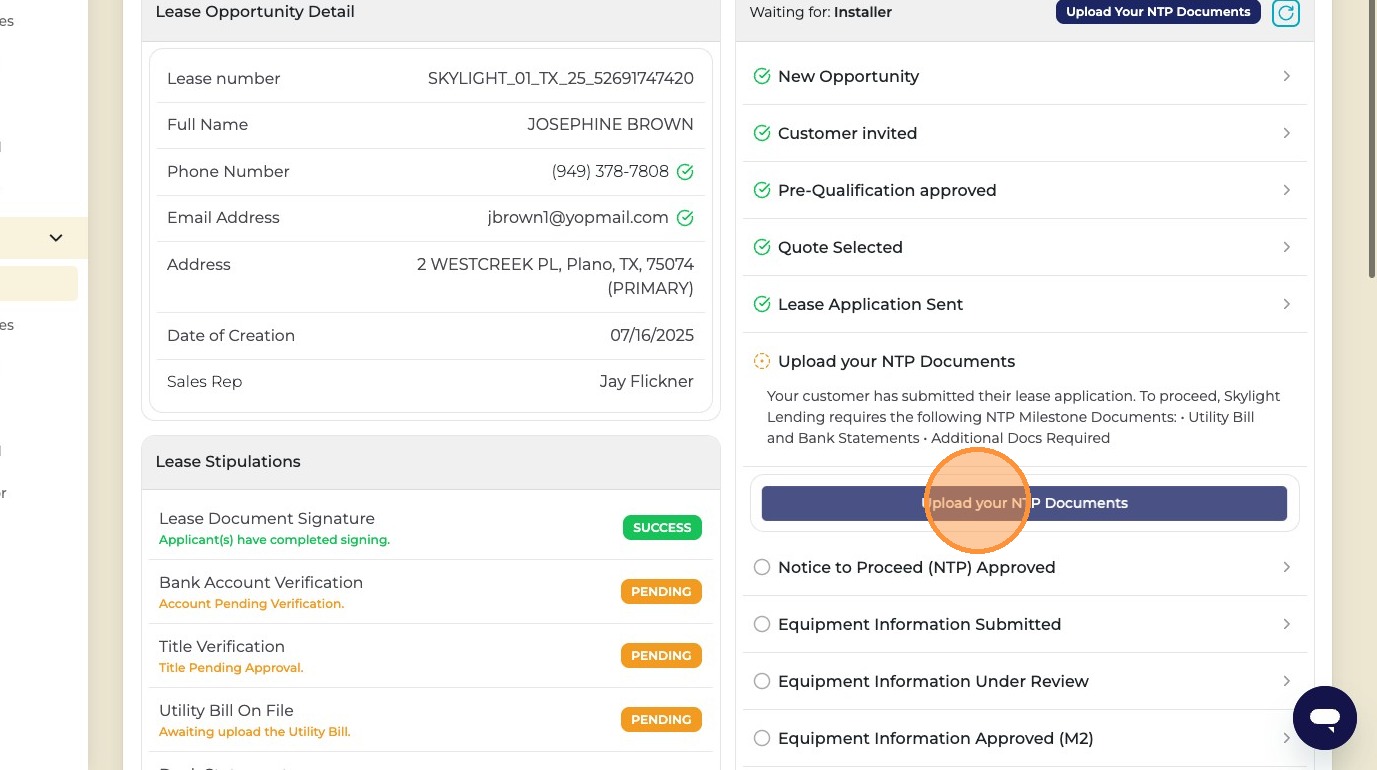
Click "Upload your NTP Documents"
Inside the opportunity, find and click "Upload your NTP Documents." This opens the NTP checklist where you'll upload each required document one by one.
Upload NTP Documents button
What you'll see in the checklist

Once inside the NTP checklist, you'll see the Lease Stipulations panel showing the status of each required item — including Lease Document Signature, Welcome Call, Bank Account Verification, Title Verification, Utility Bill on File, and Bank Statements. Upload documents for any items still showing as Pending.

Welcome Call: This is completed by the customer through their Home Monitor portal — it is not uploaded by the installer. If your customer needs guidance on completing the Welcome Call, refer them to the What You Need to Know — Video Welcome Calls article in the Help Center.

Lease stipulations checklist
5 steps
3
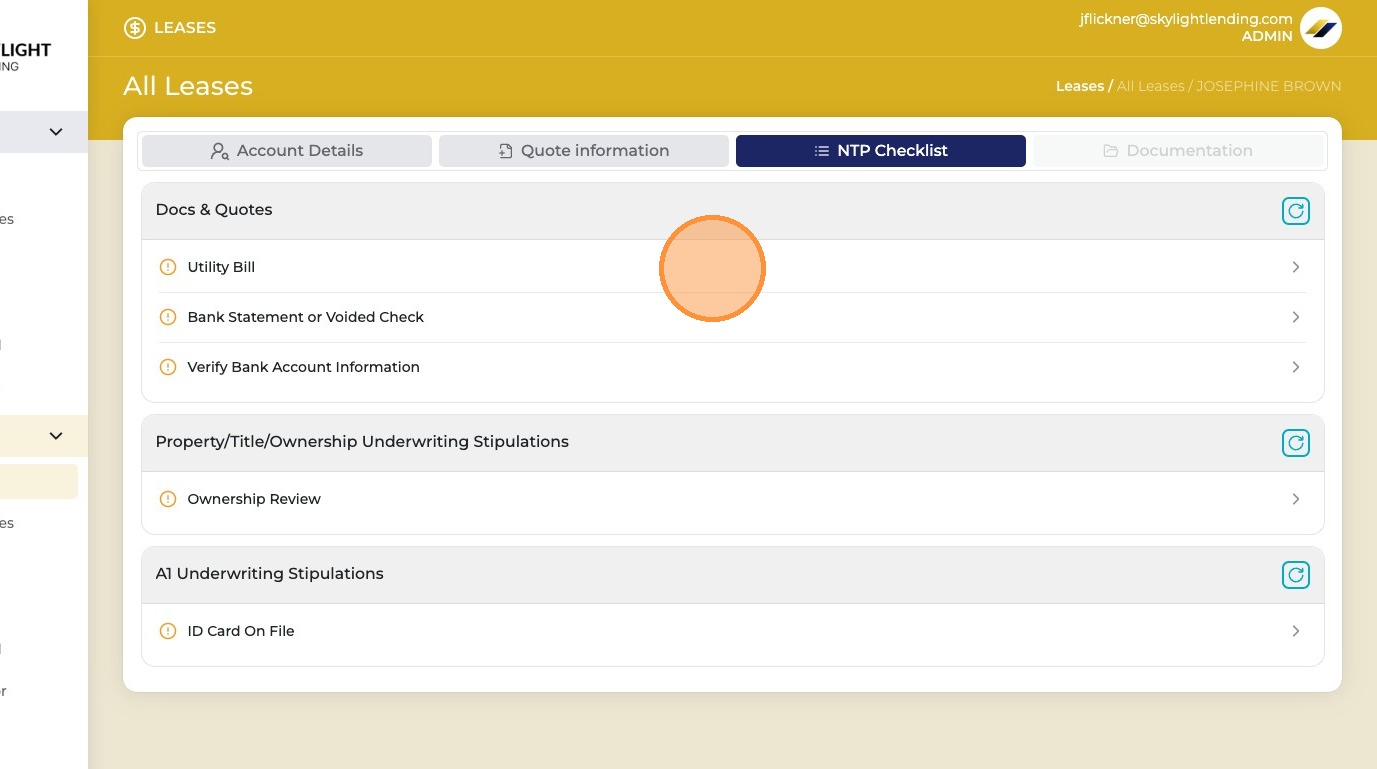
Click "Utility Bill"
Click the Utility Bill section to expand it and begin uploading the customer's utility bill document.
Utility Bill section
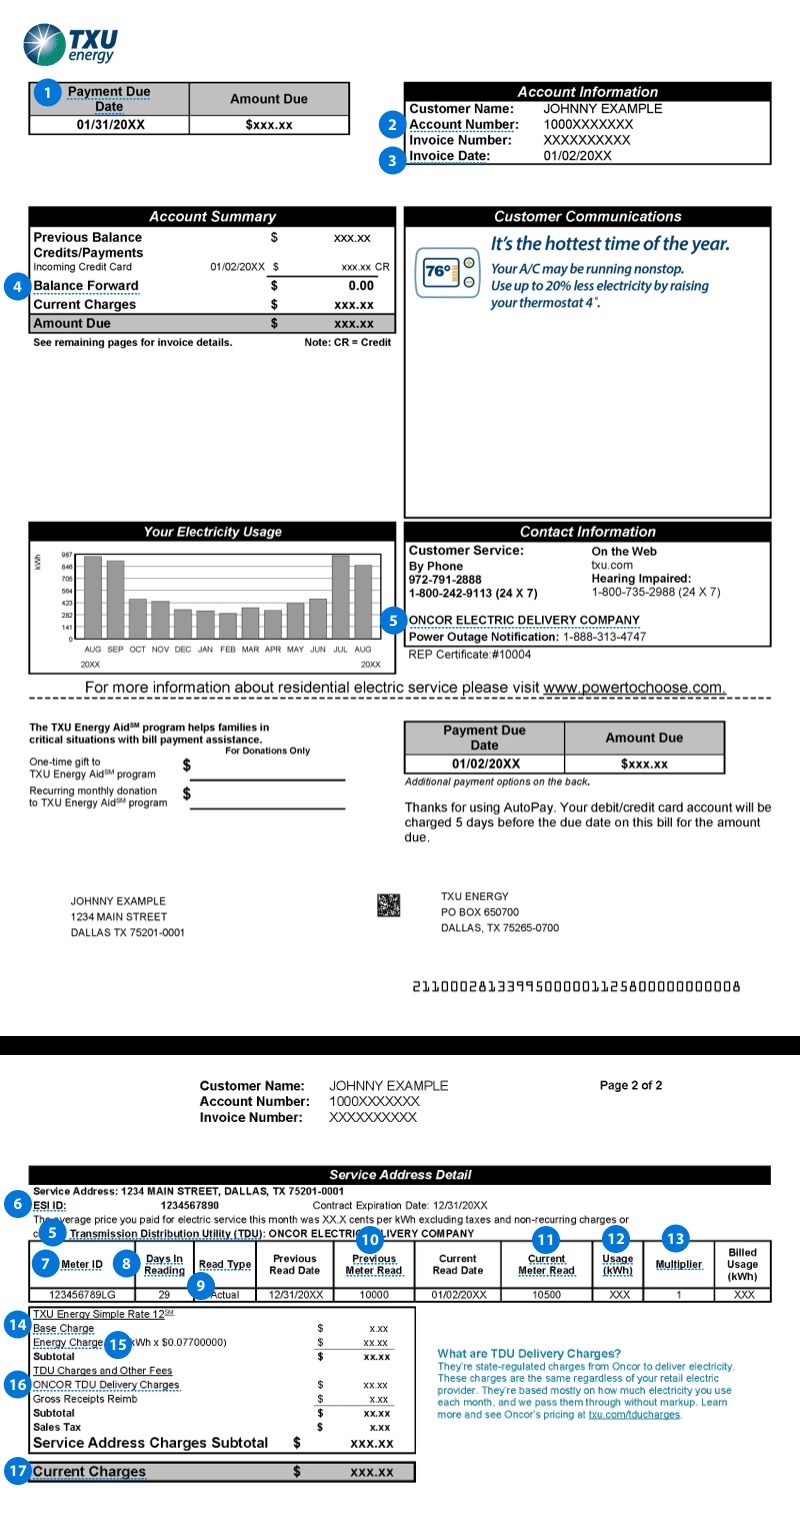
Utility bill requirements
  • Must be no more than 60 days old
  • Must show a minimum 30-day service/usage period
  • Must show the service address
  • Must show the account number
  • Must show recent monthly usage (kWh) and all charges
  • Must show the meter number
  • Customer name is not required to match — address is the key field
  • Must not show past-due or late charges
Past-due utility bills will cause delays

If the utility bill shows a past-due balance or late charges, it will be rejected and a current bill will be required before NTP can be issued. Always check the bill for any past-due amounts before uploading.

Utility bill example
4
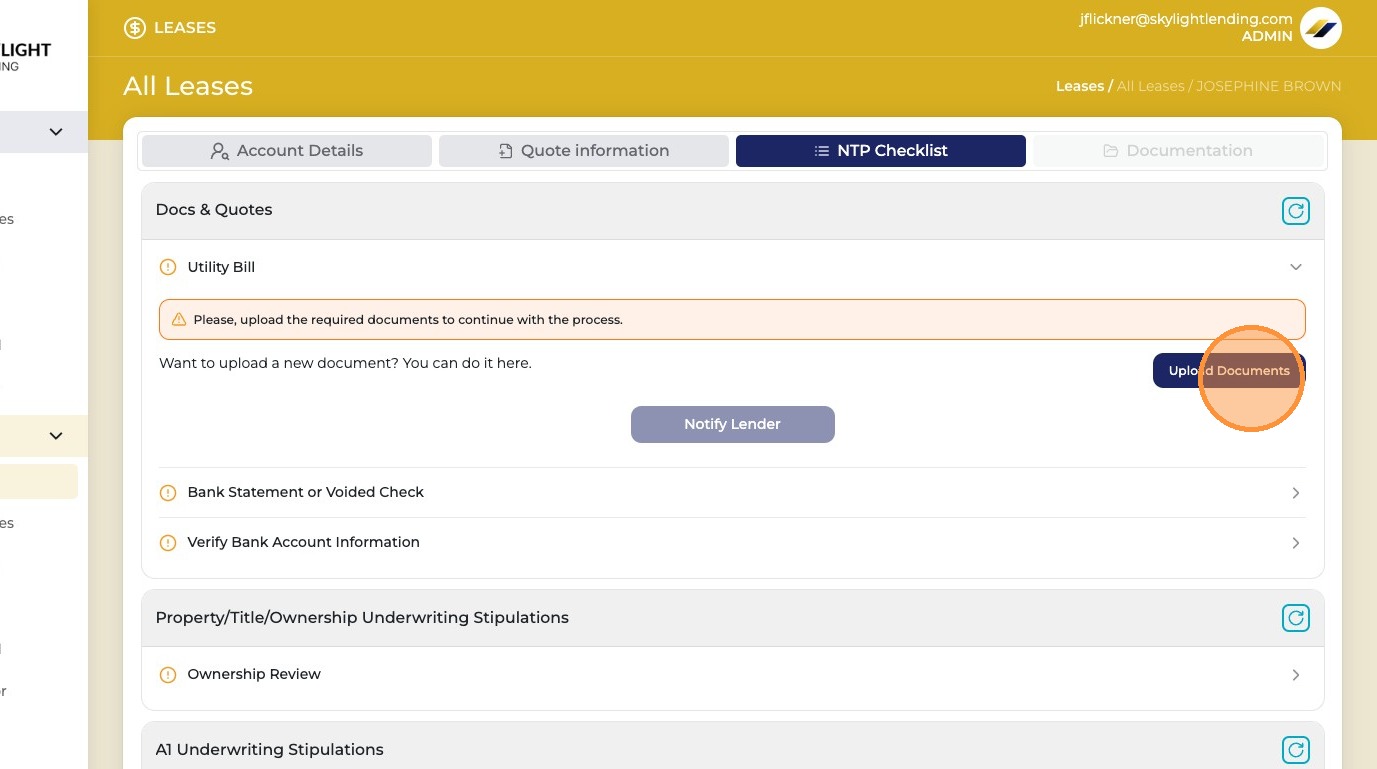
Click "Upload Documents"
Click the Upload Documents button to open the file upload interface for the utility bill.
Upload Documents button
5
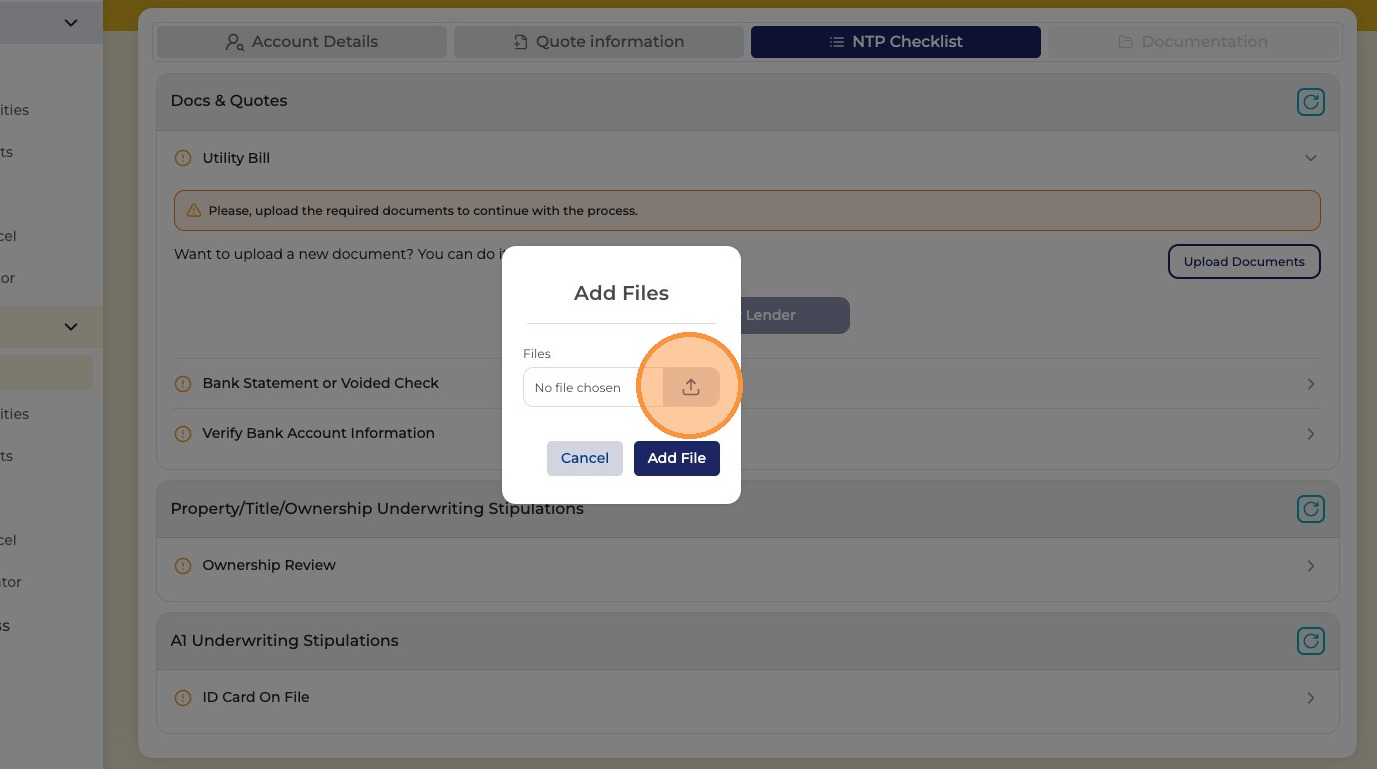
Click the upload icon to select your file
Click the upload icon to open your device's file browser and locate the utility bill file you want to upload.
Upload icon
6
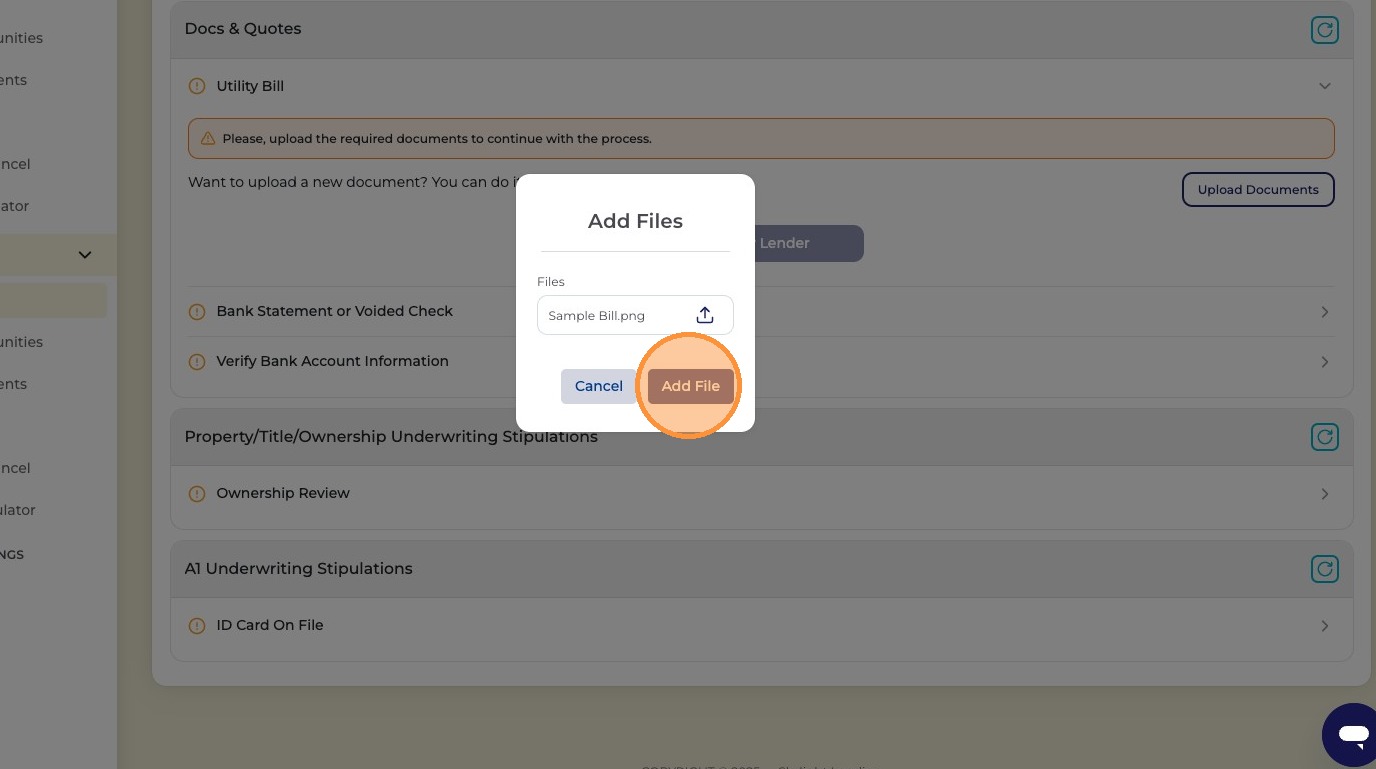
Choose the file and click "Add File"
Select the utility bill file from your device, then click "Add File" to attach it to the upload queue.
Choose file and Add File
7
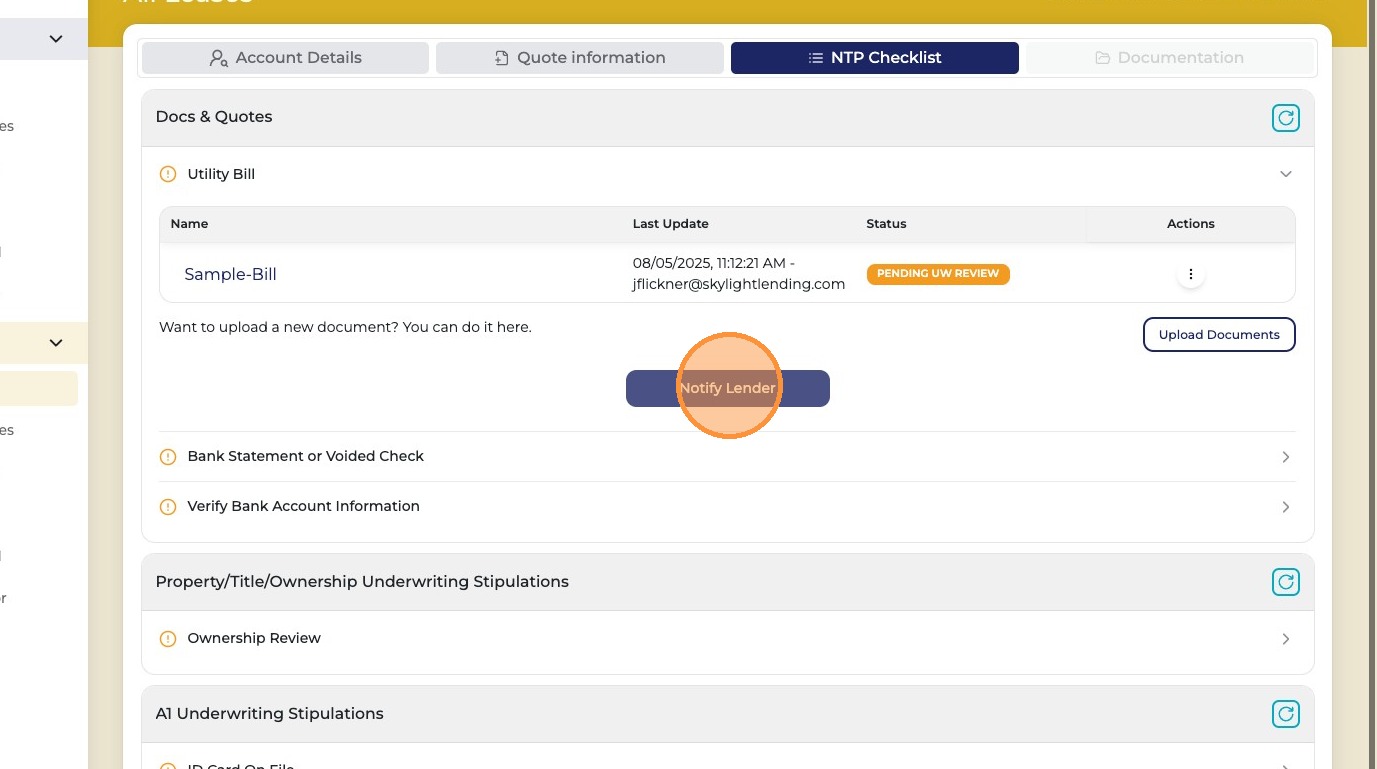
Click "Notify Lender"
After uploading the utility bill, you MUST click "Notify Lender." Without this step, Skylight Underwriting will not see the document and it will not be reviewed — your NTP will be delayed.
Notify Lender button
Critical — do not skip this

If you do not click "Notify Lender" after uploading, the document will NOT be reviewed. You must click it after every single document upload.

6 steps
8
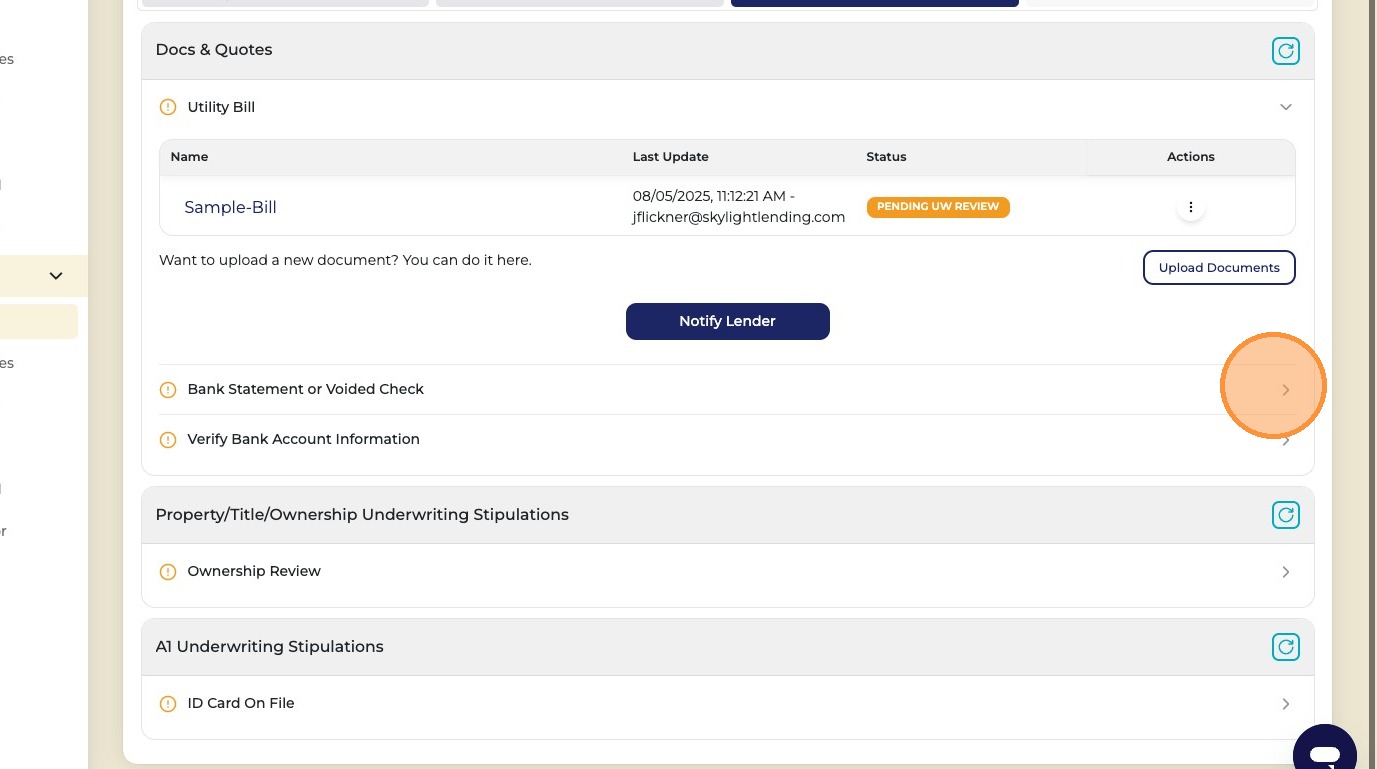
Click "Bank Statement or Voided Check"
A bank statement or voided check may be required if our underwriting team is unable to verify the customer's bank account information on their end. If this item is showing as Pending in the checklist, upload the document here.
Bank Statement section
What to upload

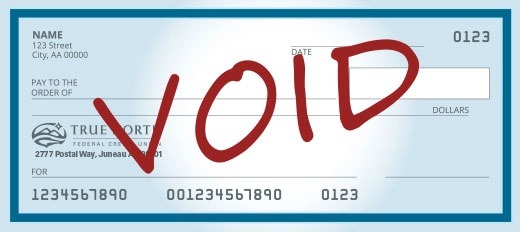
Upload either a recent bank statement (showing account holder name, bank name, and account/routing numbers) or a voided check with the customer's name and account information clearly visible.

Bank statement example
9
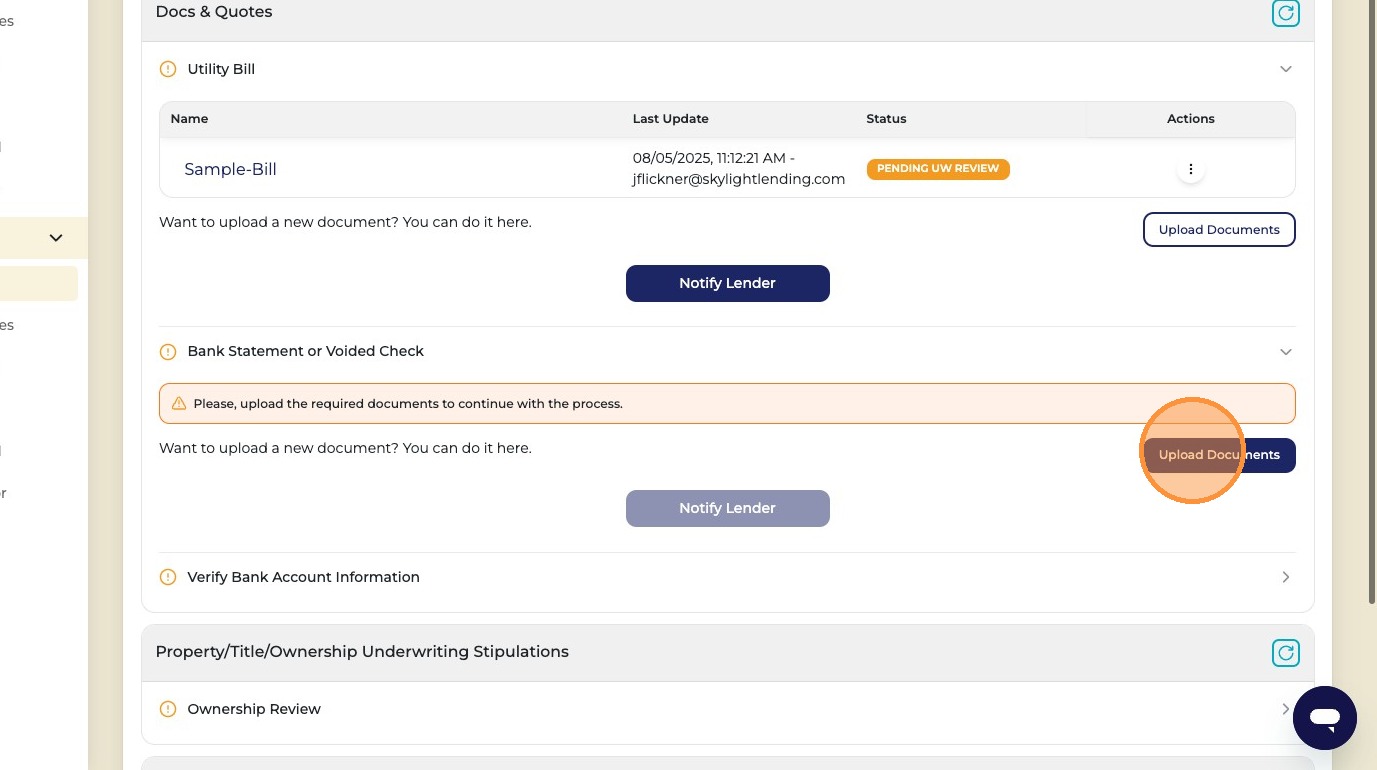
Click "Upload Documents"
Click Upload Documents to open the file upload interface for the bank statement or voided check.
Upload Documents
10
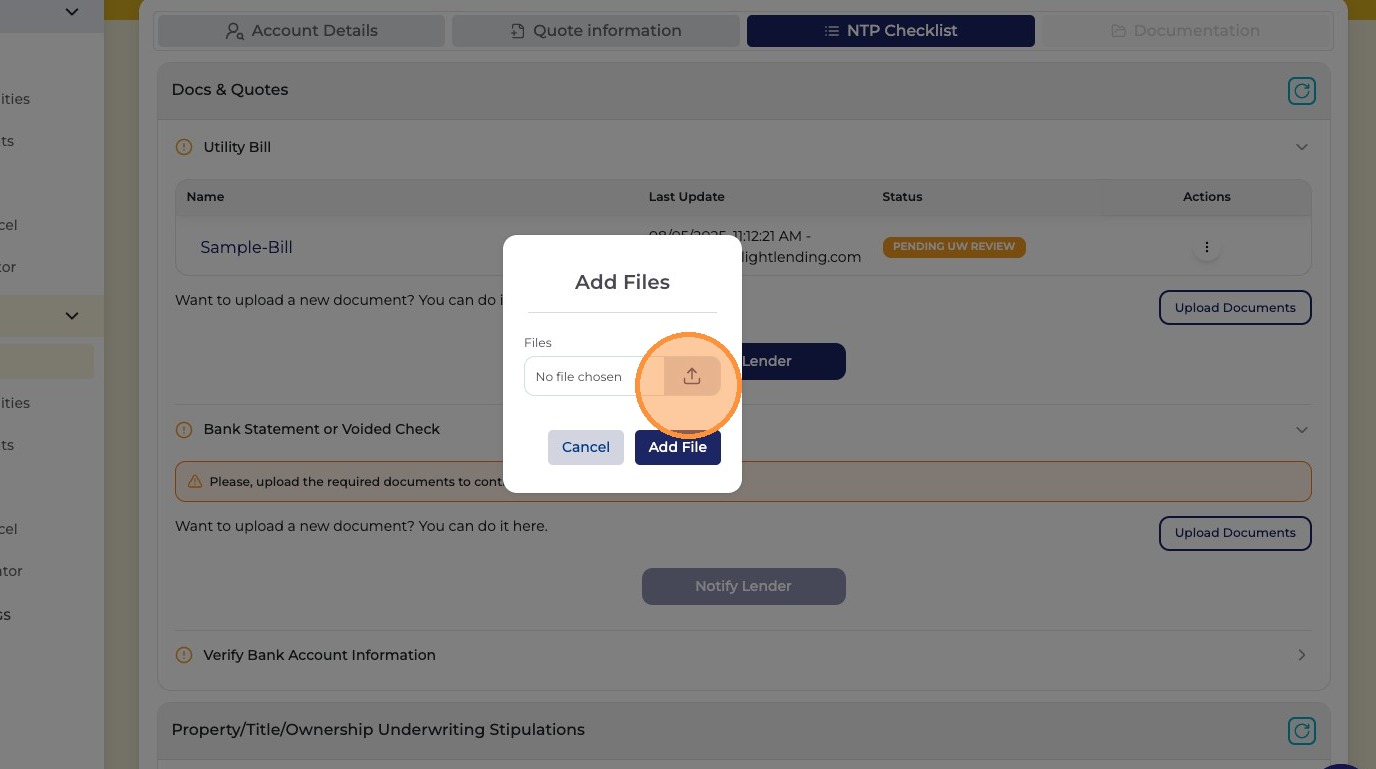
Click the upload icon to select your file
Click the icon to open your file browser and navigate to the bank statement or voided check file.
Upload icon
11
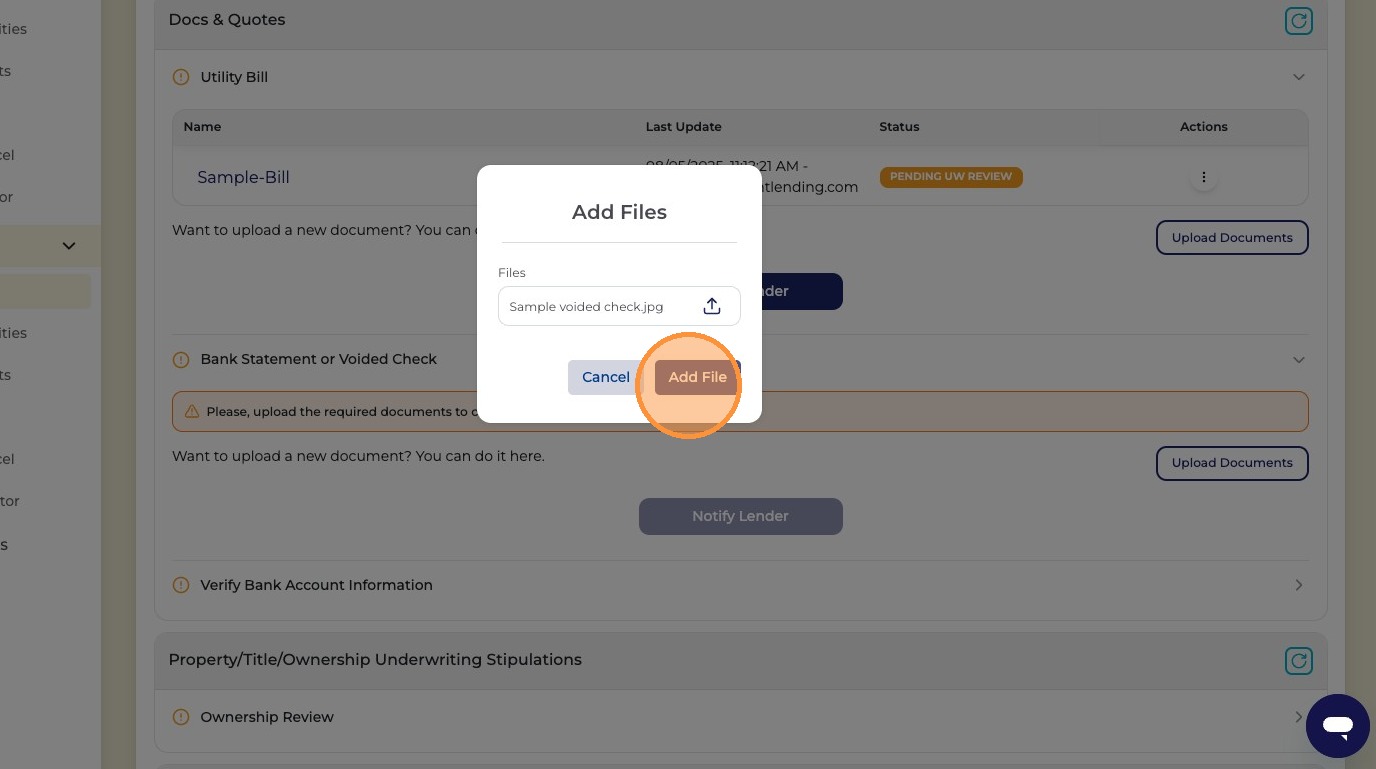
Choose the file and click "Add File"
Select the file and click Add File to attach it for upload.
Choose file and Add File
12
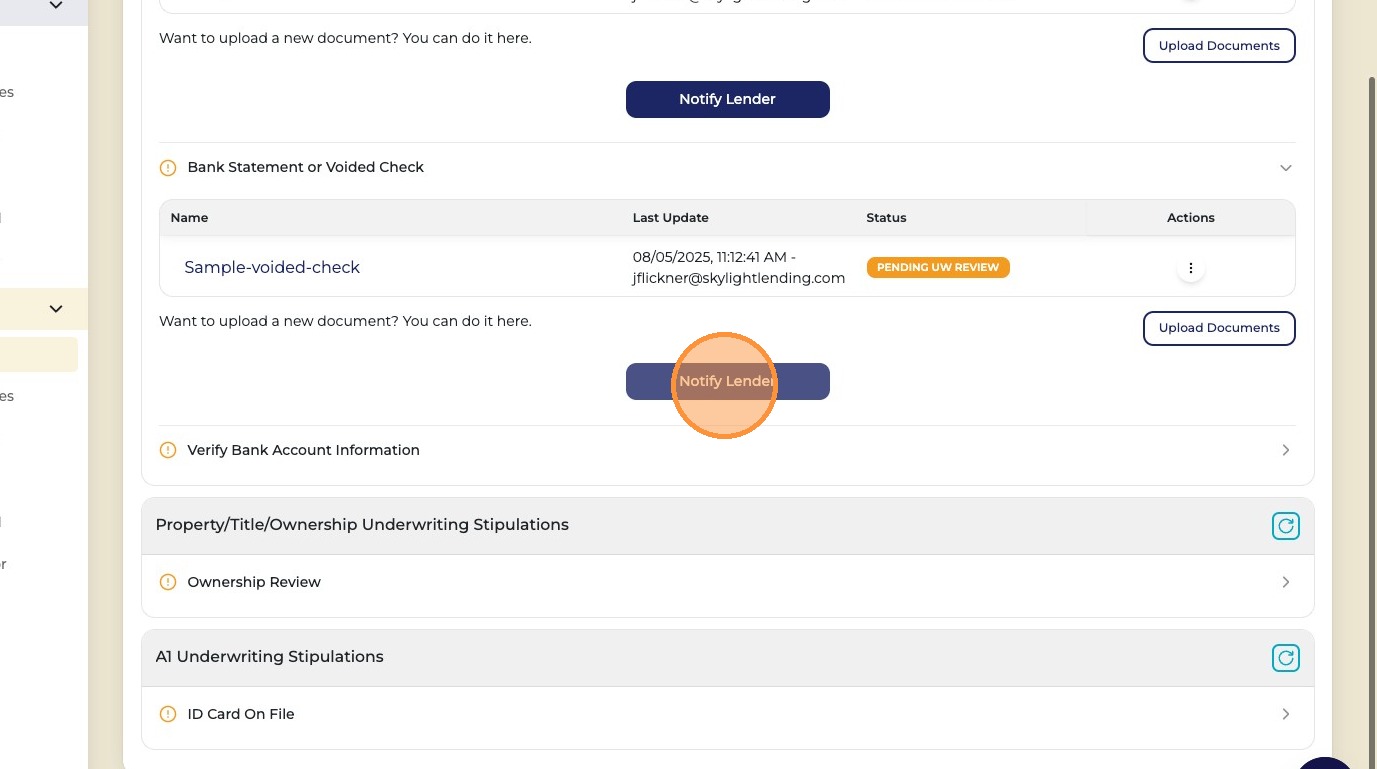
Click "Notify Lender"
Click Notify Lender after uploading the bank document. This alerts Skylight Underwriting that the file is ready for review.
Notify Lender
Don't forget

Click "Notify Lender" after every upload — without it the document won't be reviewed.

13 steps
14
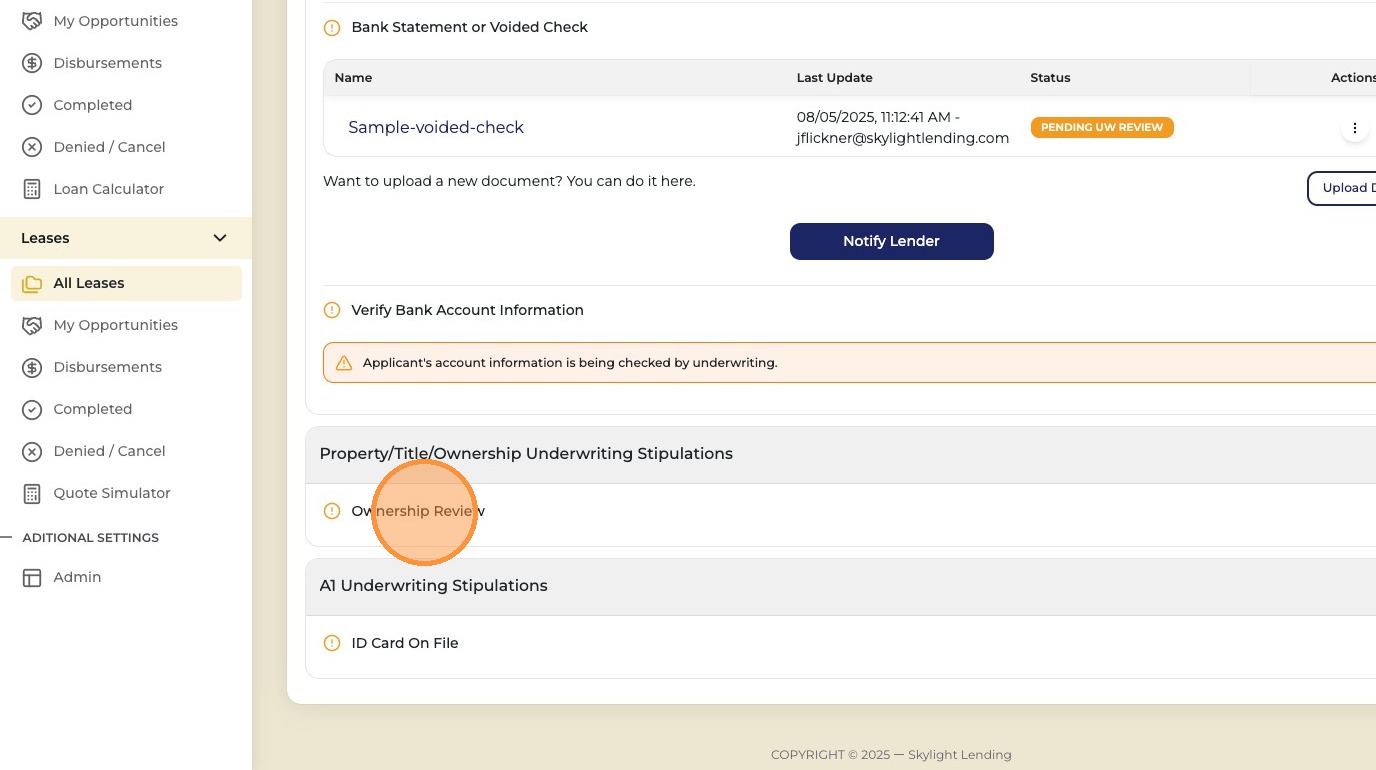
Click "Ownership Review"
Click the Ownership Review section to expand it. This is where you'll upload proof of property ownership if required.
Ownership Review section
15
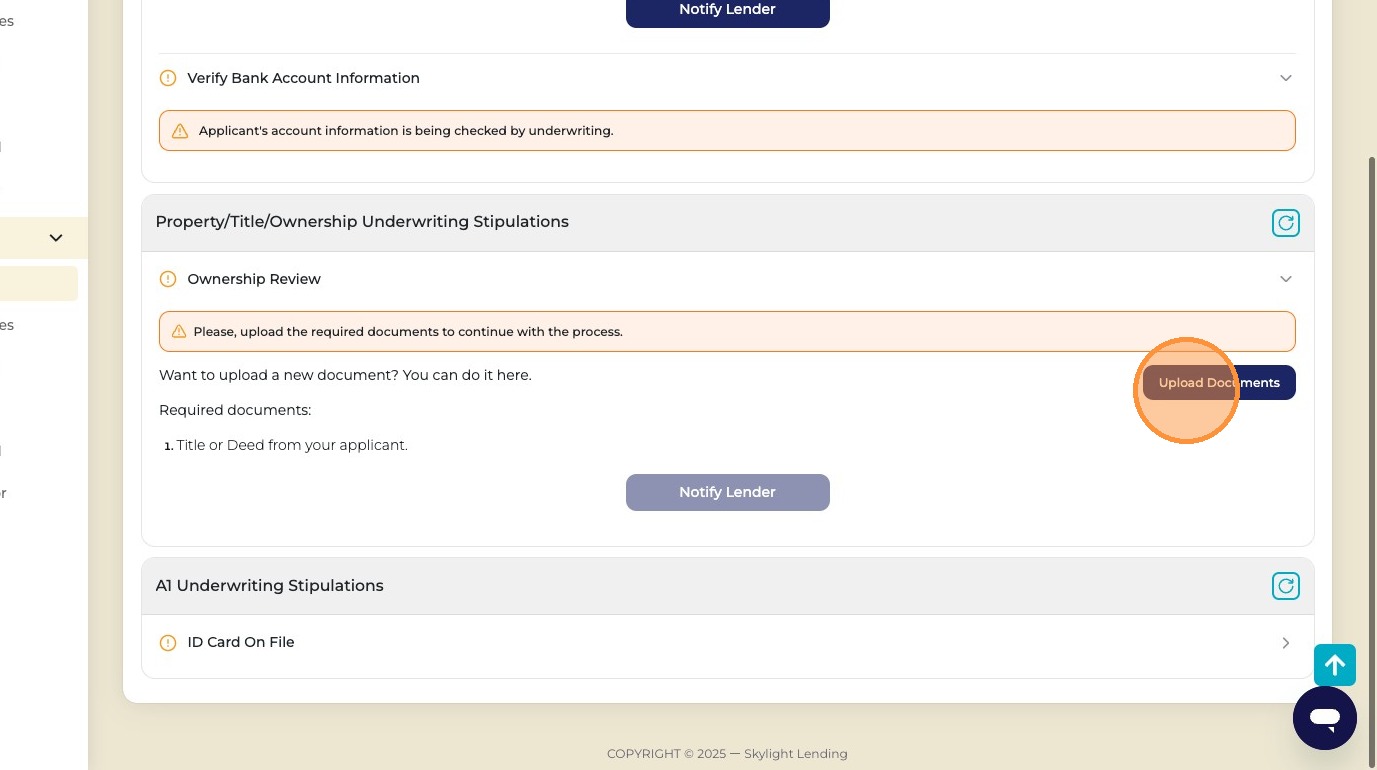
Upload a Title or Deed — only if the property owner differs from the applying customer
A title or deed upload is only required when the person on the property record is different from the customer who signed the lease application. If the applicant's name matches the property owner on file, this step may already be cleared.
Title or deed upload
When is a title/deed required?

A title or deed upload is required when the property owner on record does not match the customer applying for the lease. This is determined during the opportunity creation process when the system pulls the property owner's information. If the names match, title verification is typically already cleared. If they do not match — or if the property is held in a trust or the system flags it as required — you will need to upload a title or deed to proceed.

New construction & trust ownership

For new construction properties, additional documentation or photos may be required beyond a standard deed. For properties held in a trust, upload the trust document showing the applicant as the trustee or beneficiary with authority to sign. Contact Installer Support if you are unsure what to upload.

Steps 16 and 17 only apply if a title/deed upload is required

If the property owner already matches the applicant and this section is cleared, skip steps 16 and 17 and proceed to step 18.

16
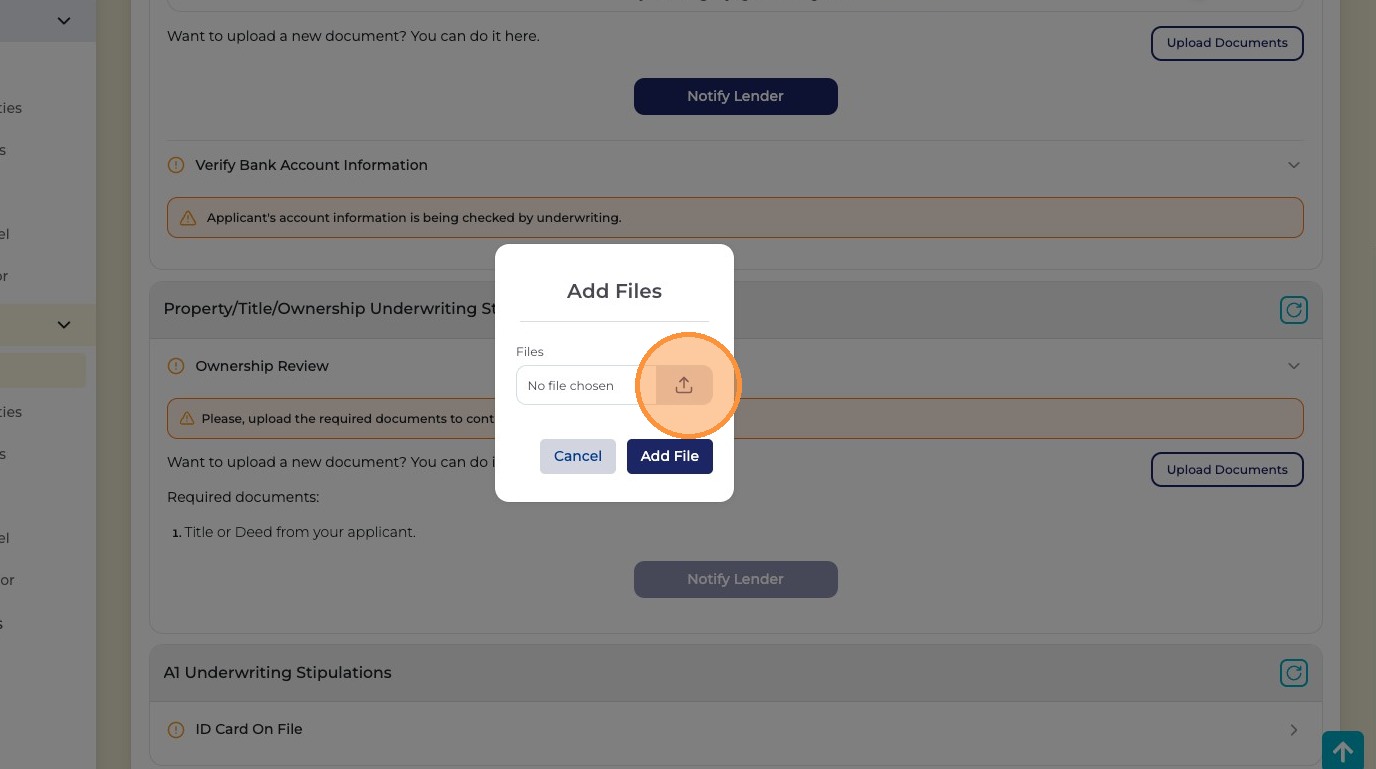
Click the upload icon to select the title/deed file
Click the icon to open your file browser and locate the Title or Deed document.
Upload icon for title
17
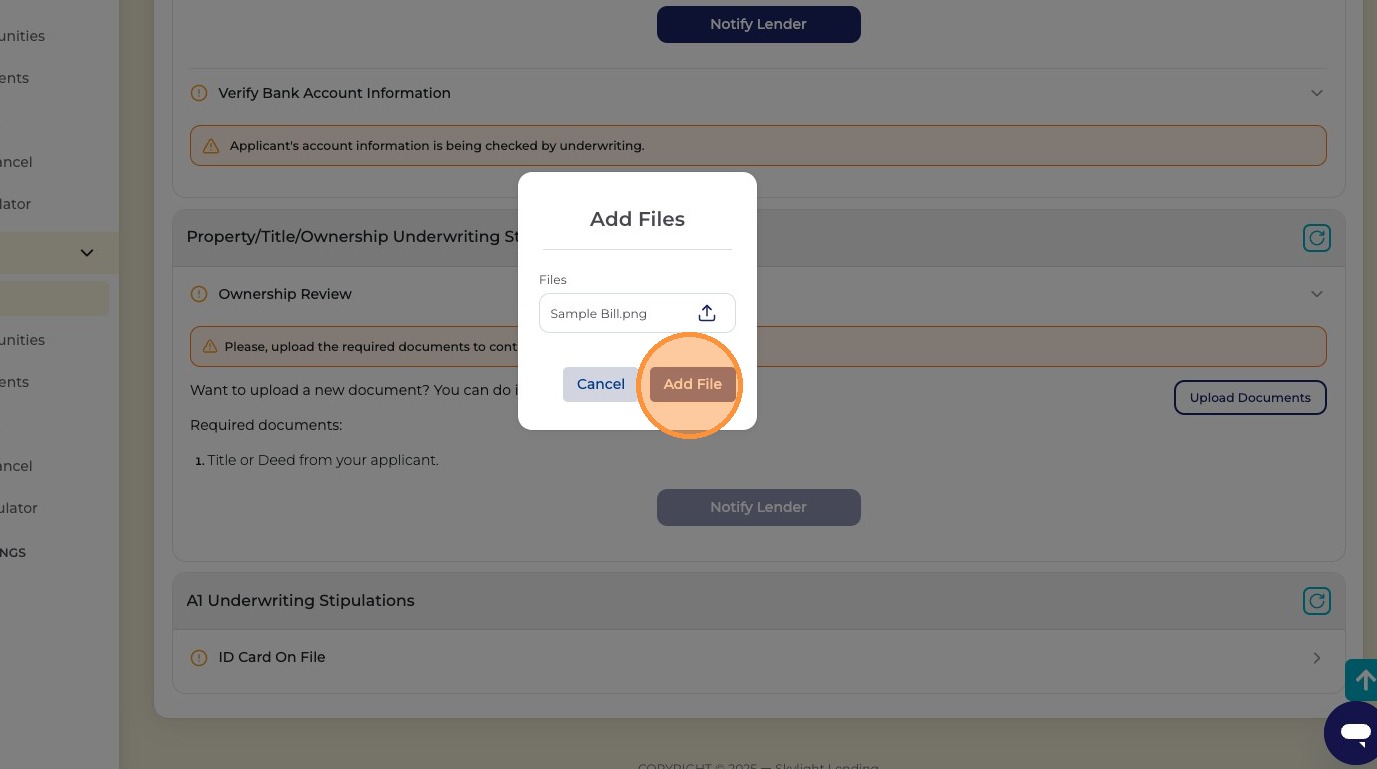
Choose the file and click "Add File"
Select the title or deed file from your device and click Add File to attach it for upload.
Add File for title
18
Upload the required Property / Structural Integrity photos
Every lease opportunity requires structural integrity photos. Please read the required documents listed carefully to ensure the correct photos are provided — submitting incorrect or incomplete photos is one of the most common causes of NTP delays.
Property / Structural Integrity review
Structural integrity — required photos
  • Clear photos of the roof/area where panels will be installed
  • Photos of all four sides of the home (front, back, left, right)
  • Include any existing solar or battery system visible on the property
  • For new construction: additional photos and documentation may be required
Add-on acknowledgement required for every lease

Every lease requires an add-on acknowledgement in the portal — this is not exclusive to add-on projects. If displayed, you must complete it before NTP can be issued. For add-on systems (adding panels to an existing solar installation), the acknowledgement also confirms: new engineering plans, separate commissioning, a new PTO, and installation photos showing a minimum 12-inch separation from the existing system. Add-on projects are not allowed if an existing battery is already present on the property.

Tree Shading & Shared Roof Notices

Depending on the property, installers may also be required to acknowledge a Tree Shading Notice (confirming tree branches over the roof are shown in the final design plans or will be trimmed) and/or a Shared Roof Notice (confirming the installation will remain on the applicant's portion of the roof). If either of these notices appears in the portal, click "Yes, I acknowledge" to confirm before submitting.

Add-on, tree shading and shared roof acknowledgements
19
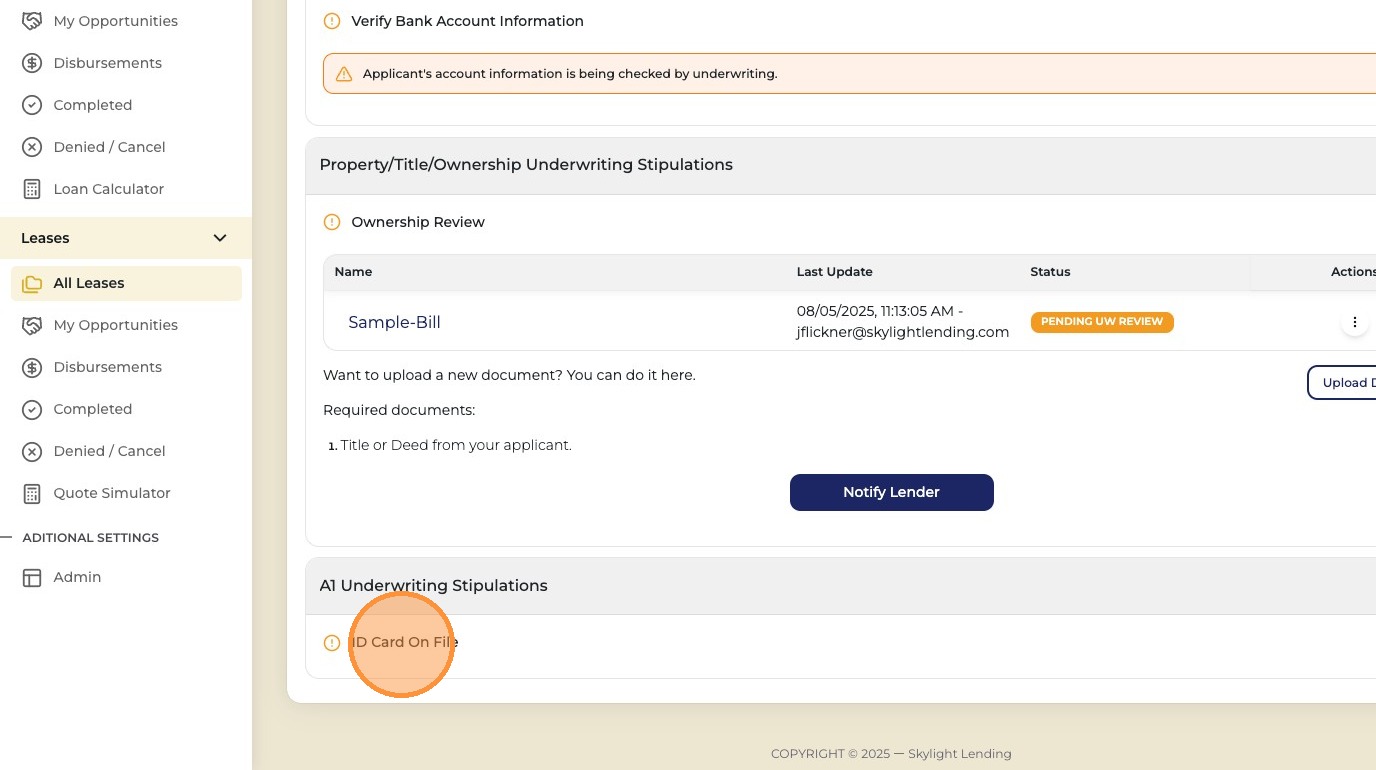
Scroll down and click "ID Card On File" to open the ID upload section
After completing the ownership section, scroll down on the same page to find "AI Underwriting Stipulations." Click "ID Card On File" to expand it. You'll need to upload both the front and back of the customer's government-issued ID.
ID Card On File section
20
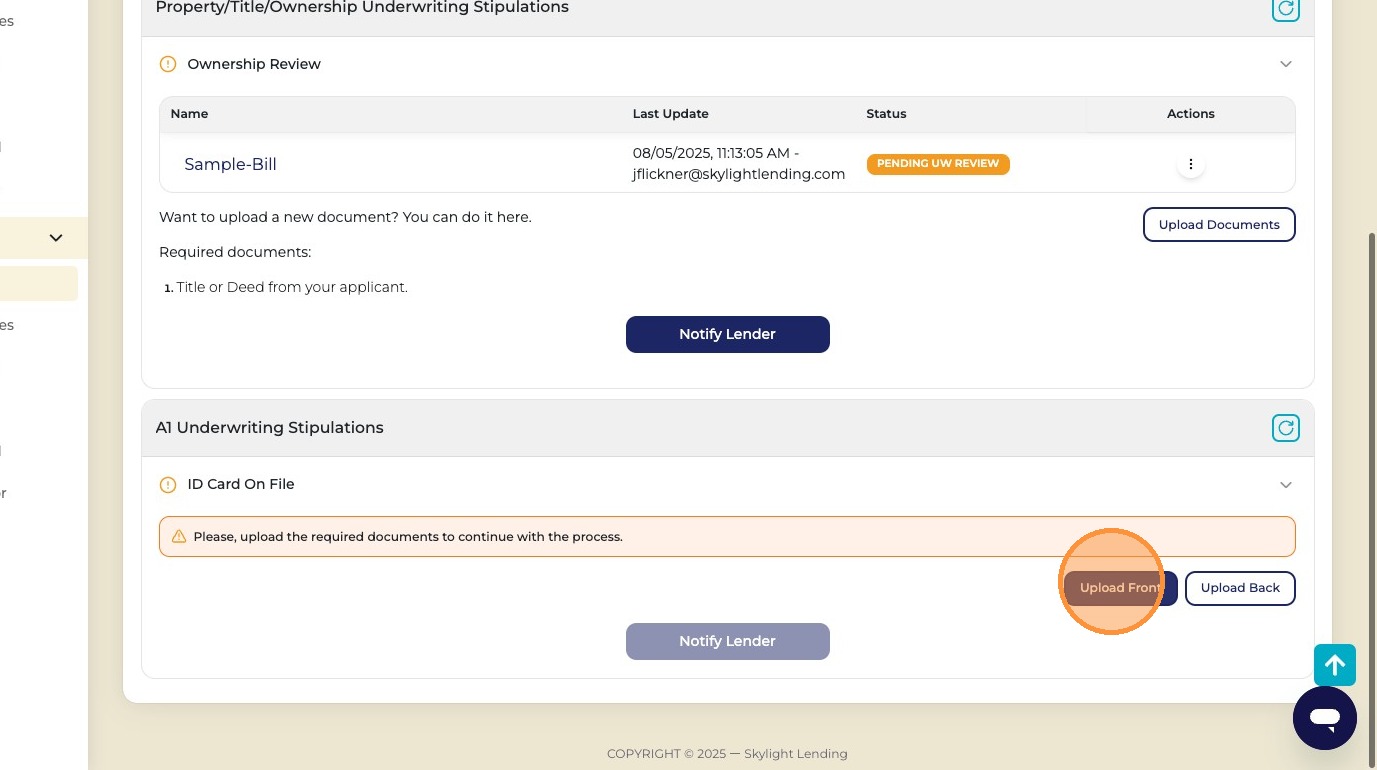
Click "Upload Front" to upload the front of the customer's ID
Inside the "ID Card On File" section, click "Upload Front" to begin uploading the front side of the customer's government-issued photo ID. You will see both an "Upload Front" and "Upload Back" button — start with the front.
Upload Front of ID
Accepted government-issued ID types
  • Driver's license
  • State-issued ID card
  • Passport (front page)
  • Must show name, photo, and expiration date
ID front example
21
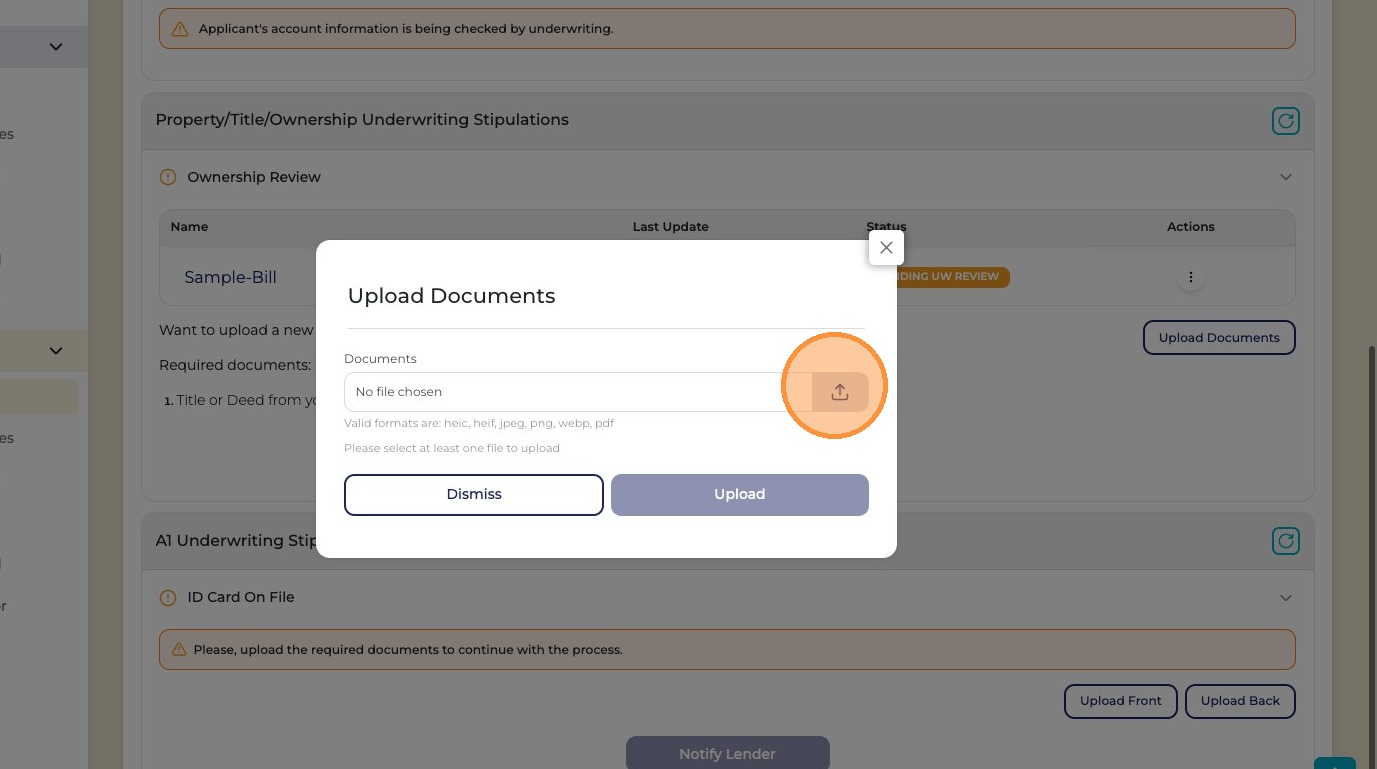
Click the upload icon to select the front ID file
A file upload dialog will appear. Click the upload icon to open your device's file browser and select the image of the front of the customer's ID.
Upload icon for ID front
22
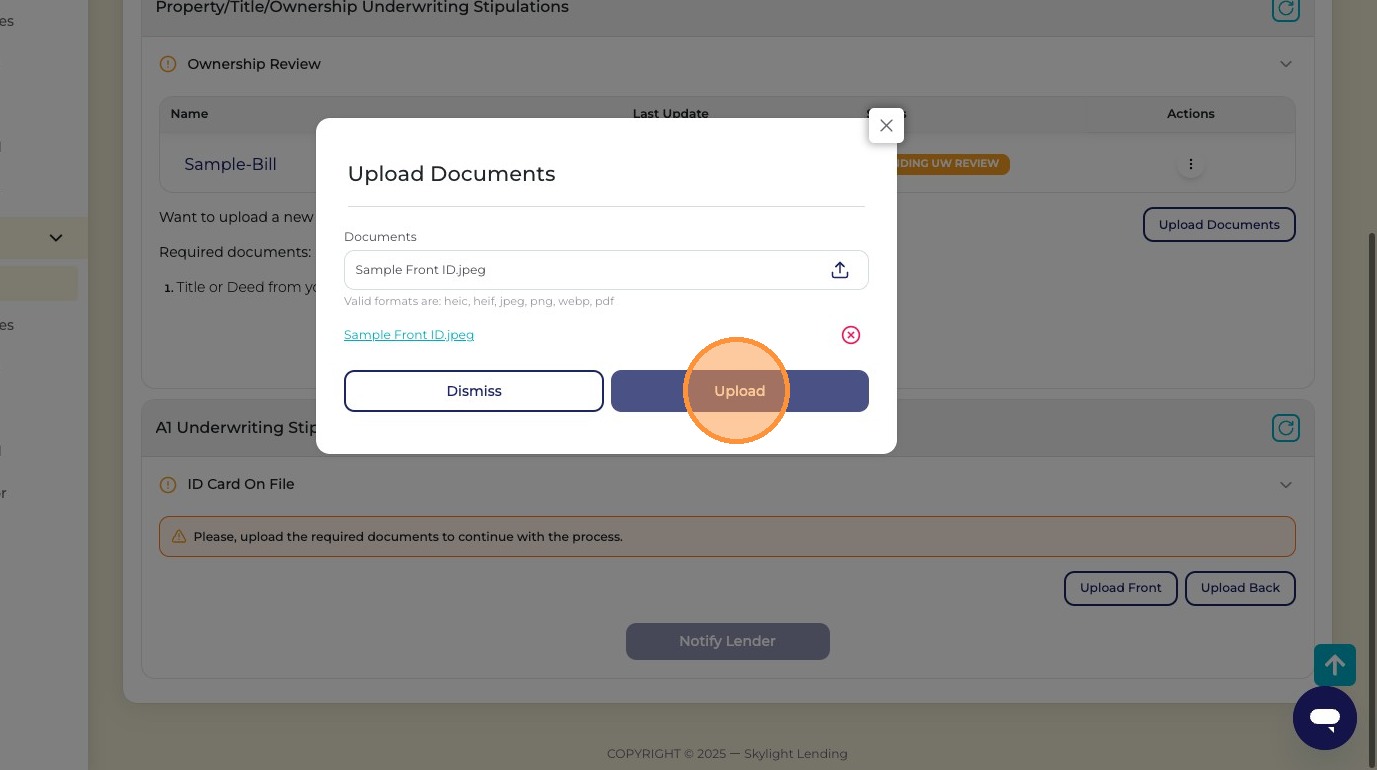
Choose the file and click "Upload"
Select the front ID image from your device and click Upload to attach it. The portal will confirm the upload before you move on to the back of the ID.
Upload front ID file
23
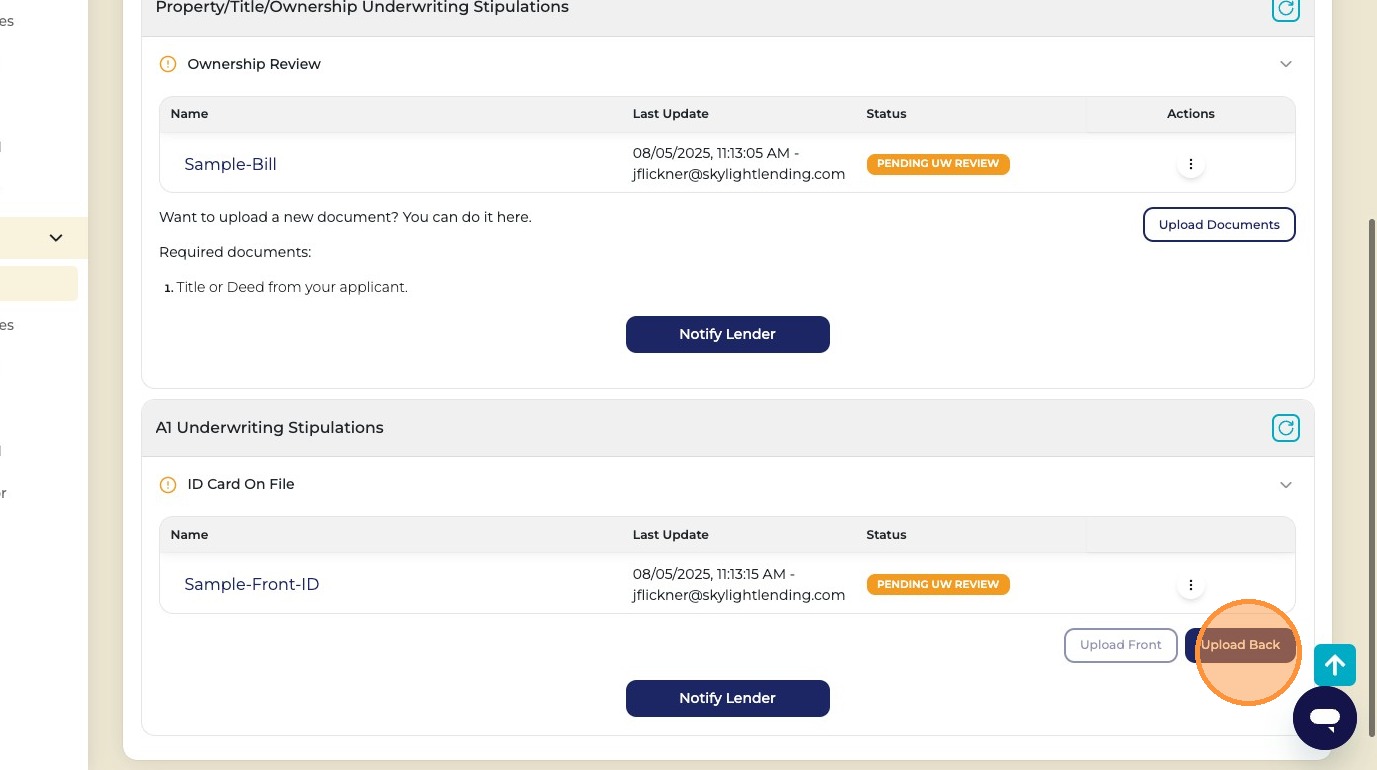
Click "Upload Back" to upload the back of the customer's ID
After uploading the front, click "Upload Back" to upload the back side of the ID. Both sides are required — the review cannot be completed with only one side.
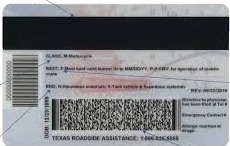
Upload Back of IDID back example
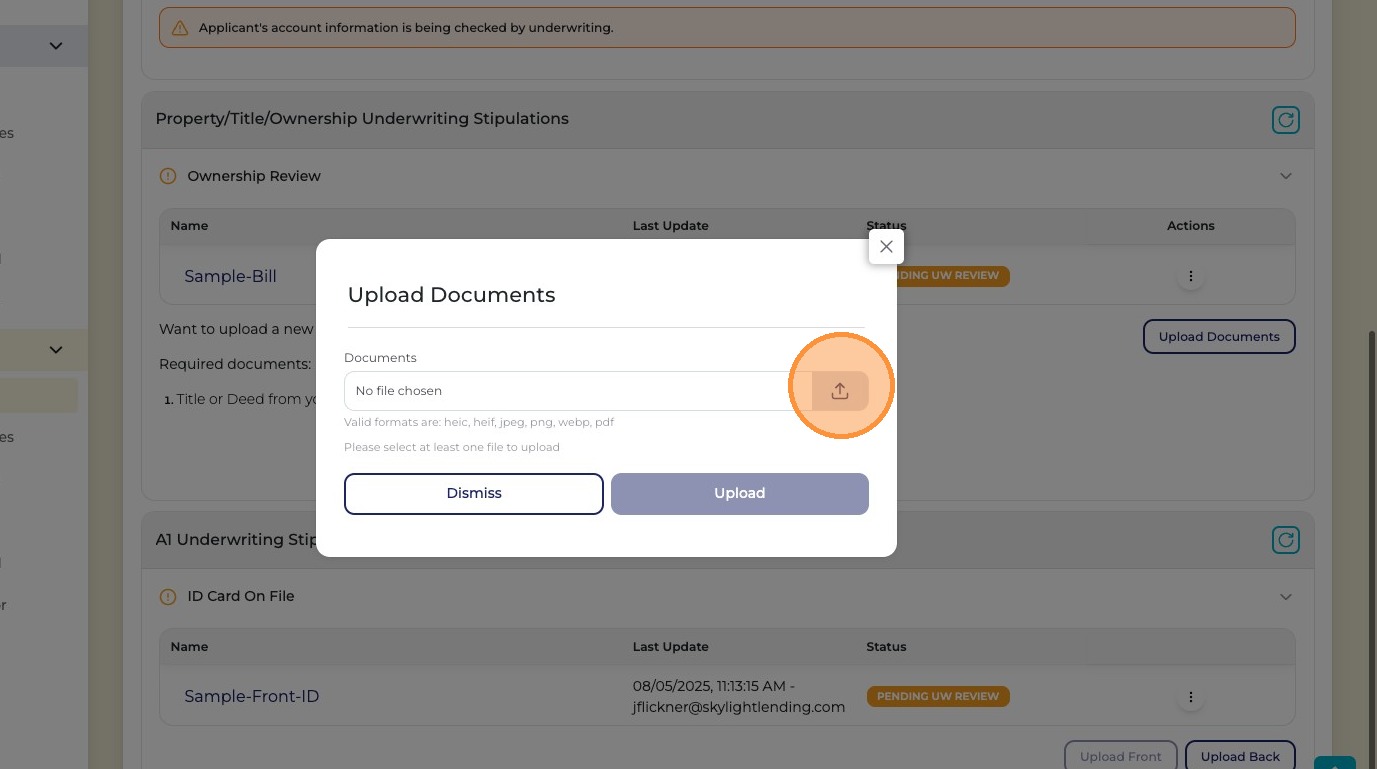
24
Click the upload icon to select the back ID file
A file upload dialog will appear. Click the upload icon to open your device's file browser and locate the image of the back of the customer's ID.
Upload icon for ID back
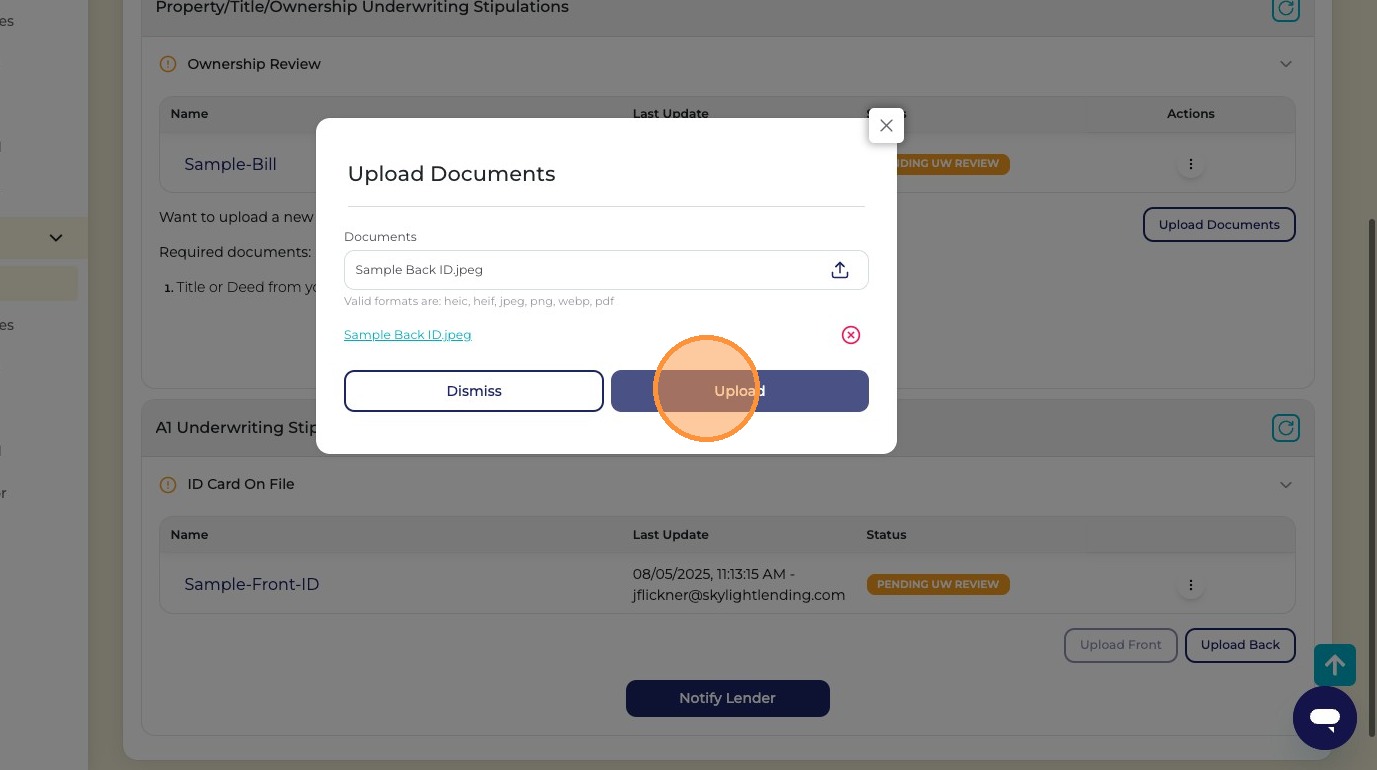
25
Choose the file and click "Upload"
Select the back ID image from your device and click Upload to attach it. Once both sides are uploaded, you are ready to notify the lender.
Upload back ID file
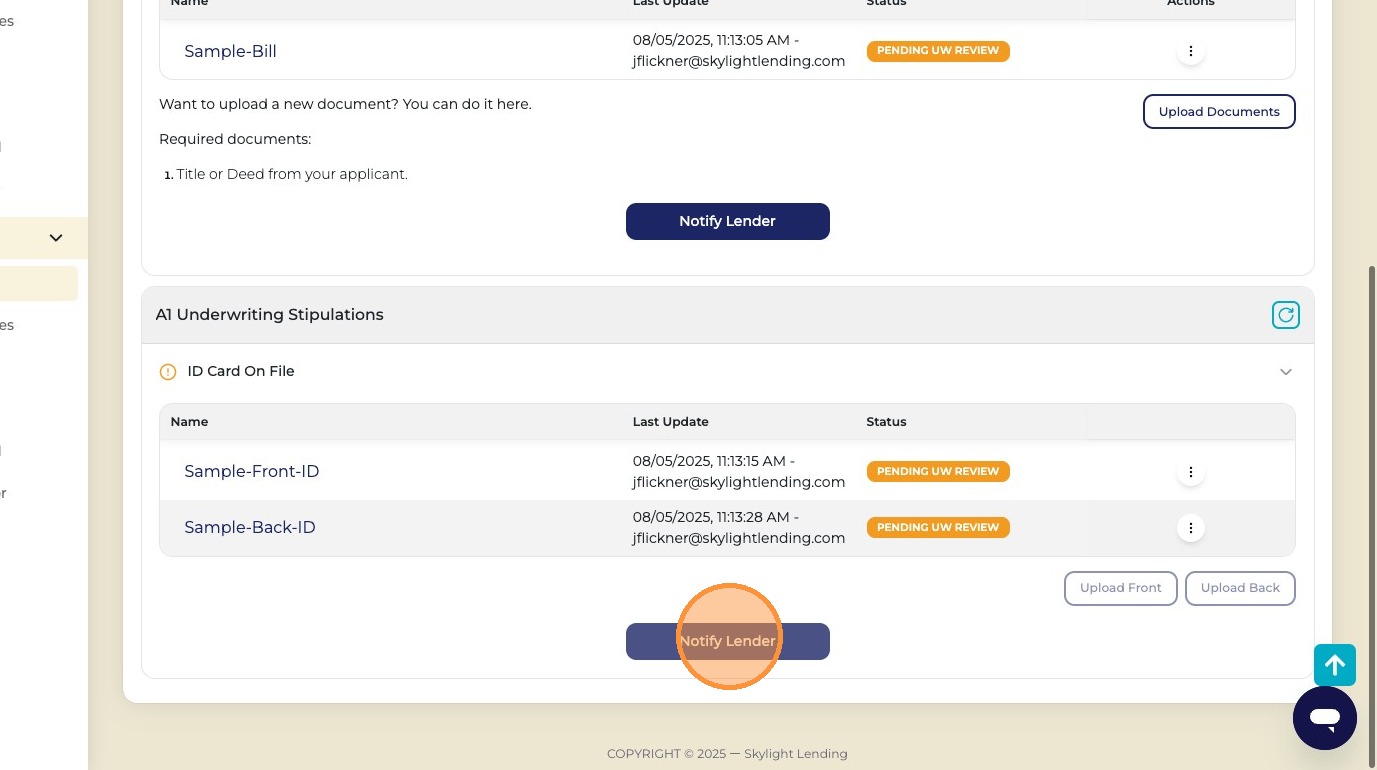
26
Click "Notify Lender"
After uploading both sides of the ID and all ownership documents, click "Notify Lender" to alert Skylight Underwriting that all documents are ready for review. This is required — without it, the documents will not be reviewed and your NTP will be delayed.
Notify Lender
Critical — do not skip

Click "Notify Lender" after uploading the ID documents. Without this step, Skylight will not review the documents and your NTP will be delayed.

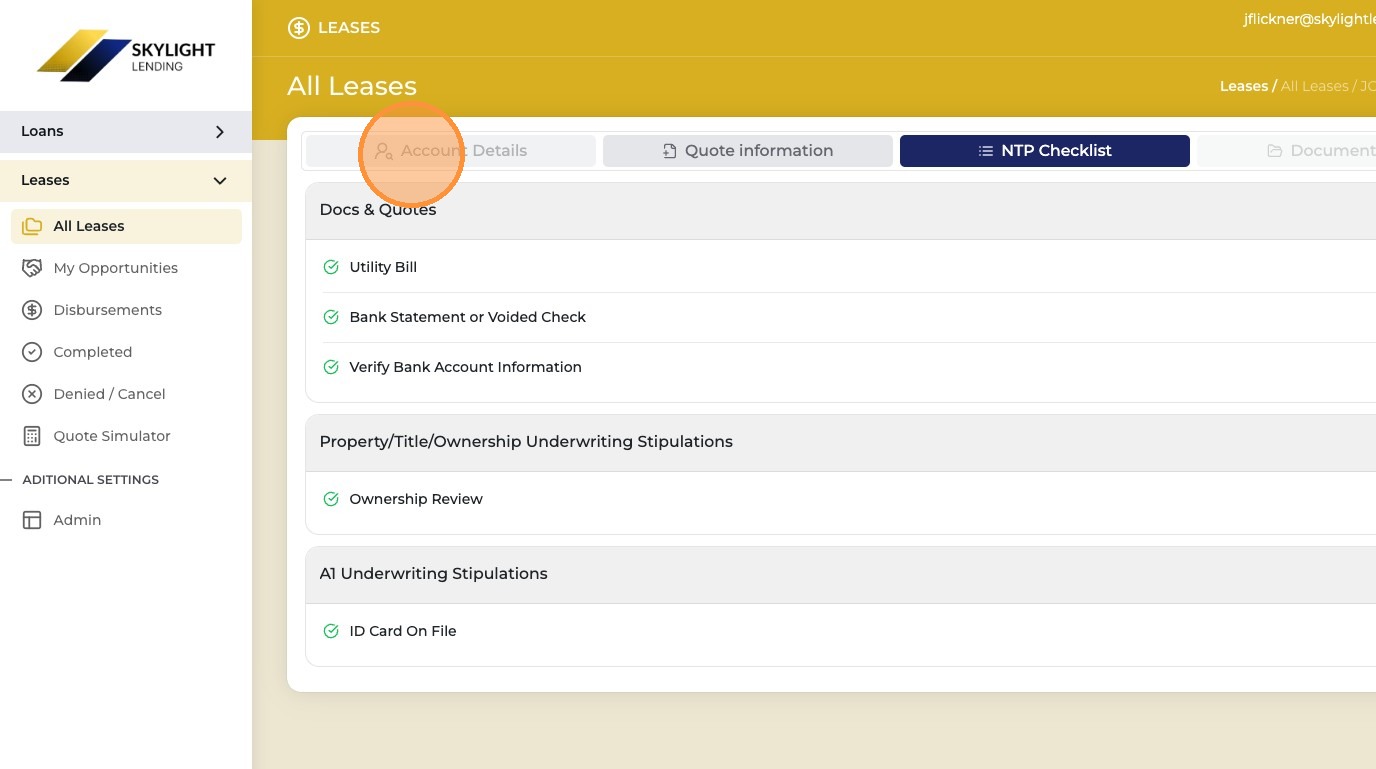
1 step
27
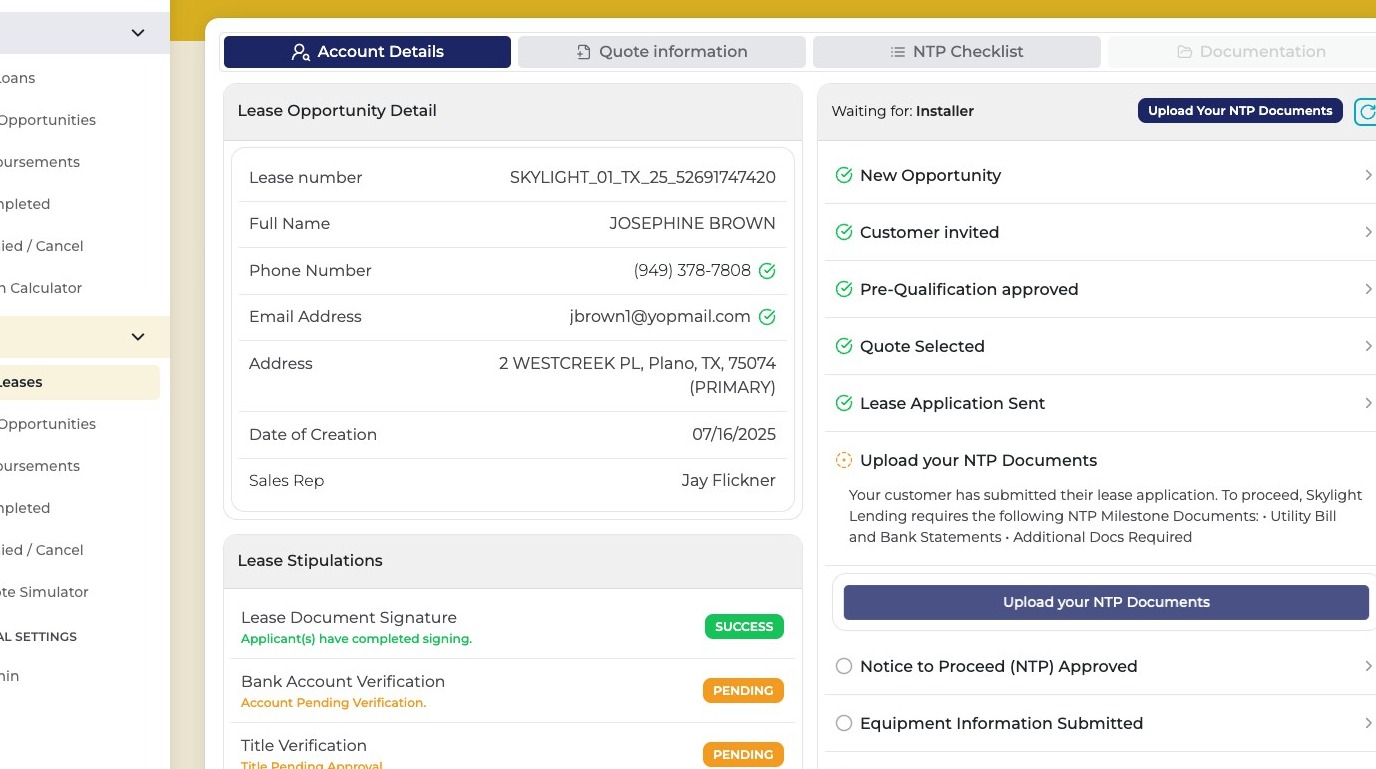
Click "Account Details" to review the opportunity status
Click Account Details to see the current status of your opportunity and confirm all documents have been received and are under review by Skylight Underwriting.
Account Details
How long does review take?

Underwriting processing time is typically 24 to 48 hours. As long as you clicked "Notify Lender" after each upload, the Skylight underwriting team will get to your documents as quickly as possible. Check back in Account Details for status updates.
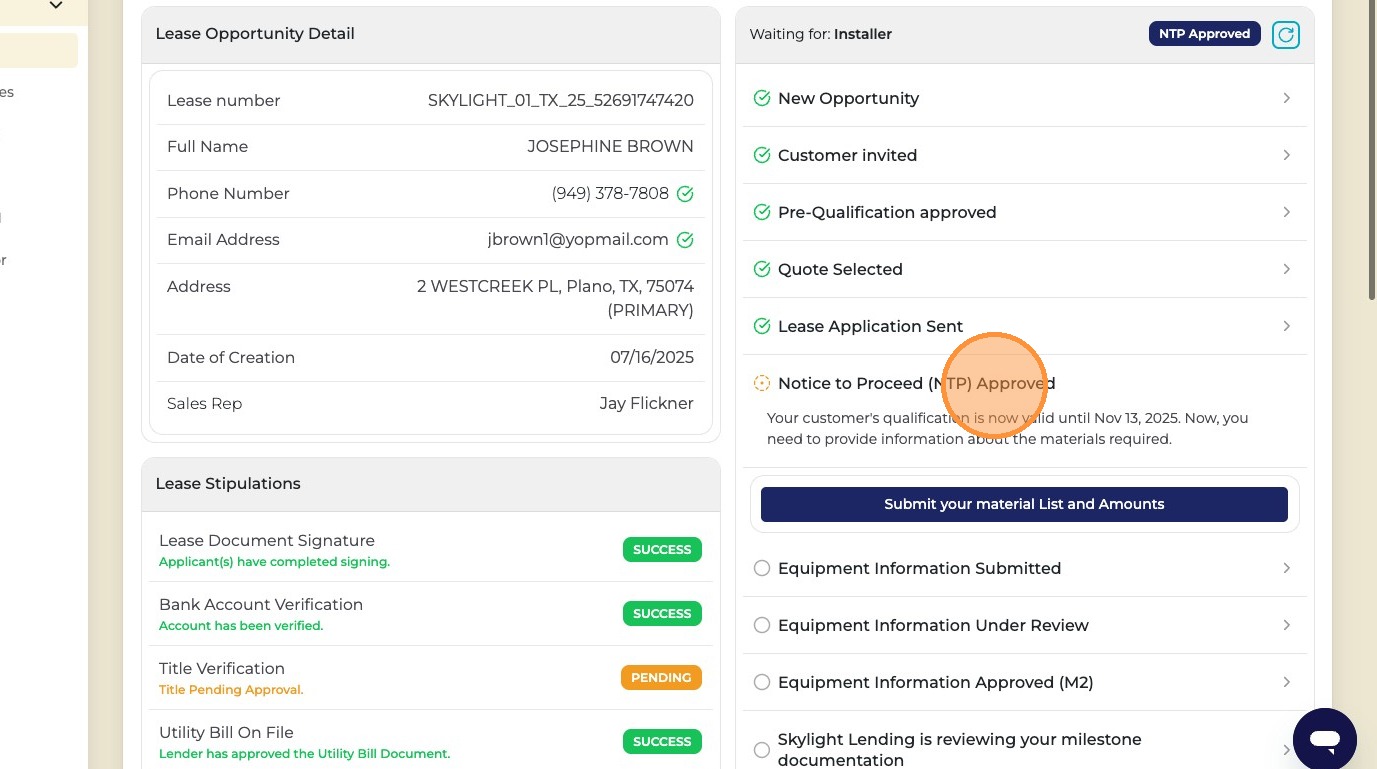
Once all documents are approved, you'll see "Notice to Proceed (NTP) Approved"
When Skylight Underwriting has reviewed and approved all uploaded documents, the opportunity will display "Notice to Proceed (NTP) Approved." You are now cleared to begin the installation!
NTP Approved
NTP Approved — you're cleared to install!
Once you see "Notice to Proceed (NTP) Approved" in the portal, Skylight Lending has reviewed all documents and given the green light. You can now begin the solar installation. Keep a copy of the NTP approval for your records.