Resubmitting Rejected NTP Documents — Skylight Installer Guide
Step-by-step guide

Resubmitting rejected
NTP documents

If one or more of your NTP documents was rejected by Skylight Underwriting, follow this guide to correctly replace and resubmit the document so your NTP approval isn't delayed further.
3
Sections
11
Steps
~5
Minutes
How this process works
Find the "Failed" document Read the rejection reason Replace document Notify Lender NTP Approved
Never use "Upload Documents" to replace a rejected document
When a document has been rejected, you must use the "Replace Document" option from the menu — NOT the "Upload Documents" button. Using "Upload Documents" will not replace the rejected file and will cause further delays. Always use "Replace Document" during a rejection resubmission.
5 steps
1
Navigate to the lease opportunity in the Skylight portal
Log into the Skylight Lending installer portal and open the lease opportunity for the customer whose documents were rejected.
Lease opportunity
2
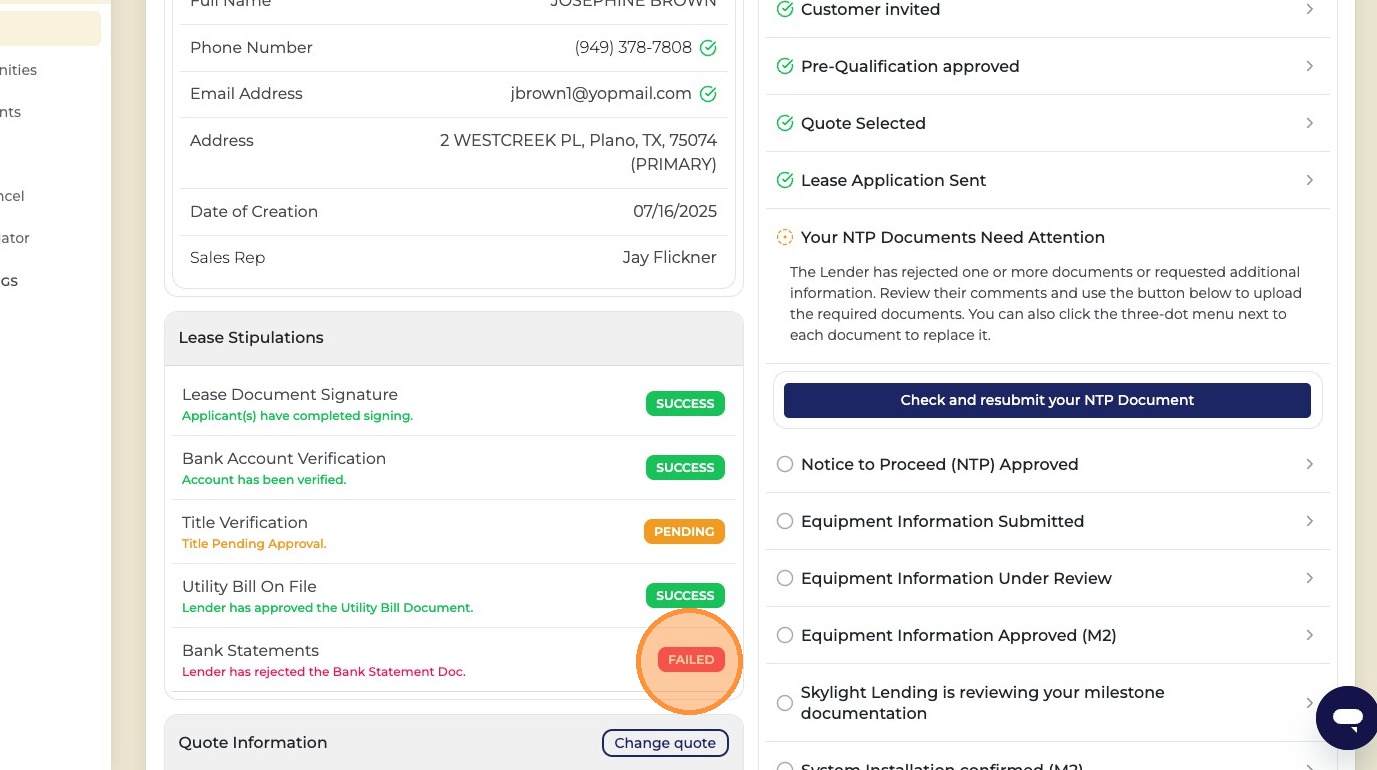
Look for any item that says "Failed" — that document needs to be resubmitted
In the NTP checklist, any document that was reviewed and rejected by Skylight Underwriting will be marked "Failed." You'll need to replace and resubmit a corrected version of each failed document before NTP can be approved.
Failed document status
Multiple failures?

If more than one document shows "Failed," repeat the resubmission steps in this guide for each one. Every failed document must be replaced before NTP can be approved.
3
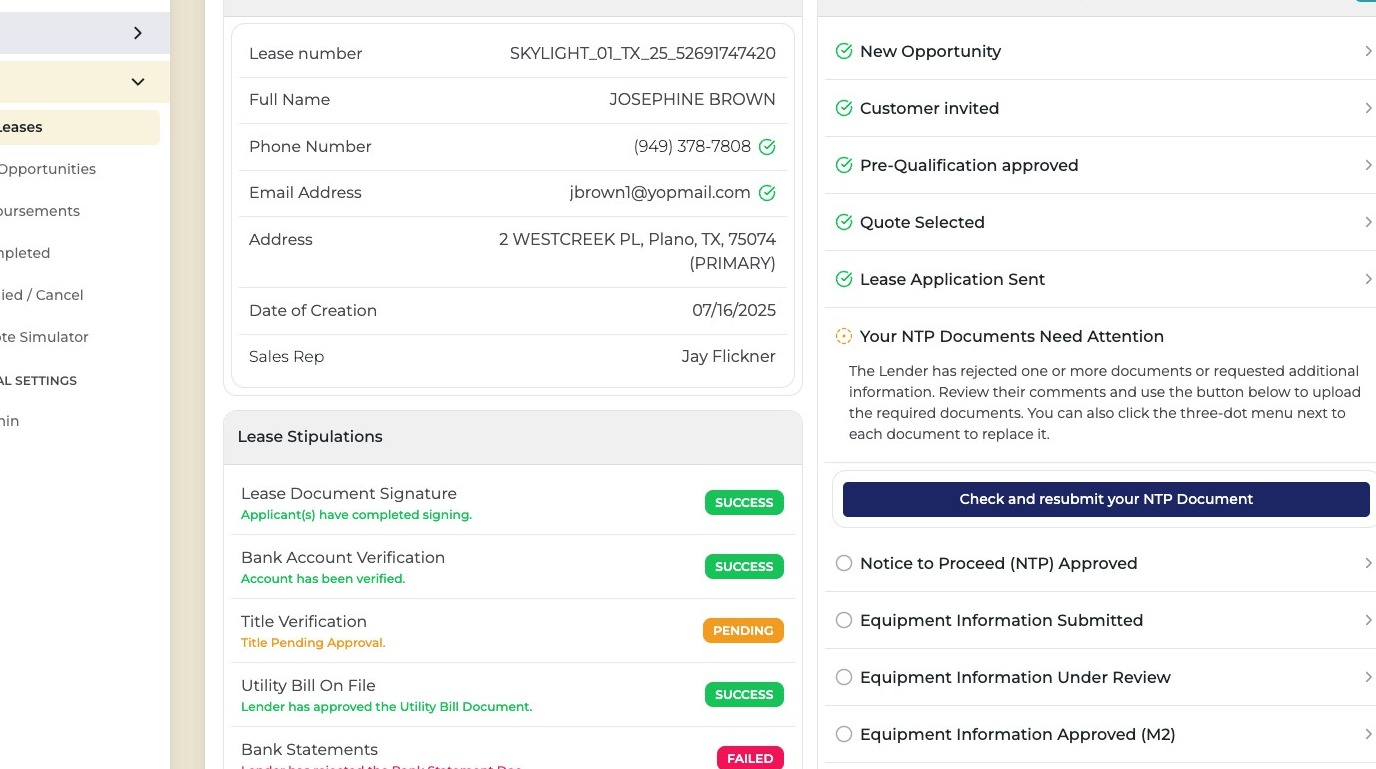
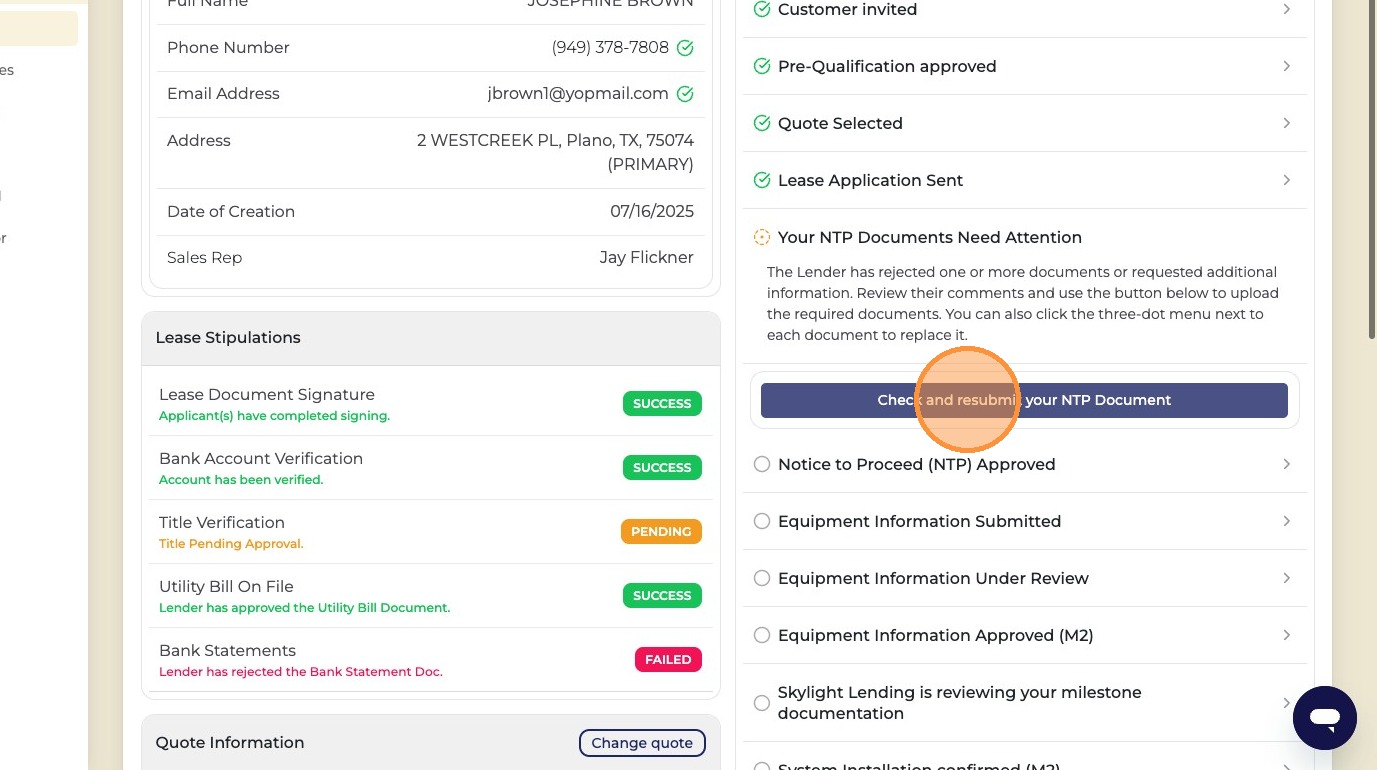
Click "Check and resubmit your NTP Document"
Click this button to open the resubmission workflow for the rejected document. This takes you into the document review area where you'll find the rejection reason and replacement options.
Check and resubmit button
4
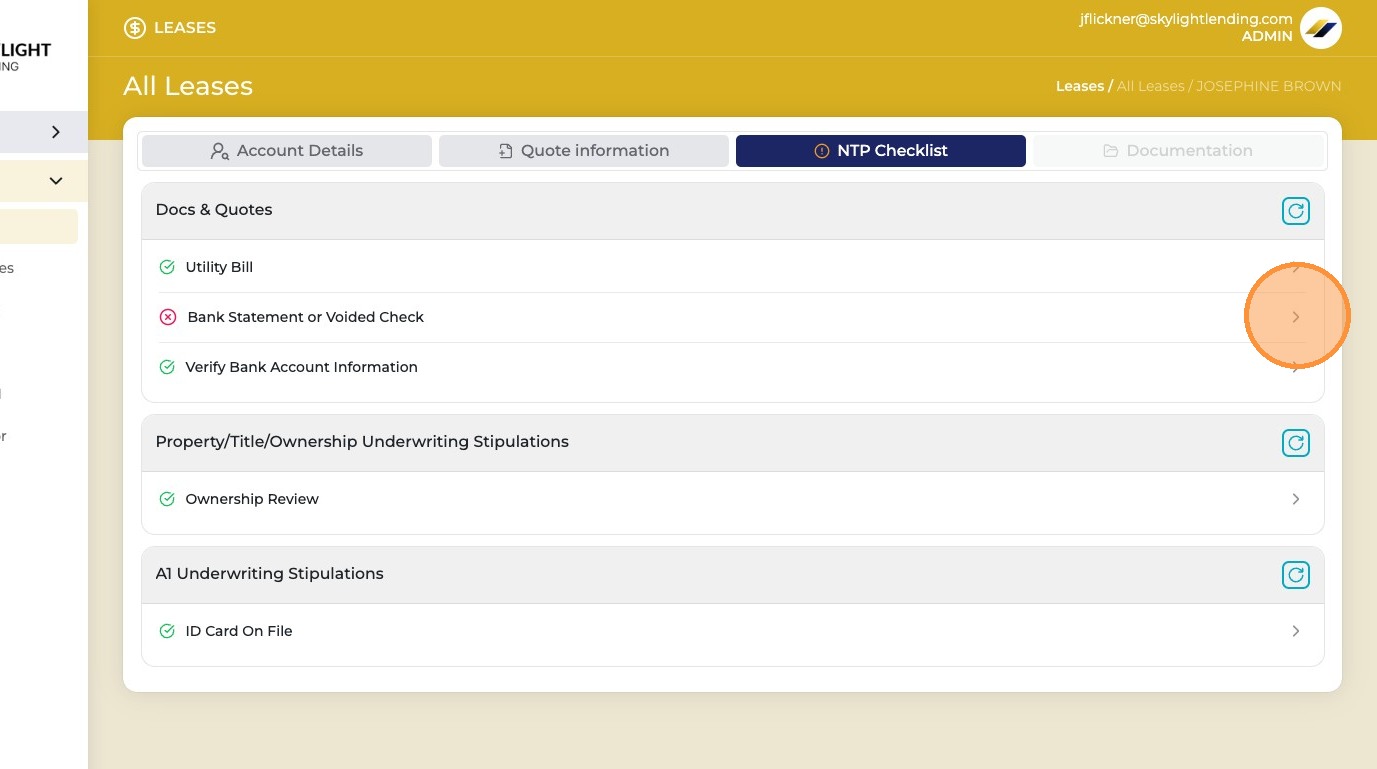
Click to expand the failed document section
Click into the failed document to expand it and see more details, including the rejection reason provided by Skylight Underwriting.
Expand failed document
5
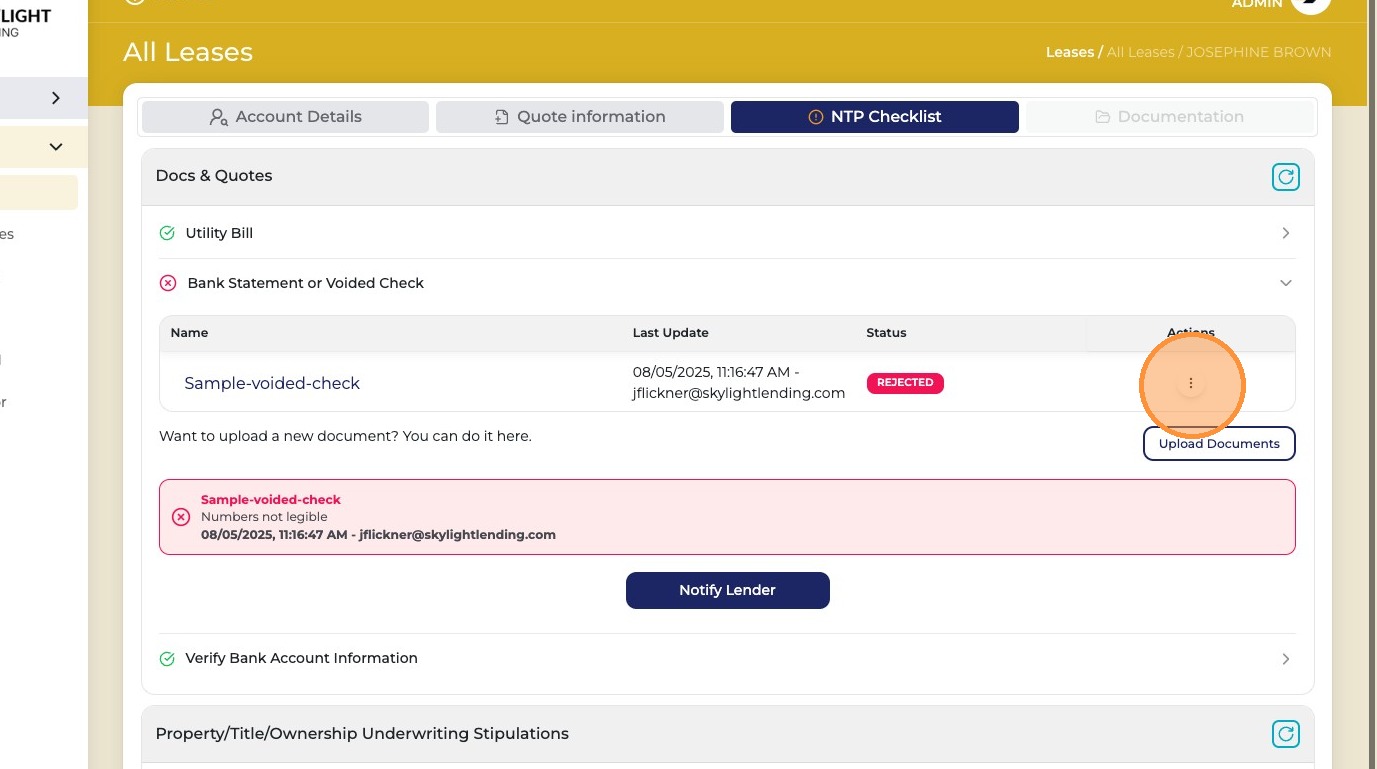
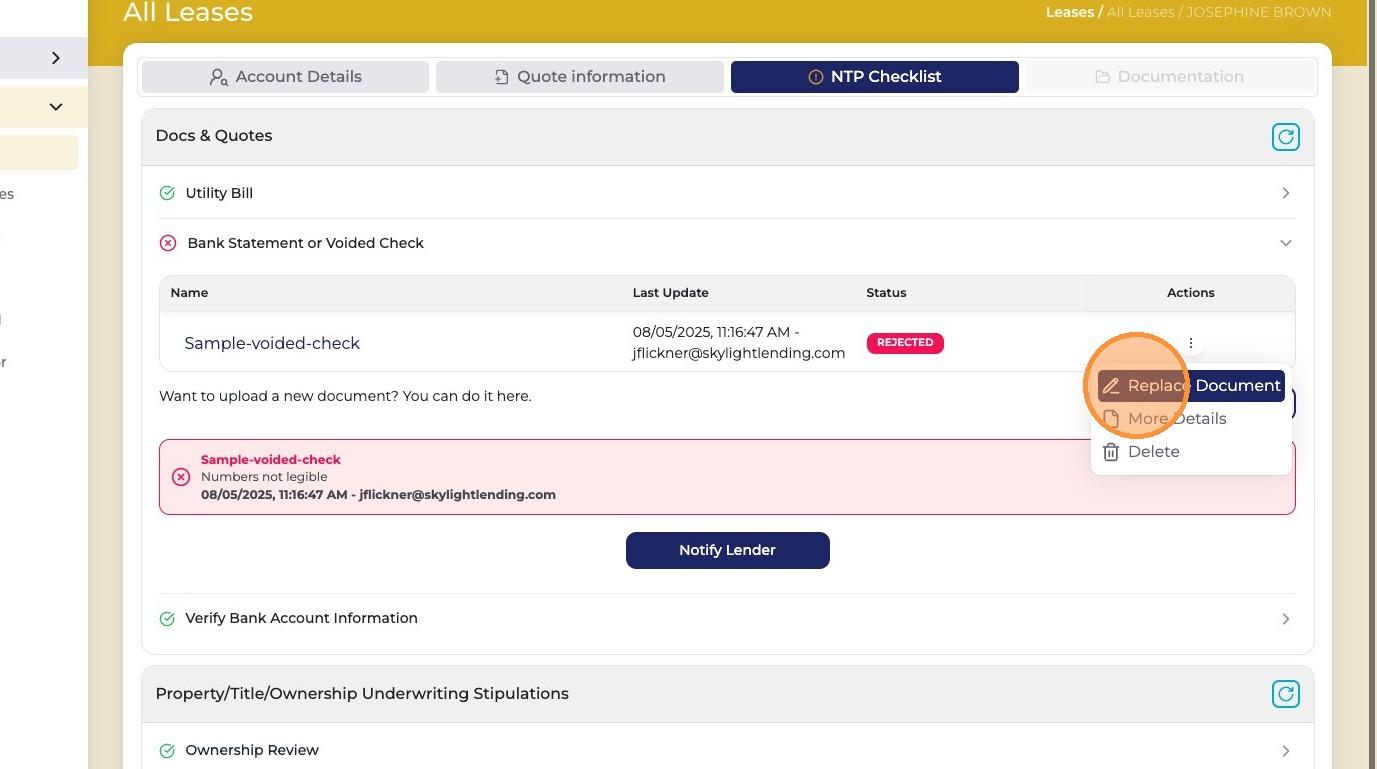
Read the rejection reason in the red box, then click the menu button on the right to replace the document
A red box will display the specific reason why the document was rejected — for example, a missing account number, illegible image, or wrong document type. Read this carefully before uploading a replacement so you can fix the exact issue. Then click the menu button (three dots or kebab menu) on the right side to access replacement options.
Rejection reason red box and menu button
Read the rejection reason first

Before uploading a new document, read the rejection reason carefully. Simply re-uploading the same file will result in another rejection. Fix the specific issue noted in the red box before resubmitting.

Use the menu button — not "Upload Documents"

Do NOT click "Upload Documents" to replace a rejected file. Always use the menu button on the right to access "Replace Document." Using the wrong method will not properly replace the rejected file.
4 steps
6
Click "Replace Document"
From the menu that appears, click "Replace Document." This is the correct and only way to replace a rejected NTP document. It will prompt you to upload the corrected file in place of the rejected one.
Replace Document option
7
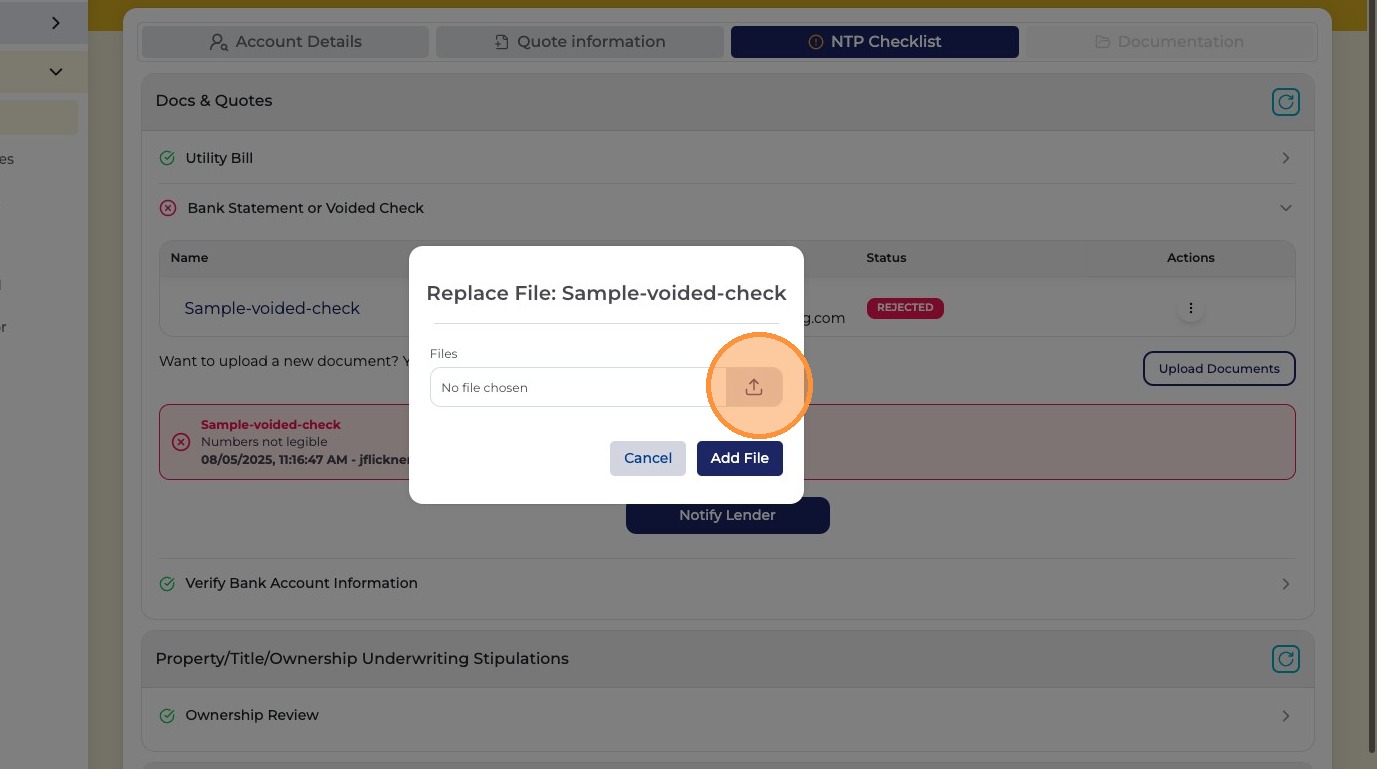
Click the upload icon to select your corrected file
Click the upload icon to open your device's file browser. Navigate to the corrected document you prepared to replace the rejected one.
Upload icon
8
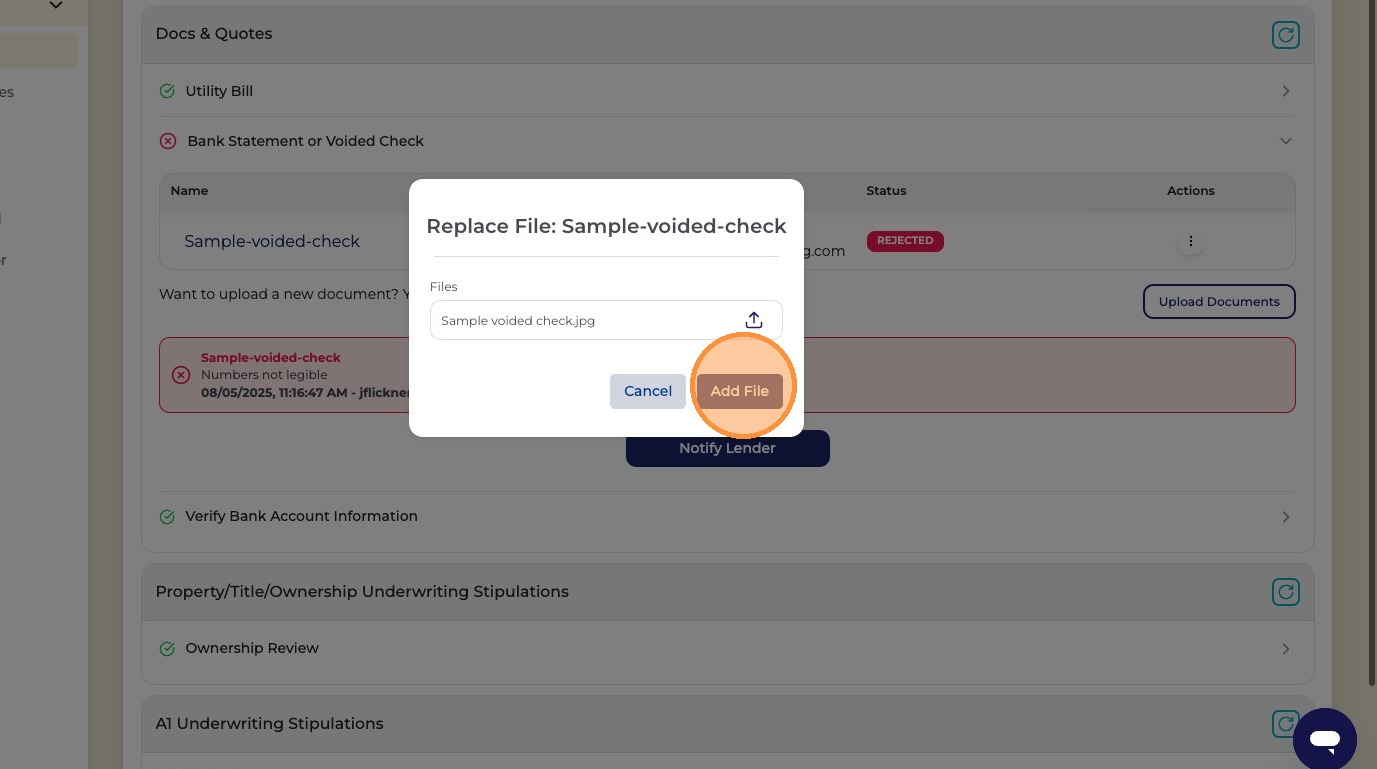
Choose the corrected file and click "Add File"
Select the corrected replacement document from your device — make sure this version addresses the rejection reason noted in the red box. Then click "Add File" to attach it.
Choose file and Add File
Double-check before uploading

Before clicking Add File, confirm the replacement document actually fixes the problem noted in the rejection. Re-uploading the same flawed document will cause another rejection and further delay your NTP.
9
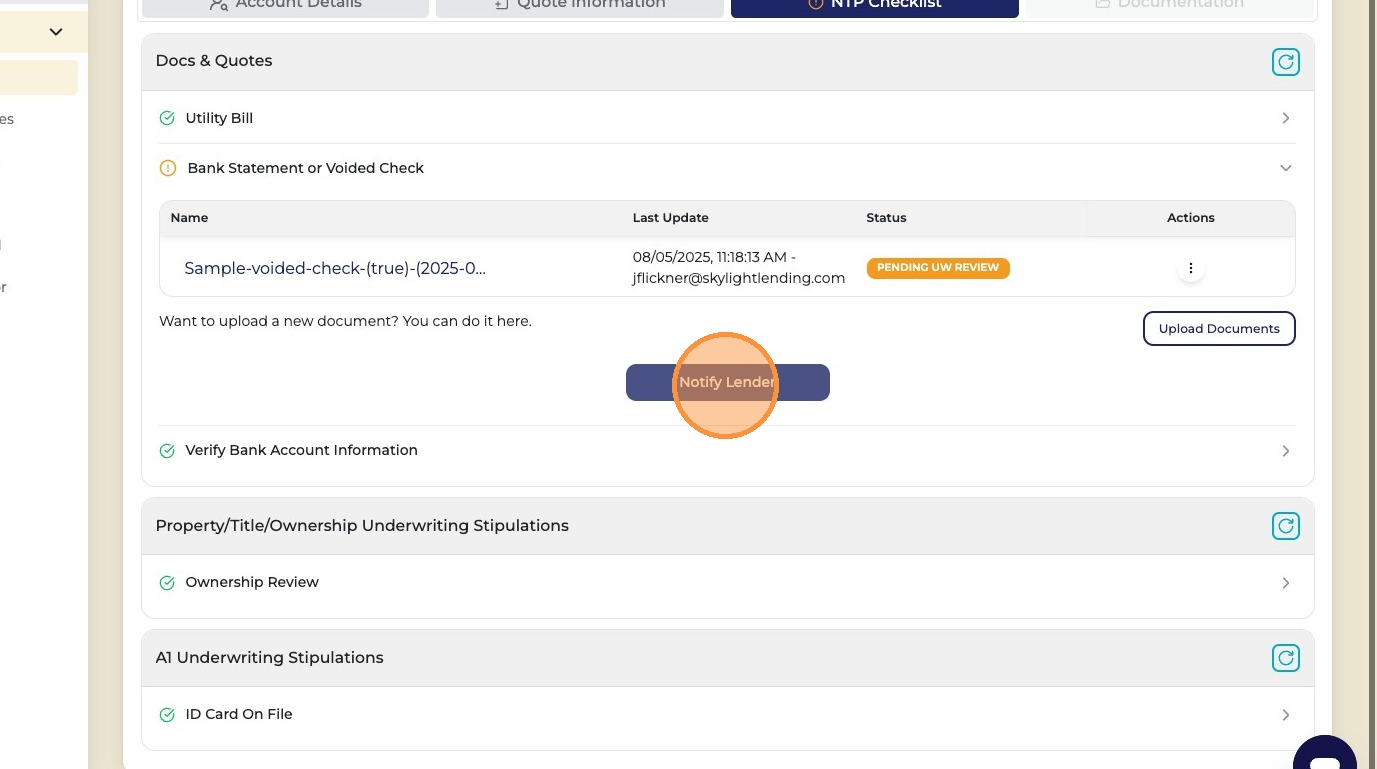
Click "Notify Lender"
After uploading the replacement document, you MUST click "Notify Lender." This alerts Skylight Underwriting that a new document is ready for review. Without this step, the replacement will not be reviewed and your NTP will remain on hold.
Notify Lender button
Critical — do not skip

Always click "Notify Lender" after replacing a document. Without this notification, Skylight Underwriting will not know the replacement is ready and will not review it.
2 steps
10
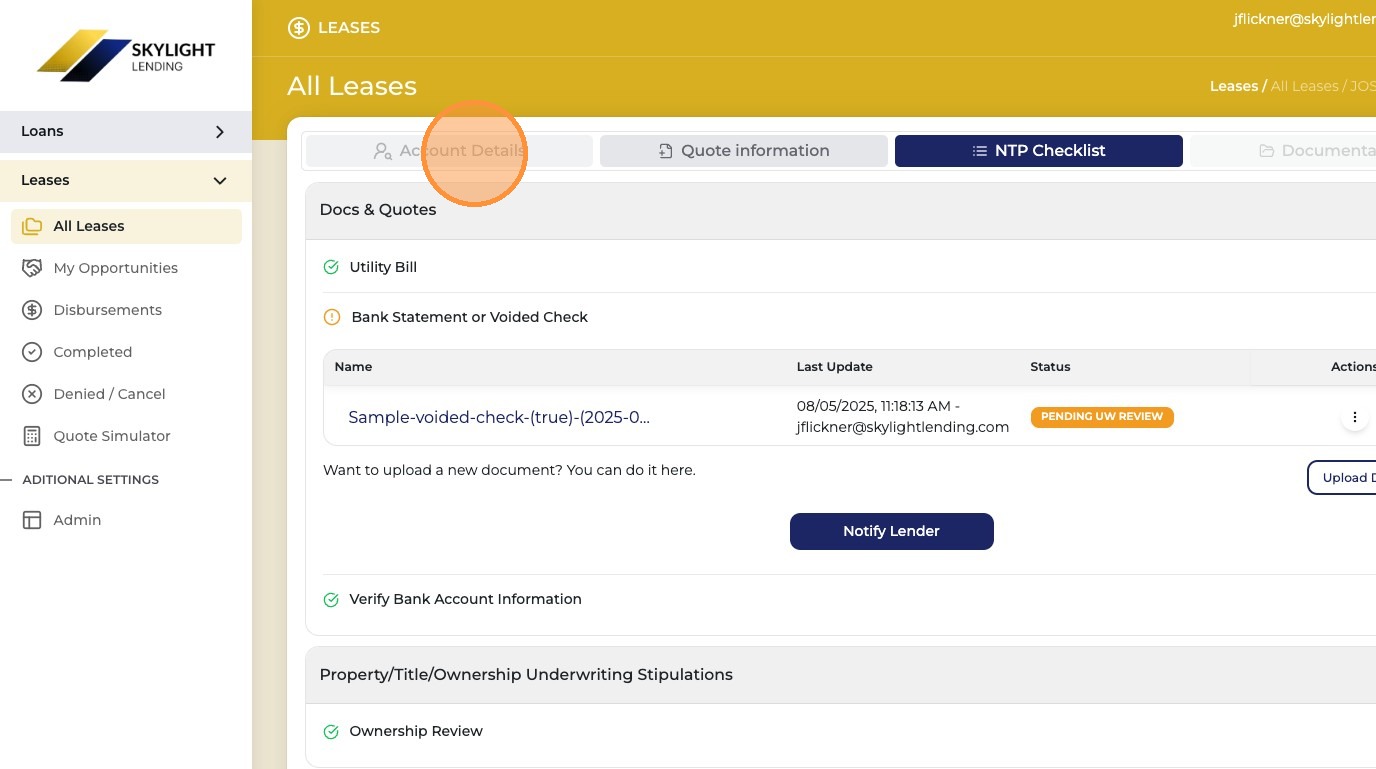
Click "Account Details" to check the review status
After notifying the lender, click "Account Details" to monitor the status of your resubmitted document. Skylight Underwriting will review the replacement and update the status here.
Account Details
How long does review take?

Underwriting processing time is typically 24 to 48 hours. As long as you clicked "Notify Lender" after uploading, the Skylight underwriting team will get to it as quickly as possible. Check back in the Account Details section for status updates.
11
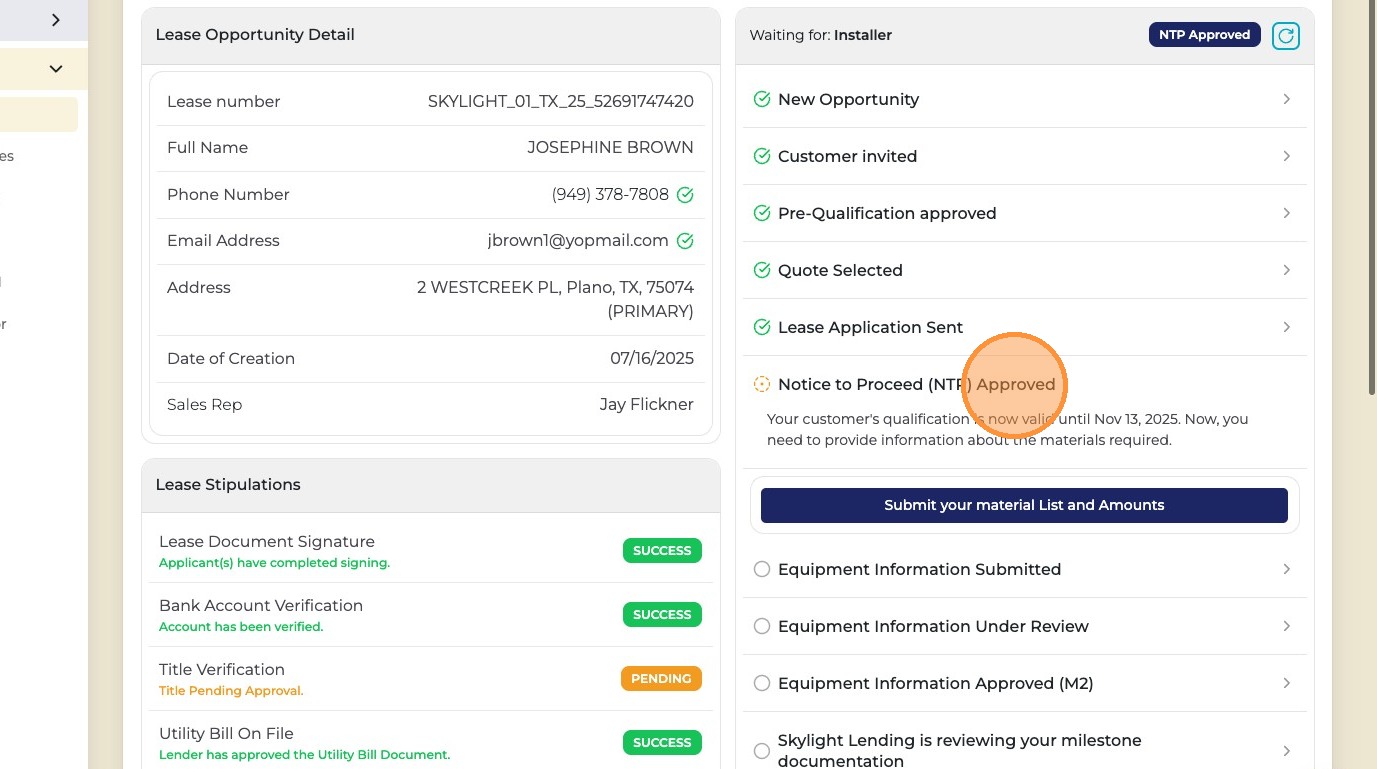
Once the replacement is approved, the page will show "Notice to Proceed (NTP) Approved"
When Skylight Underwriting has reviewed and approved the replacement document — and all other NTP documents are also approved — the Account Details page will update to show "Notice to Proceed (NTP) Approved." You are now cleared to begin the installation.
NTP Approved
NTP Approved — you're cleared to install!
Once "Notice to Proceed (NTP) Approved" appears on the Account Details page, all documents have passed review and Skylight Lending has given the green light. You can now begin the solar installation. Keep a record of the NTP approval for your files.